If you are an AI filmmaker, you’ve likely encountered a specific frustration: you generate stunning individual shots, but when you edit them together into a dialogue scene, something feels "off." The cuts are jarring, the geography feels messy, and the viewer gets disorientated.
The problem isn't the quality of your rendering; it's a violation of a fundamental cinematic law: The 180-Degree Rule.
In this guide, we will break down why AI models struggle with spatial continuity, what the 180-degree rule is, and how you can use tools like Atlabs AI to gain total control over your dialogue scenes.
The Problem: The "Randomness" of Generative AI
In live-action filmmaking, a director places a physical camera in a specific spot. In generative AI, the "camera" doesn't exist.
When you prompt a standard AI video generator with "Close up of a man talking," the AI flips a coin. It might place the man on the left looking right, or on the right looking left.
Why this destroys your film:
If you cut from a shot of a man looking Left-to-Right directly to a shot of a woman also looking Left-to-Right, it looks like they are standing next to each other, not talking to each other. Even worse, if the AI randomly flips the actor's position in the frame, the viewer loses track of where the characters are located. This breaks immersion instantly.
The Solution: The 180-Degree Rule
What is the 180-Degree Rule?
The 180-Degree Rule is a filmmaking guideline that states two characters in a scene should maintain the same left/right relationship to one another. Imagine an invisible line connecting the two characters. The camera can be placed anywhere on one side of that line (within a 180-degree arc) but should never cross over it.
In simple terms:
Character A should always be on the Left side of the screen, looking Right.
Character B should always be on the Right side of the screen, looking Left.
As long as you stay on one side of the line, the eyelines match, and the audience understands the geography of the room.
How to execute the 180-Degree Rule with Atlabs AI
To create professional narrative films with AI, you must stop relying on random generation and start directing the AI. Here is the workflow to ensure spatial continuity using Atlabs AI.
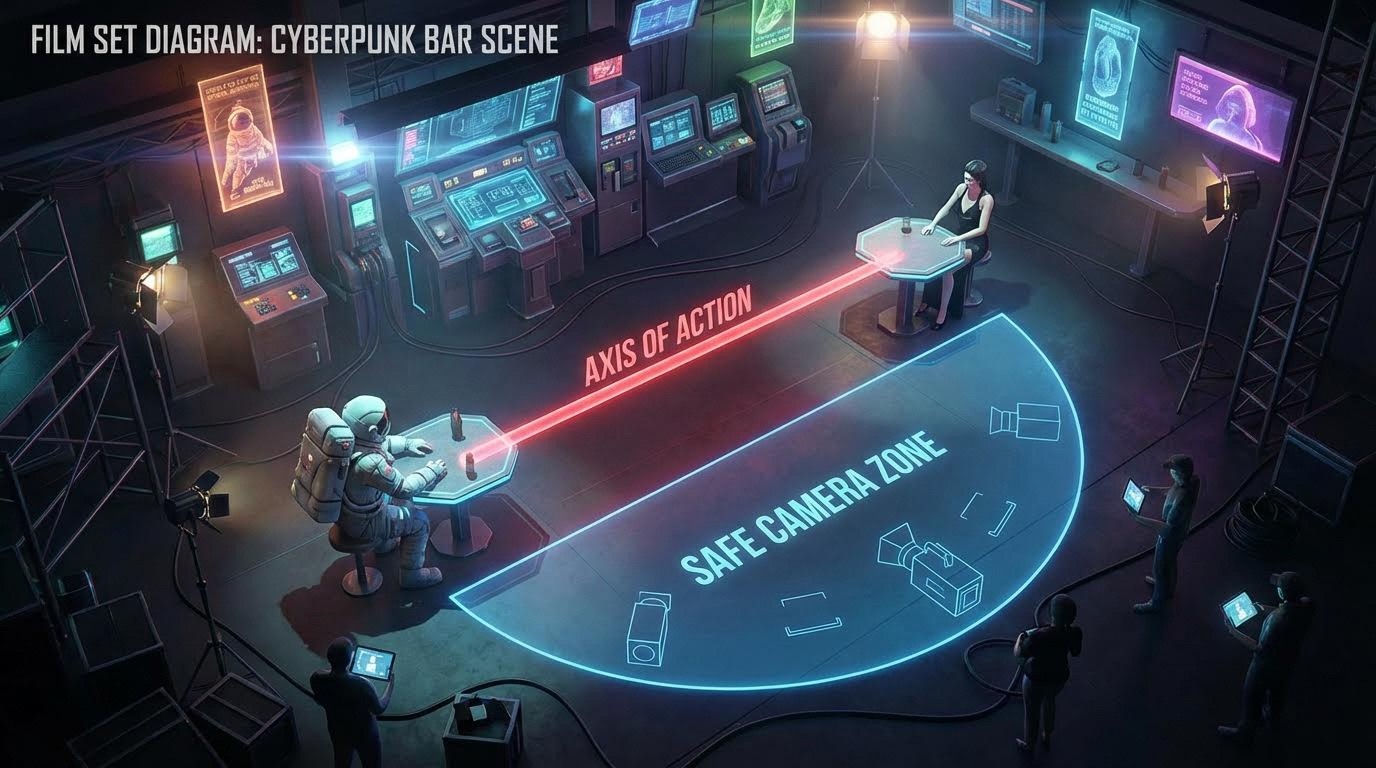
1. Establish the "Line" with a Master Shot
Start by generating a wide shot (or "Two Shot") of your characters.
Example: An astronaut sits on the left; a woman sits on the right.
The Line: The invisible line runs directly between them.
The Rule: You must now keep the "camera" on the side where the astronaut is on the left and the woman is on the right.
Prompt Logic : Cinematic wide two-shot, side profile view inside a dimly lit cyberpunk bar. On the LEFT: a rugged Asian man wearing a dirty white sci-fi spacesuit. On the RIGHT: a woman with a sharp black bob haircut wearing an elegant black dress. They are sitting at a table facing each other. Neon signs in the background, volumetric lighting, photorealistic, 8K

2. Prompting for Coverage (Over-The-Shoulder)
When generating close-ups in Atlabs AI, you need to be specific about the camera angle to maintain the rule. You cannot just ask for a "Close up."
Shot A (The Astronaut): You need a close-up of the man. To keep him on the left, you must prompt for an "Over-the-Shoulder" shot from behind the woman.
Prompt logic:
"Medium shot of the man [image1], over the left shoulder of the woman[image1]. He is positioned on the LEFT side of the frame, looking towards the woman"
!["Medium shot of the man [image1], over the left shoulder of the woman[image1]. He is positioned on the LEFT side of the frame, looking towards the woman"](https://framerusercontent.com/images/Ur6KBOteXBoIIH5ZWy6sYpYVHe0.jpg)
Shot B (The Woman): To keep her on the right, looking left, you do the reverse.
Prompt logic:
"Medium shot of the woman [image1], over the right shoulder of the man[image1]. She is positioned on the RIGHT side of the frame, looking towards the man"
!["Medium shot of the woman [image1], over the right shoulder of the man[image1]. She is positioned on the RIGHT side of the frame, looking towards the man"](https://framerusercontent.com/images/Dvpq9jBDlEsGX0bzjvhZTLx2OI.jpg)
3. Using Variations in Atlabs AI
If you are using Atlabs AI specifically, you can generate multiple variations of the same prompt.
The Trap: You might get one result over the left shoulder and one over the right.
The Fix: Do not simply pick the one that "looks coolest." You must pick the one that matches the screen direction established in your master shot. If the astronaut was looking right in the wide shot, he must be looking right in the close-up.
4. Advanced Control: Motion Capture & Image-to-Video
The most effective way to ensure the 180-degree rule is followed is to take the "guessing game" away from the AI entirely.
Instead of text-to-video, utilize Atlabs AI’s image-to-video or motion-control capabilities (if available in your specific workflow) to drive the performance.
The Workflow: Record yourself acting out the dialogue.
Direction: When acting the astronaut's part, physically look to your right. When acting the woman's part, look to your left.
Generation: Use these reference videos or distinct screenshots to drive the generation in Atlabs AI. This ensures the head turn and eyeline are locked in exactly where they need to be, guaranteeing that the final edit will cut together seamlessly.
Summary Checklist for AI Filmmakers
If you want your AI film to look cinematic rather than synthetic, follow this checklist before you hit "Generate" on Atlabs AI:
Draw a map: Sketch where your characters are sitting.
Pick a side: Decide where your "camera" is and stick to that semicircle.
Check Eyelines: Does Character A look Right? Does Character B look Left?
Curate Ruthlessly: Discard any AI generation that flips the character's position, no matter how good the lighting looks.
By applying traditional filmmaking theory to modern generative tools like Atlabs AI, you move from being a "prompter" to a true director.