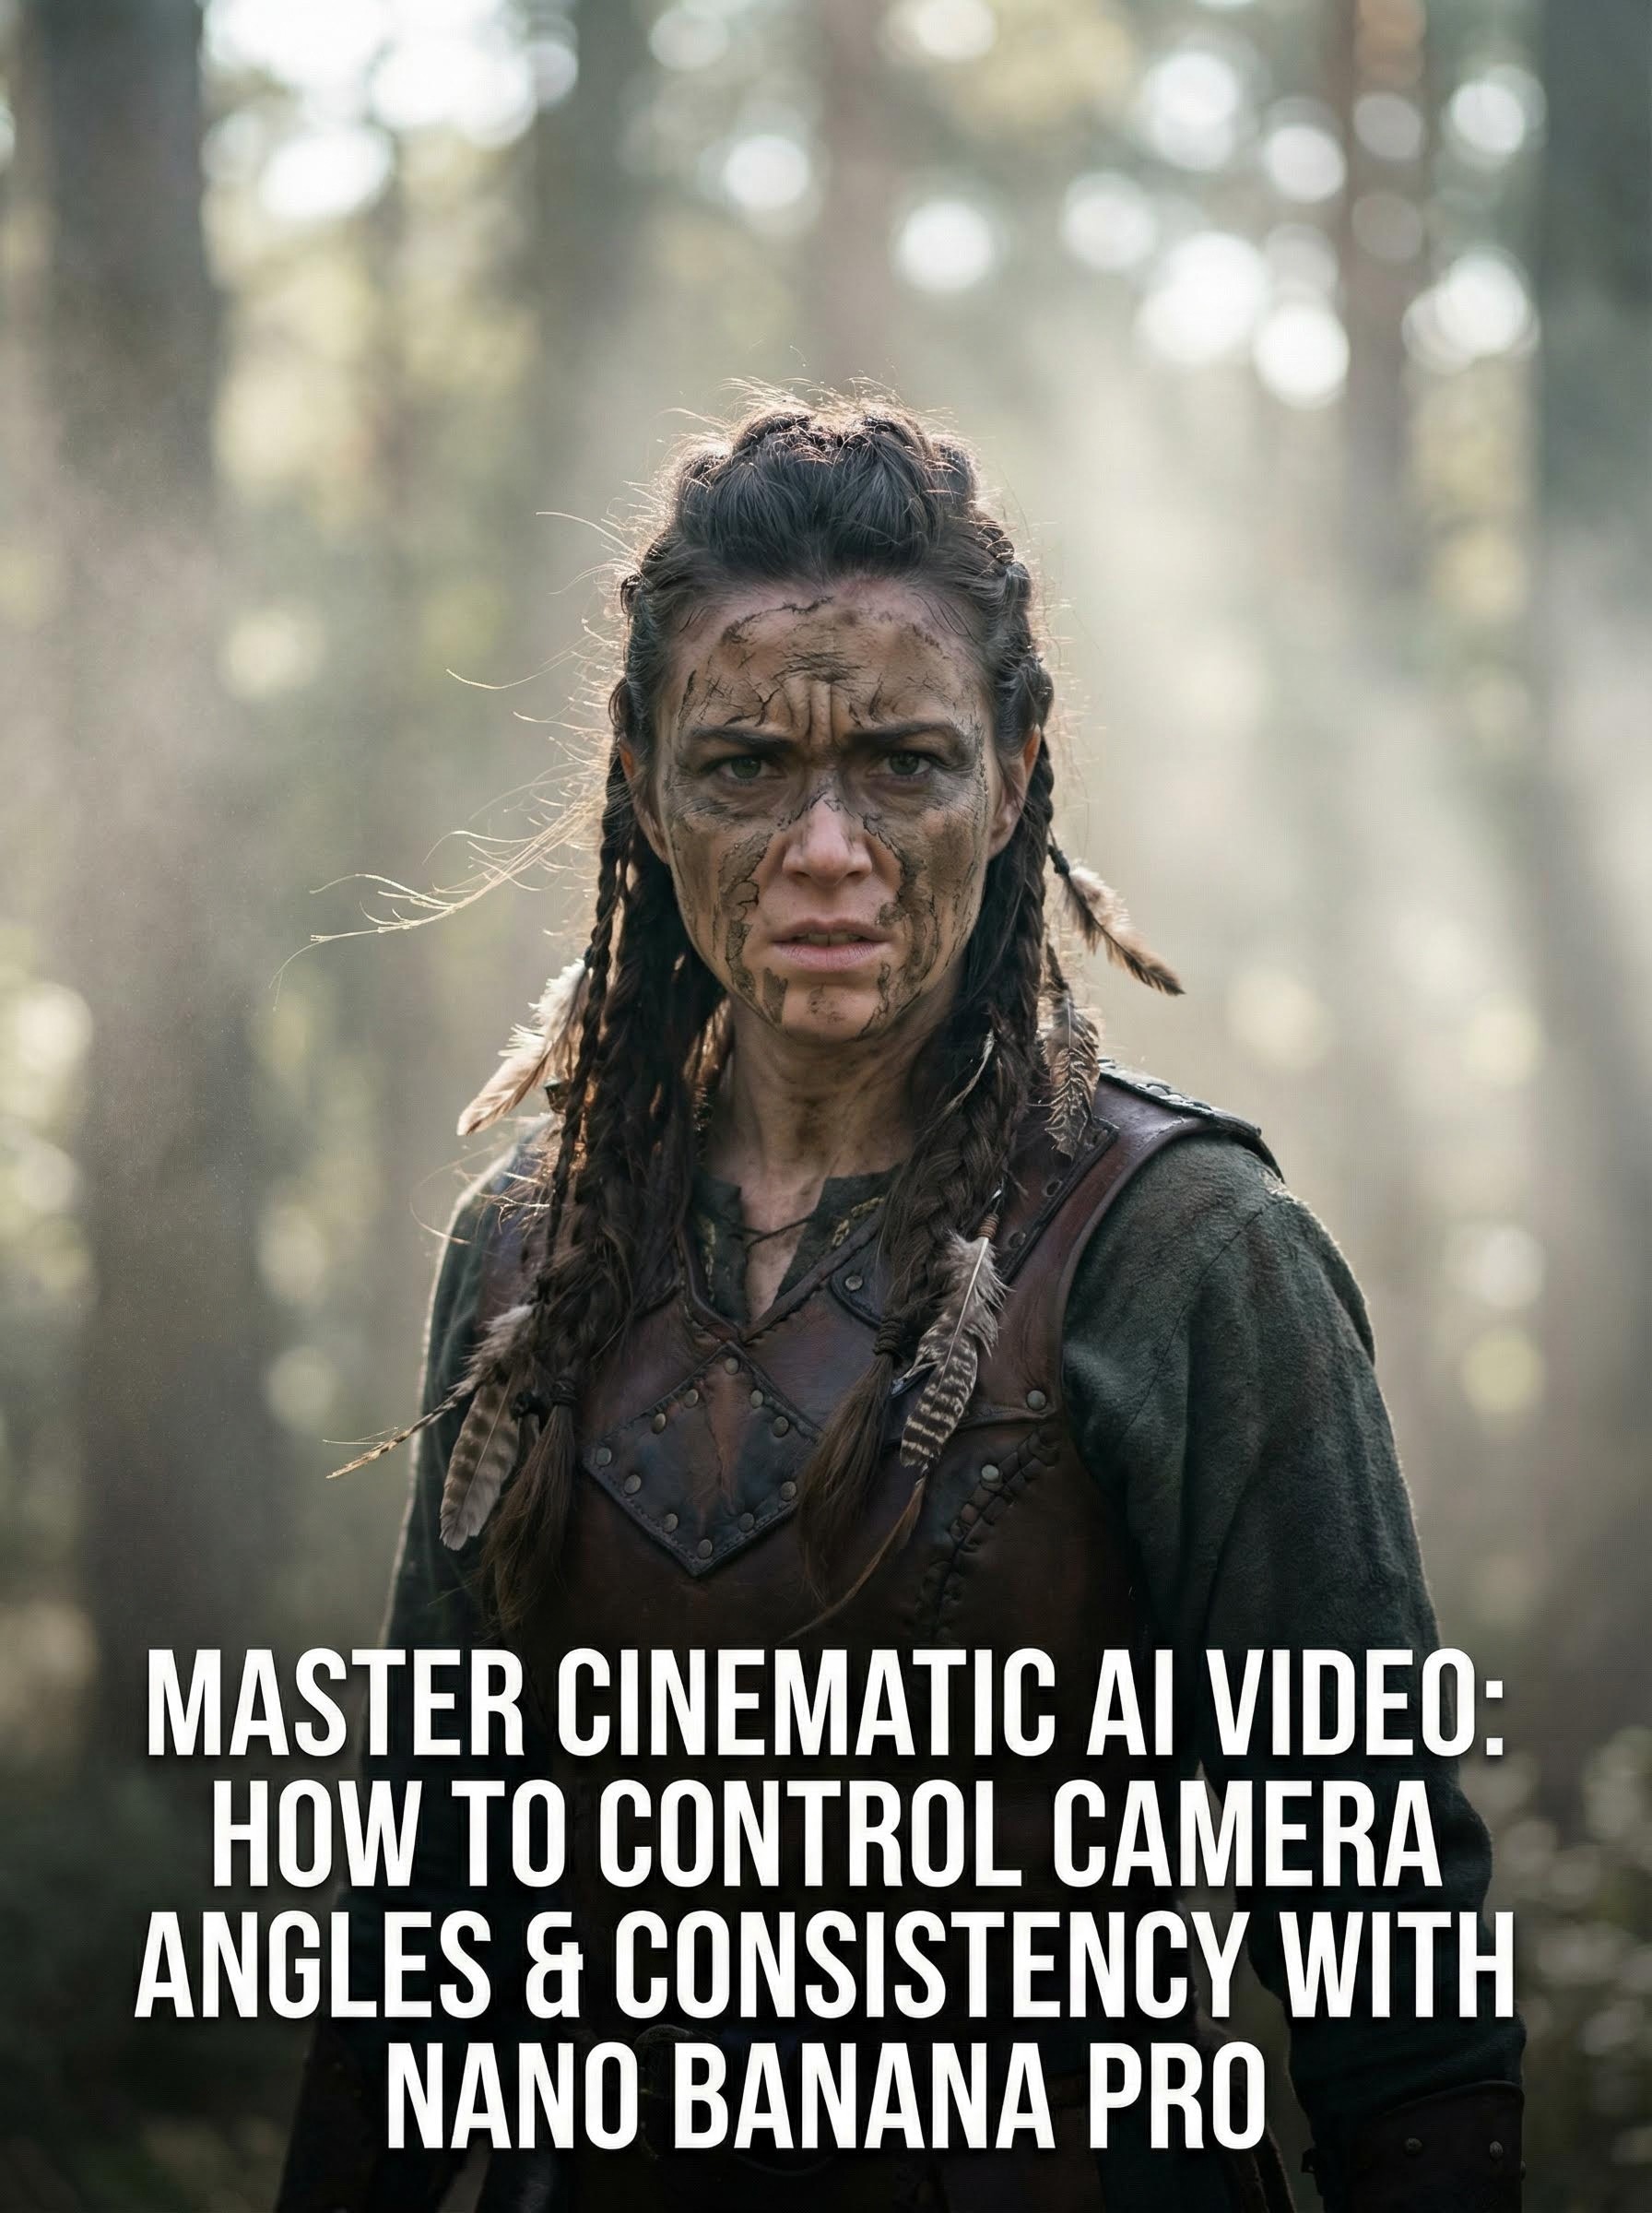
Master Cinematic AI Video: How to Control Camera Angles & Consistency with Nano Banana Pro
Master Cinematic AI Video: How to Control Camera Angles & Consistency with Nano Banana Pro
Master Cinematic AI Video: How to Control Camera Angles & Consistency with Nano Banana Pro
Are you using AI video generators like a slot machine? You type a prompt, hit generate, and hope for a good result. If that sounds familiar, you are leaving your storytelling up to luck.
To create professional, cinematic AI films, you need to stop gambling and start directing. Control isn't optional; it is essential.
In this guide, we will walk you through how to use Nano Banana Pro on Atlabs AI to take a single character image and transform it into a fully consistent, multi-shot cinematic masterpiece using precise camera angles and motion control.
The 3-Step Formula for AI Video Consistency
Most creators struggle with keeping characters consistent from shot to shot. The solution lies in a specific workflow:
Foundation: Creating a rock-solid base image.
Variation: Using camera prompts to change angles while keeping the character locked.
Motion: Converting those consistent images into a video.
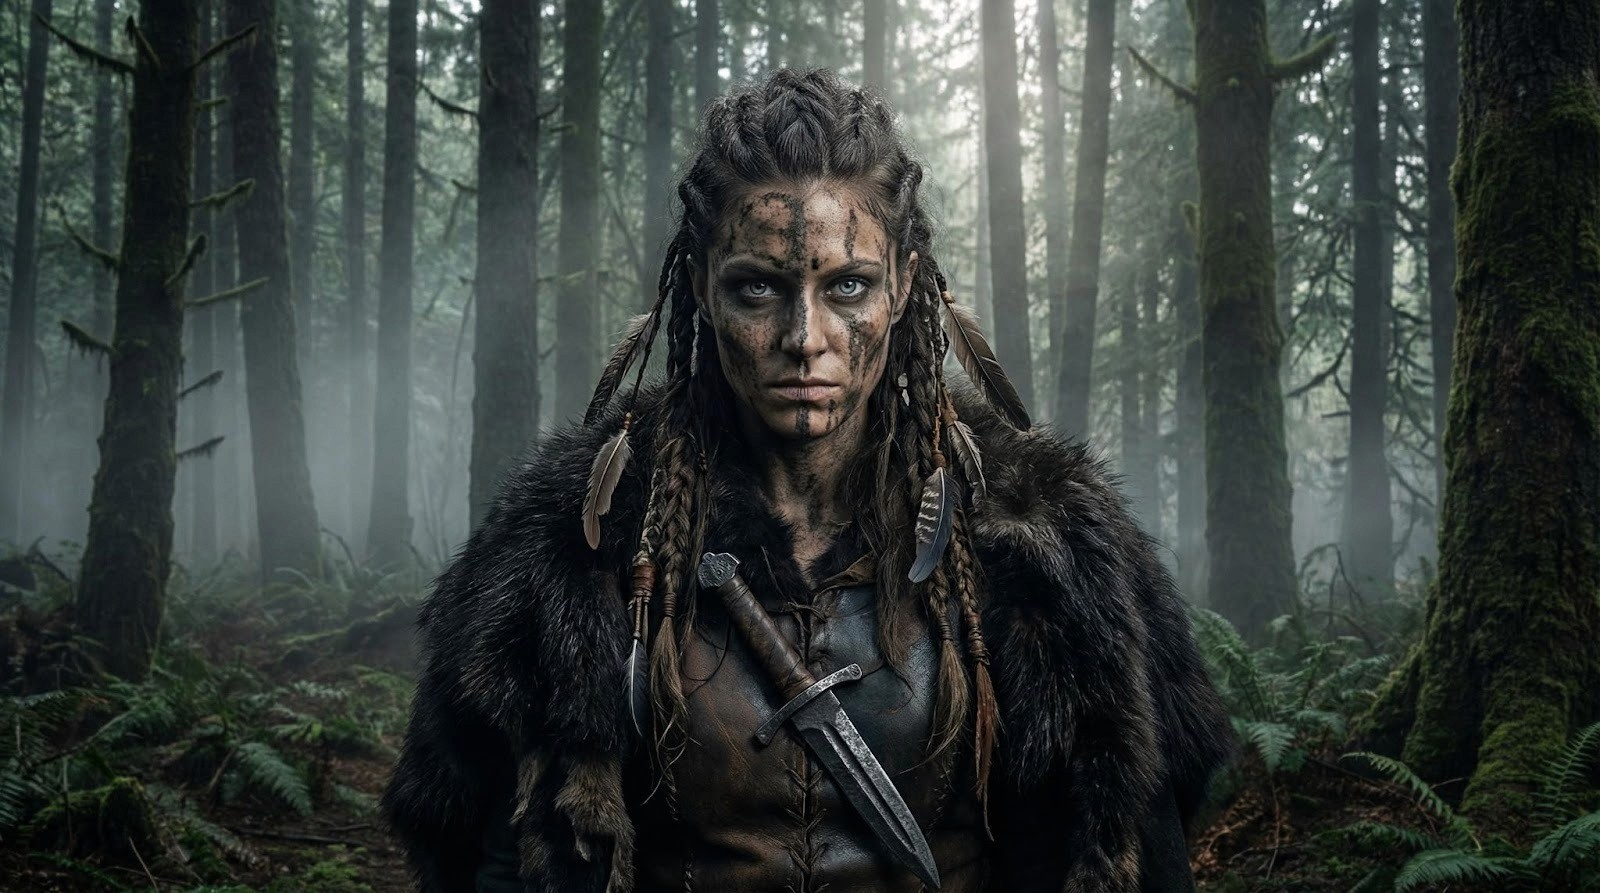
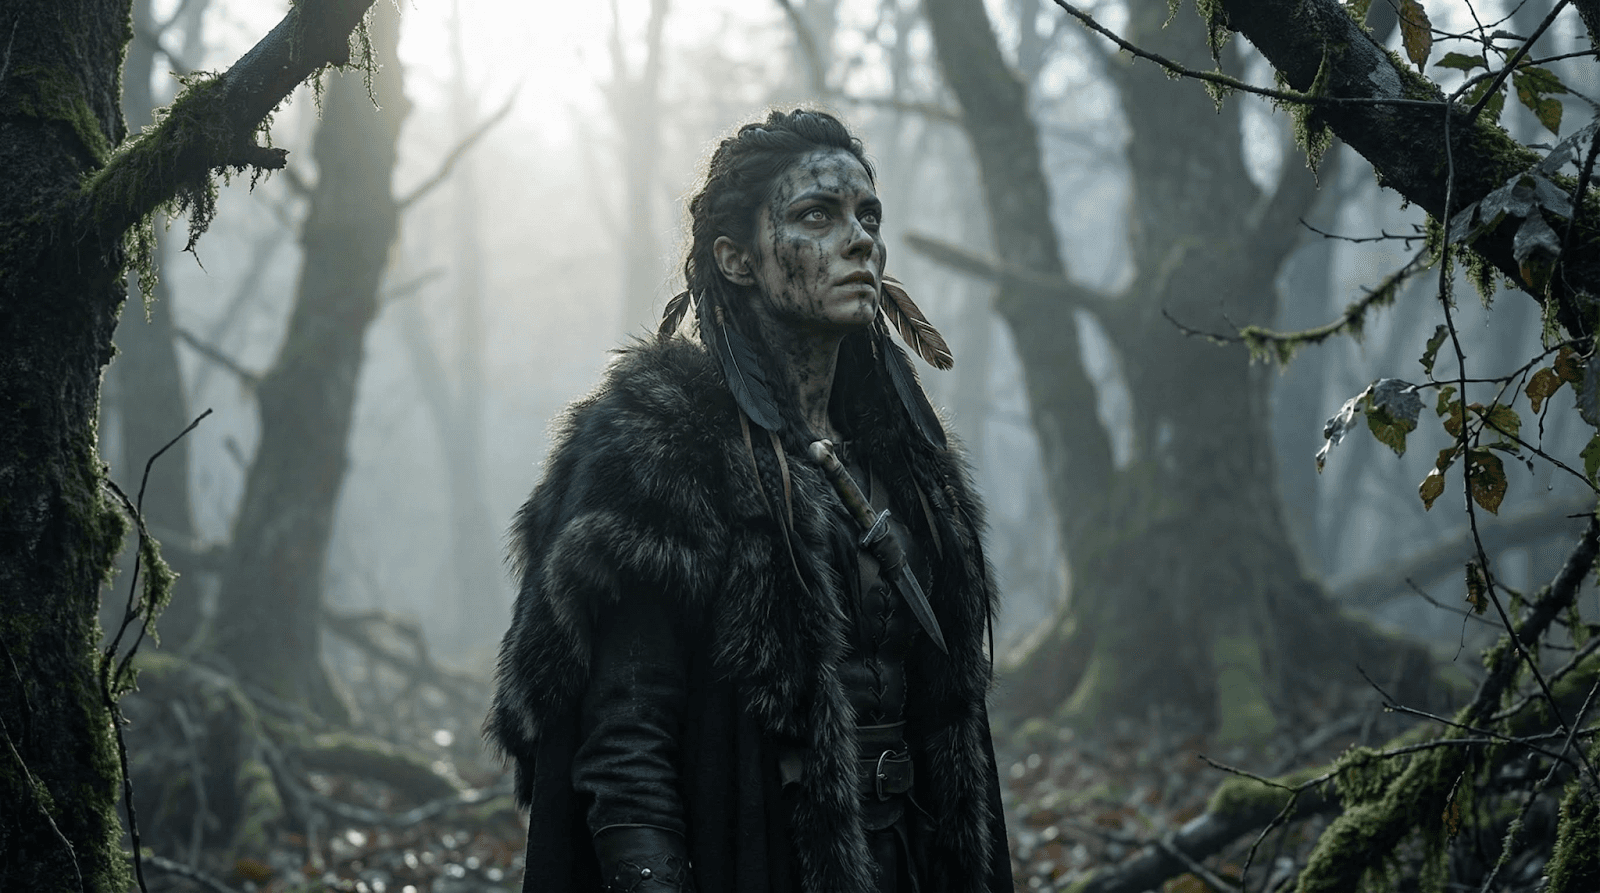
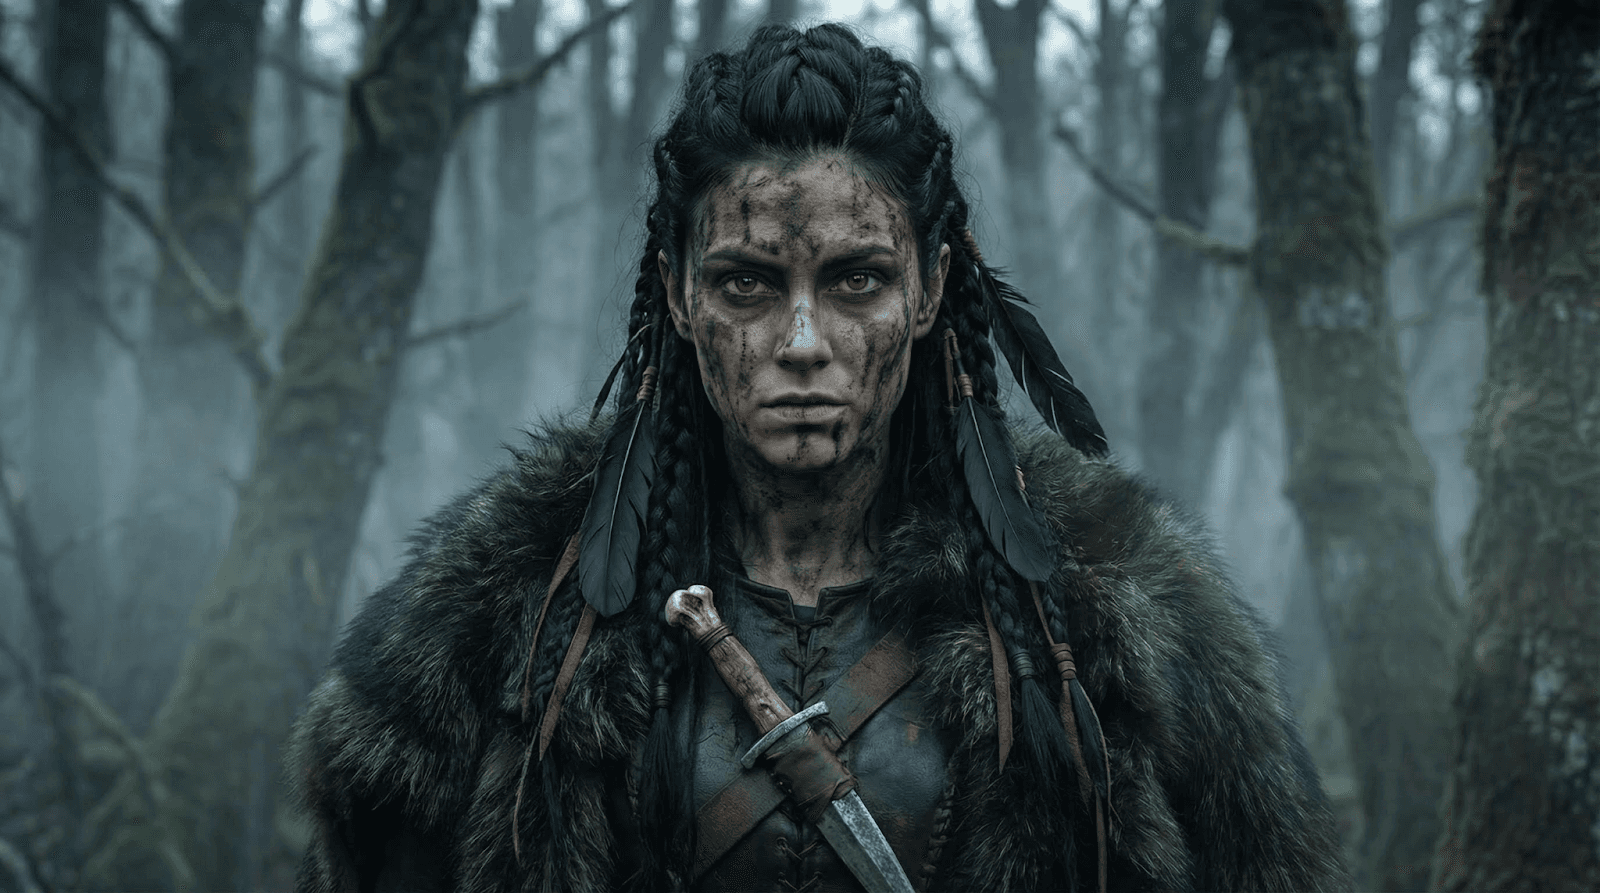
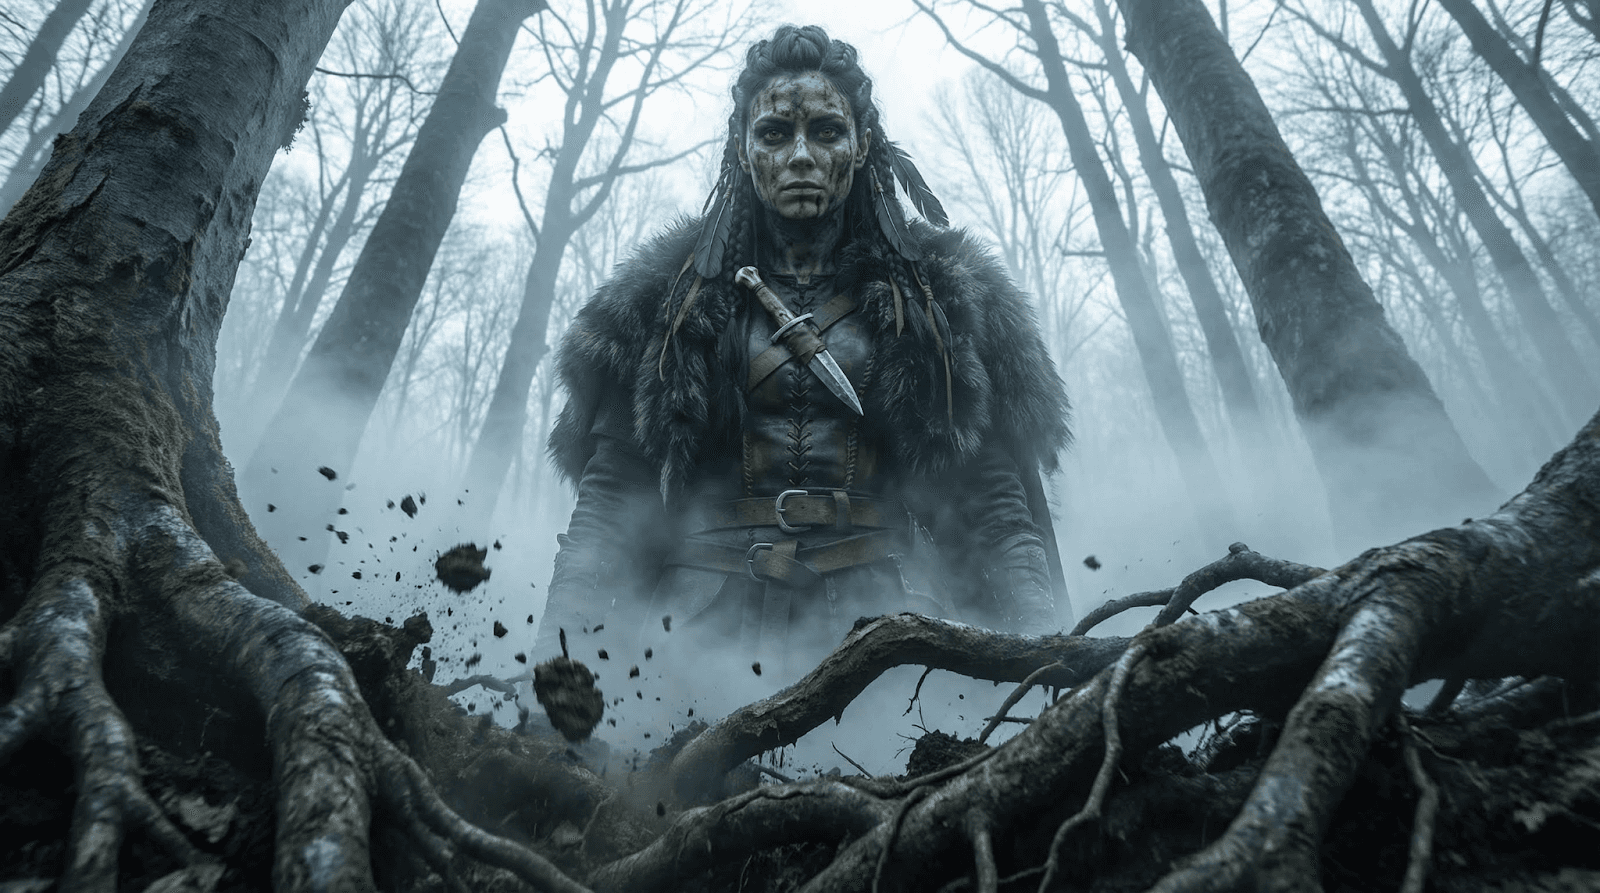
Step 1: Create Your "Foundation Image"
Before you worry about camera movement, you need one perfect image that defines your character’s face, outfit, and environment. This is your "Reference Image."
The Prompt Strategy: Be descriptive about lighting, texture, and mood.
The Tool: Select Nano Banana Pro in the Atlabs "Create Images" dashboard.
"Viking female warrior emerging from a dense dark forest... sharp wolf-like eyes... heavy fur cloak... hyperreal cinematic portrait."
"Viking female warrior emerging from a dense dark forest... sharp wolf-like eyes... heavy fur cloak... hyperreal cinematic portrait."
"Viking female warrior emerging from a dense dark forest... sharp wolf-like eyes... heavy fur cloak... hyperreal cinematic portrait."
Once you generate an image you love, save it. This image will now act as the DNA for every other shot in your video.
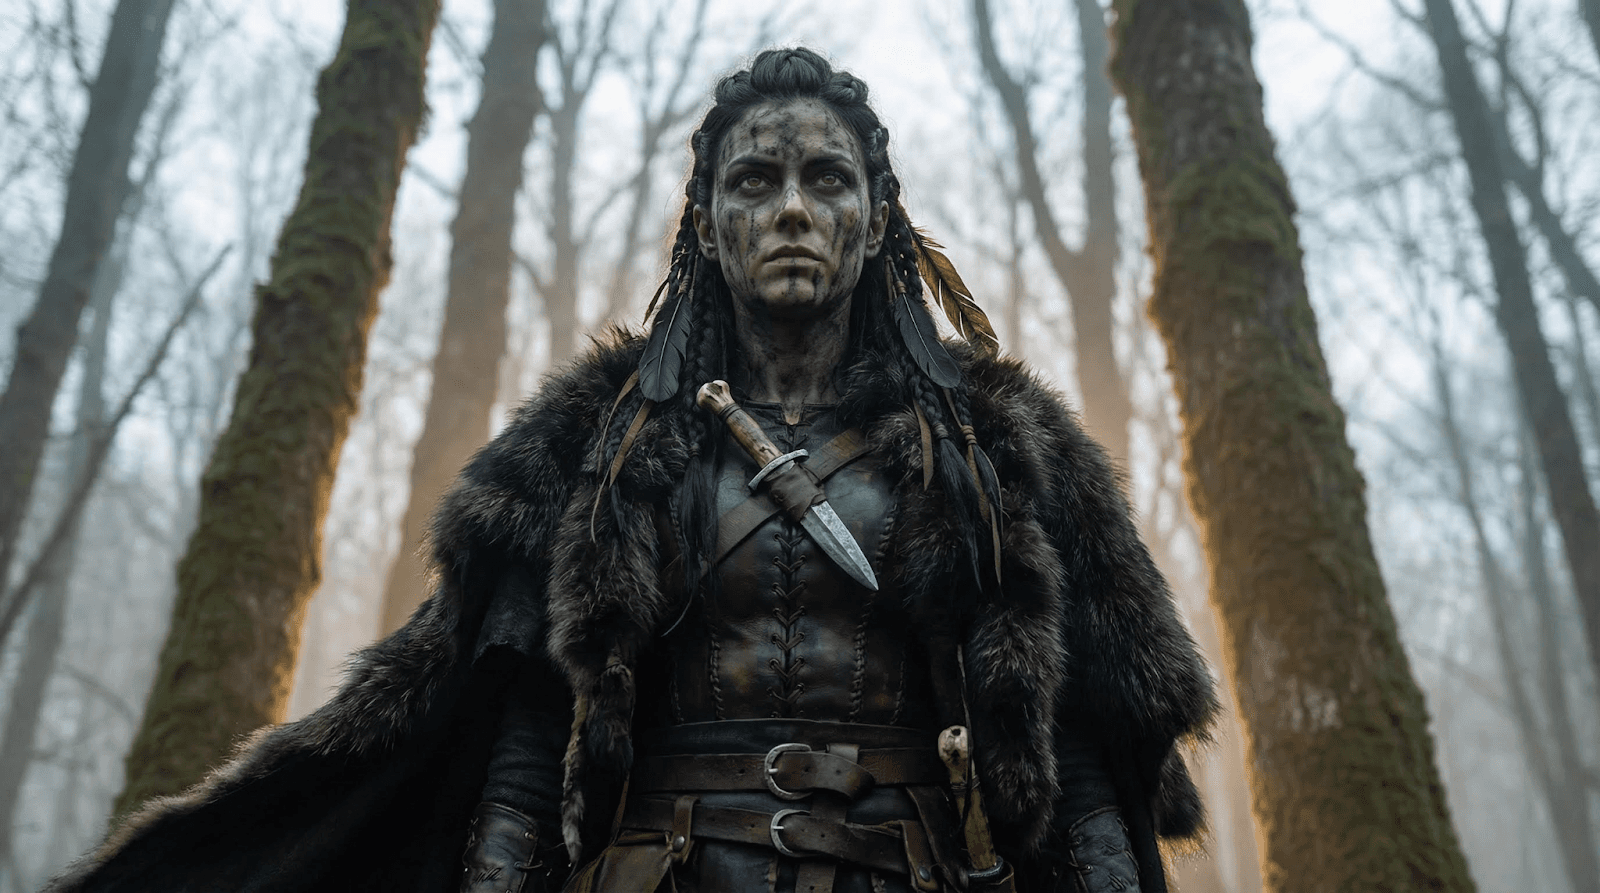
Step 2: The Director’s Guide to AI Camera Prompts
This is where Nano Banana Pro shines. By using your Foundation Image as a Reference Image and applying specific cinematic terminology, you can force the AI to keep the character the same but change the camera angle.
Here are the essential camera shots you need to know:
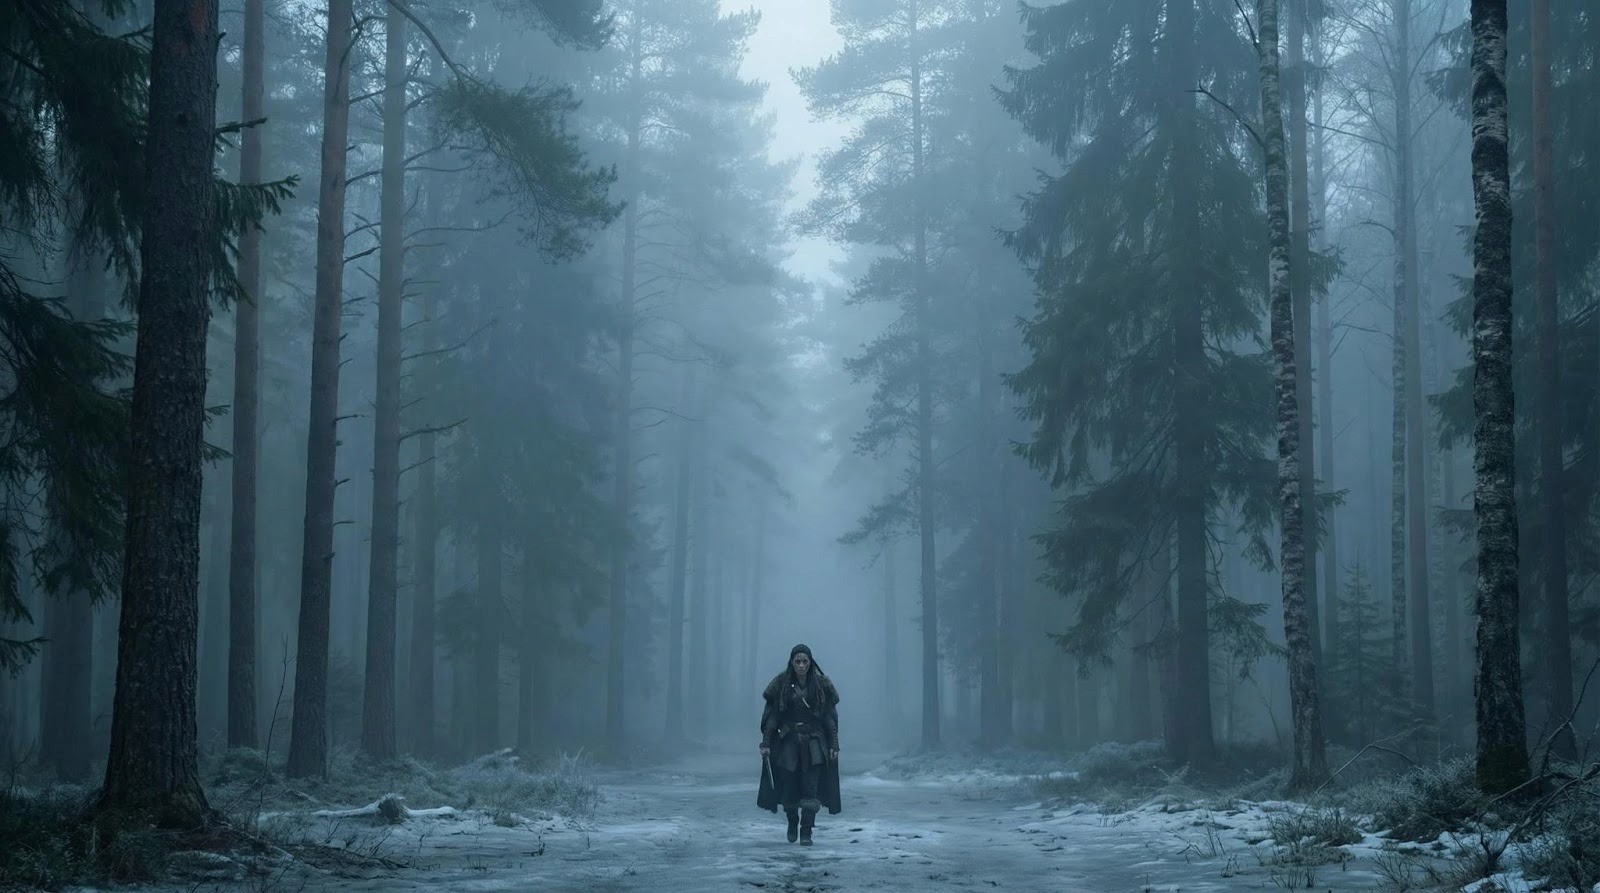
1. The Establishing Shot (Extreme Wide Shot)
Set the scene. Use this to show the vastness of the environment.
Prompt Key: Extreme wide shot, vast Scandinavian forest... woman very small in frame walking toward camera...
Why it works: It establishes scale and atmosphere without losing the vibe of the original reference.
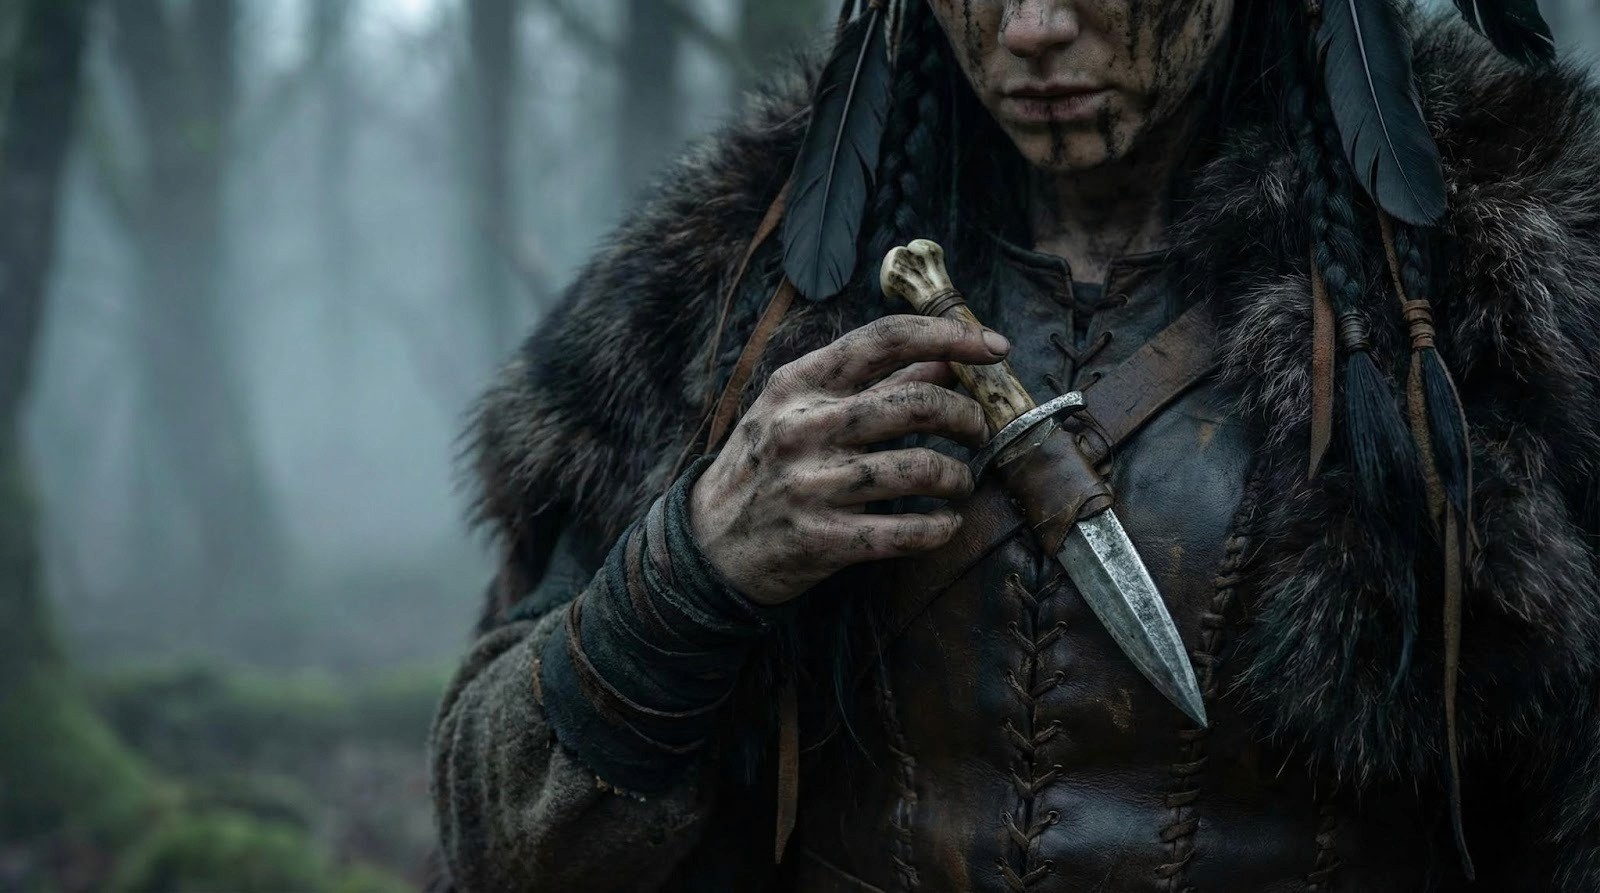
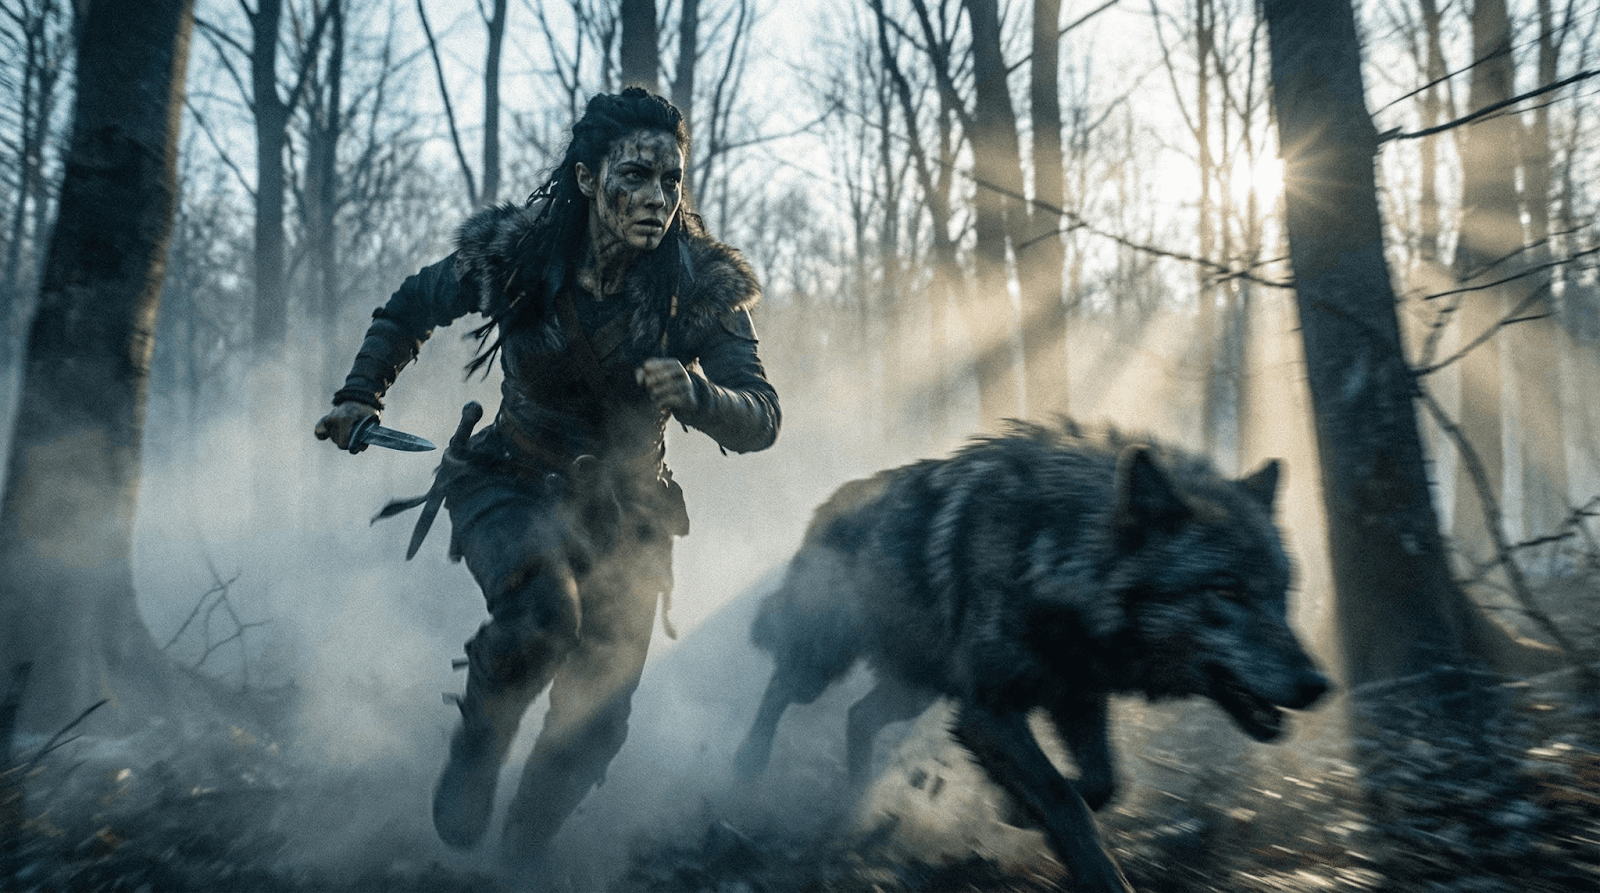
2. The Cowboy Shot (Action Stance)
Perfect for showing weapons or holsters while keeping the face visible.
Prompt Key: Cowboy shot, waist to head framing... hand lowering toward bone-handled dagger...
Result: The AI understands "Cowboy Shot" means framing from the mid-thigh up, perfect for tension.
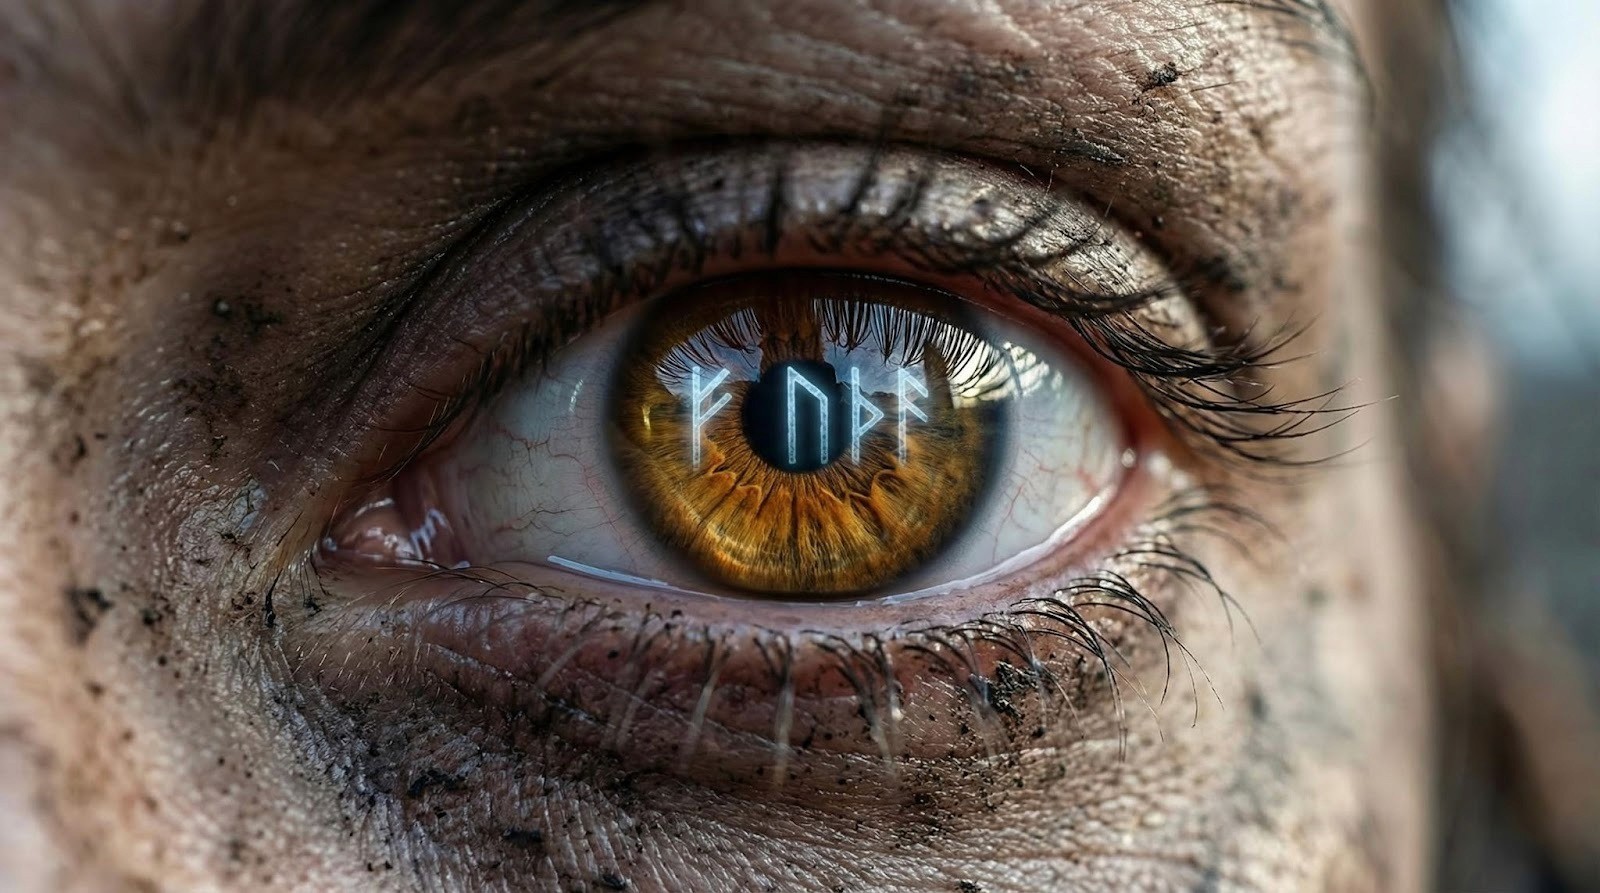
3. The Extreme Close-Up (Texture & Emotion)
Capture the micro-details that make a video feel real.
Tilt the camera to create unease or disorientation.
Prompt Key: Canted shot, forest tilting as supernatural force distorts space.
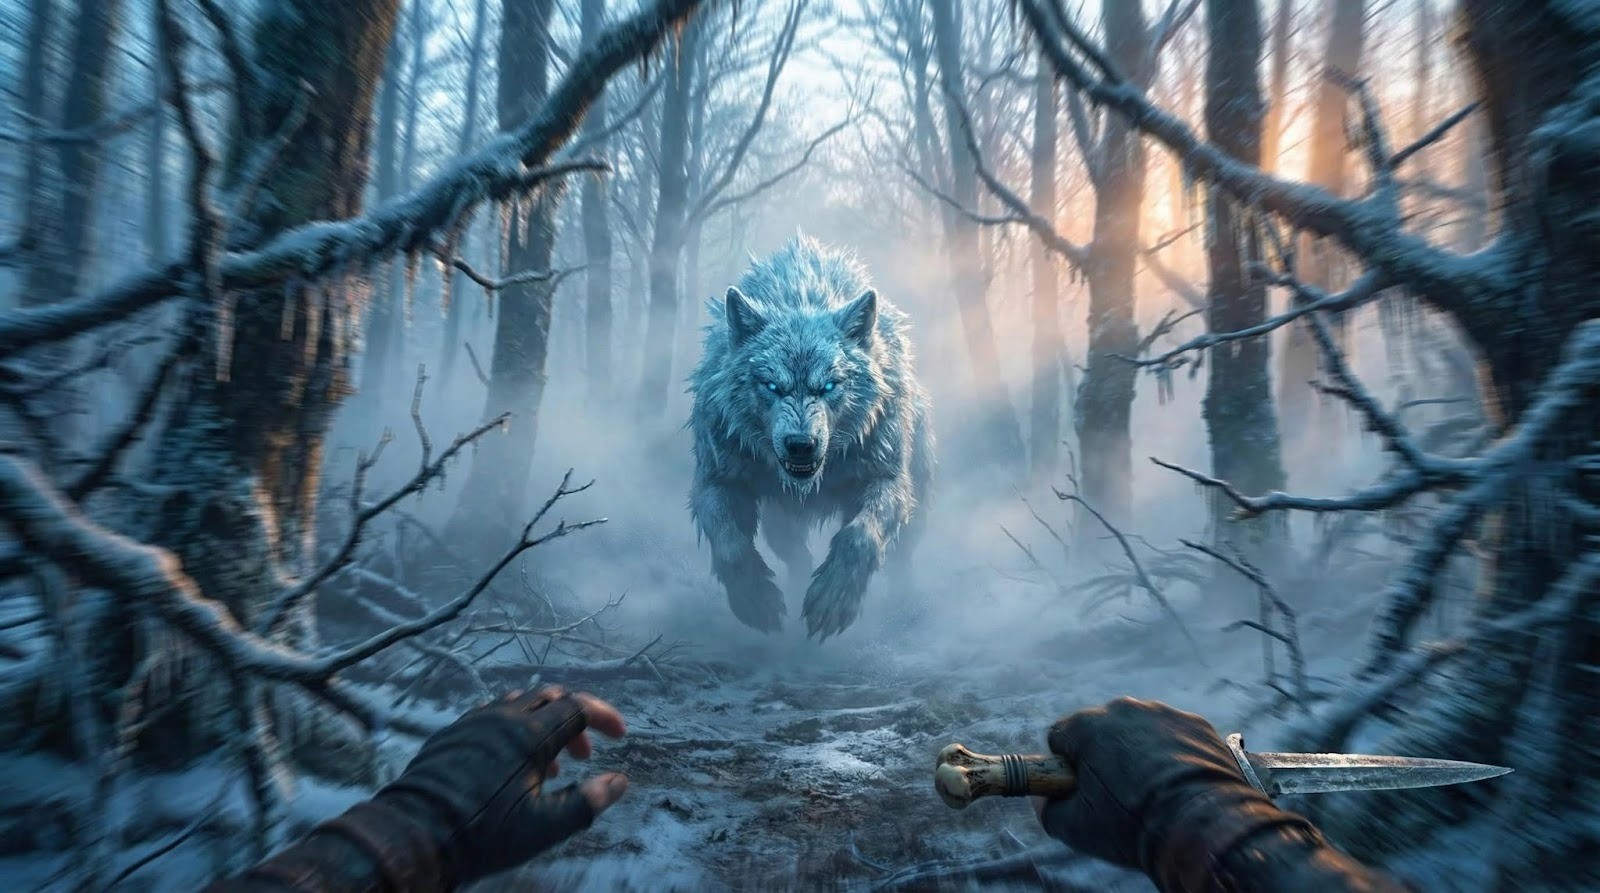
6. The POV Shot (First Person Perspective)
Put the audience in the character's shoes.
Prompt Key: POV shot, from her eyes, frost-beast charging forward... high-intensity motion blur.
Prompts Examples
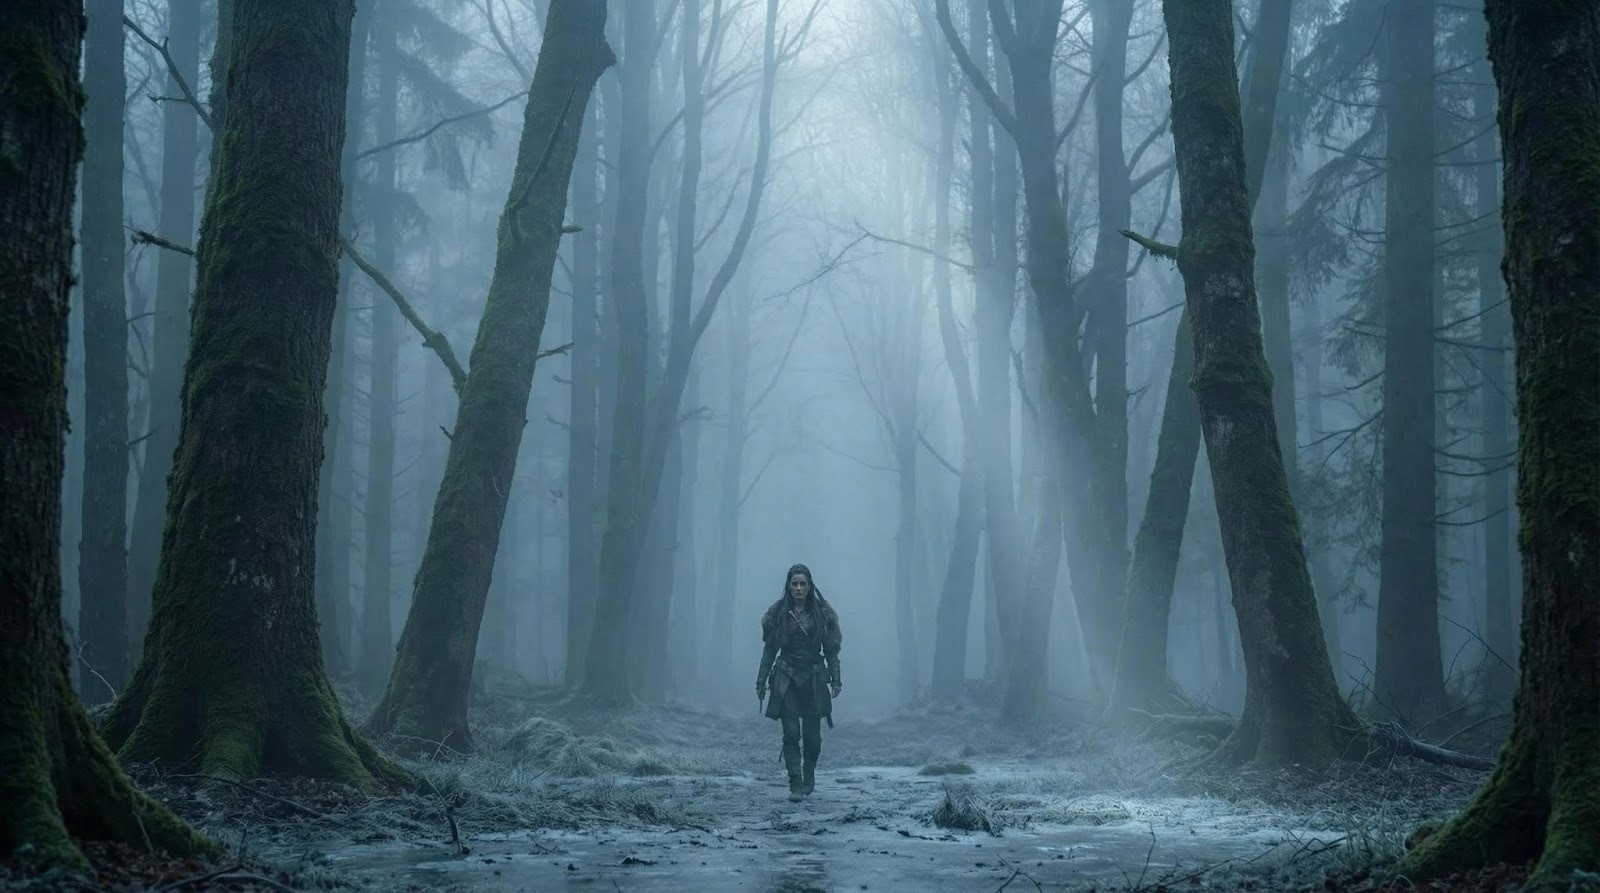
1. EXTREME WIDE SHOT — Establishing the World
Prompt:
extreme wide shot,vast Scandinavian forest wrappedinheavy blue-gray dawn fog,towering ancient trees fading into distance,icy ground withfaint frost,solitary Viking woman very smallinframe walking toward camera,atmospheric depth layers,soft volumetric light beams cutting through haze,cold,moody,desaturated Nordic palette,hyperreal cinematic realism,35mm lens equivalent,high dynamic range
extreme wide shot,vast Scandinavian forest wrappedinheavy blue-gray dawn fog,towering ancient trees fading into distance,icy ground withfaint frost,solitary Viking woman very smallinframe walking toward camera,atmospheric depth layers,soft volumetric light beams cutting through haze,cold,moody,desaturated Nordic palette,hyperreal cinematic realism,35mm lens equivalent,high dynamic range
extreme wide shot,vast Scandinavian forest wrappedinheavy blue-gray dawn fog,towering ancient trees fading into distance,icy ground withfaint frost,solitary Viking woman very smallinframe walking toward camera,atmospheric depth layers,soft volumetric light beams cutting through haze,cold,moody,desaturated Nordic palette,hyperreal cinematic realism,35mm lens equivalent,high dynamic range
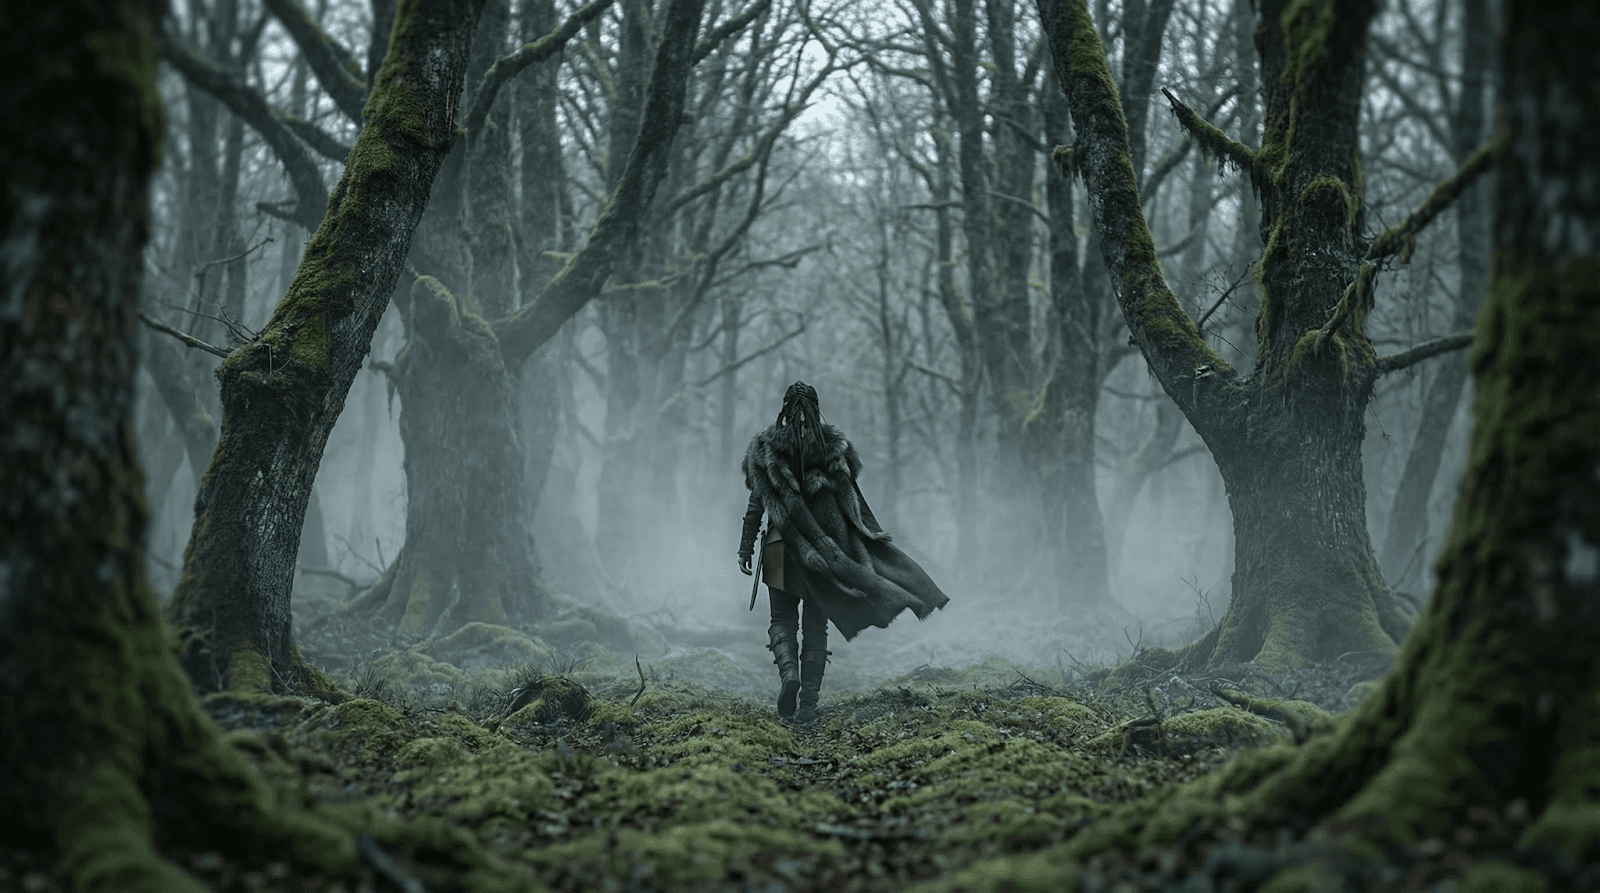
2. WIDE / LONG SHOT — Approaching the Clearing
Prompt:
wide/long shot,Viking woman walking into a mossy forest clearing,consistent cold dawn light,drifting fog,muted greens and grays,trees framing the scene symmetrically,ground texture continuous withprevious shot,subtle windincloak,cinematic composition,50mm lens depth
wide/long shot,Viking woman walking into a mossy forest clearing,consistent cold dawn light,drifting fog,muted greens and grays,trees framing the scene symmetrically,ground texture continuous withprevious shot,subtle windincloak,cinematic composition,50mm lens depth
wide/long shot,Viking woman walking into a mossy forest clearing,consistent cold dawn light,drifting fog,muted greens and grays,trees framing the scene symmetrically,ground texture continuous withprevious shot,subtle windincloak,cinematic composition,50mm lens depth
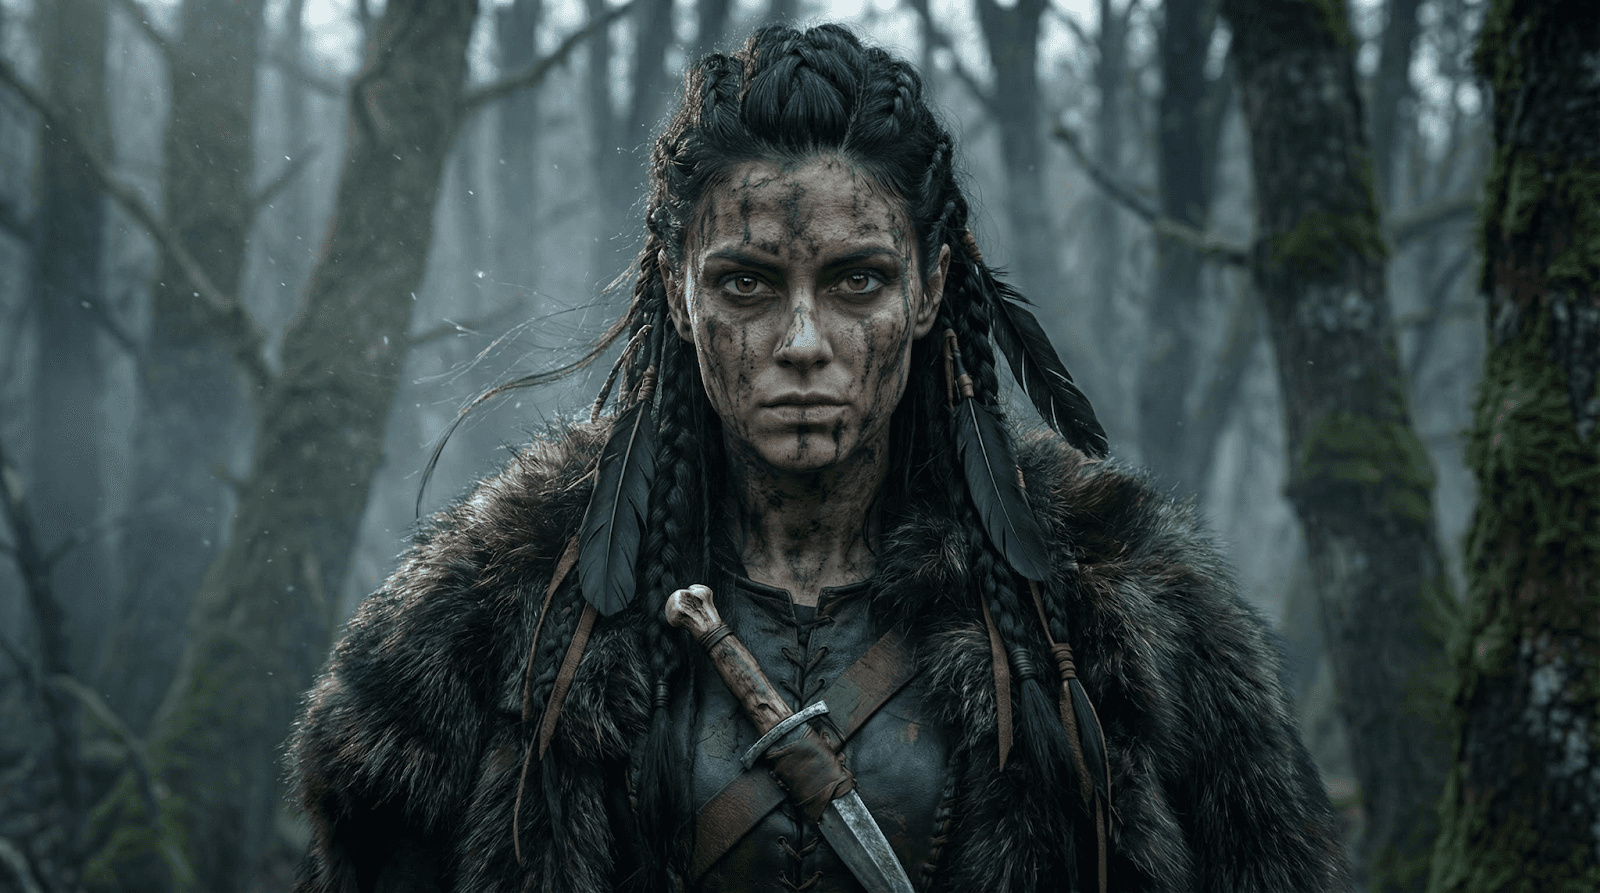
3. FULL SHOT — Presence in the Clearing
Prompt:
full-body shot,Viking woman standing centeredinclearing,fur cloak and leather armor visible,frost-crusted foliage,diffused morning light behind her creating soft rim light,fog swirling at knee level,consistent environment,cinematic color grading,forest depth maintained,65mm lens
full-body shot,Viking woman standing centeredinclearing,fur cloak and leather armor visible,frost-crusted foliage,diffused morning light behind her creating soft rim light,fog swirling at knee level,consistent environment,cinematic color grading,forest depth maintained,65mm lens
full-body shot,Viking woman standing centeredinclearing,fur cloak and leather armor visible,frost-crusted foliage,diffused morning light behind her creating soft rim light,fog swirling at knee level,consistent environment,cinematic color grading,forest depth maintained,65mm lens
4. MEDIUM LONG SHOT — Sensing the Omen
Prompt:
medium long shot,Viking woman slightly turned,head raisedas she senses danger,soft backlight from cold dawn,fog density slightly increased,foreground branches framing edges,consistent forest textures,shallow DOF isolating character,cinematic realism
medium long shot,Viking woman slightly turned,head raisedas she senses danger,soft backlight from cold dawn,fog density slightly increased,foreground branches framing edges,consistent forest textures,shallow DOF isolating character,cinematic realism
medium long shot,Viking woman slightly turned,head raisedas she senses danger,soft backlight from cold dawn,fog density slightly increased,foreground branches framing edges,consistent forest textures,shallow DOF isolating character,cinematic realism
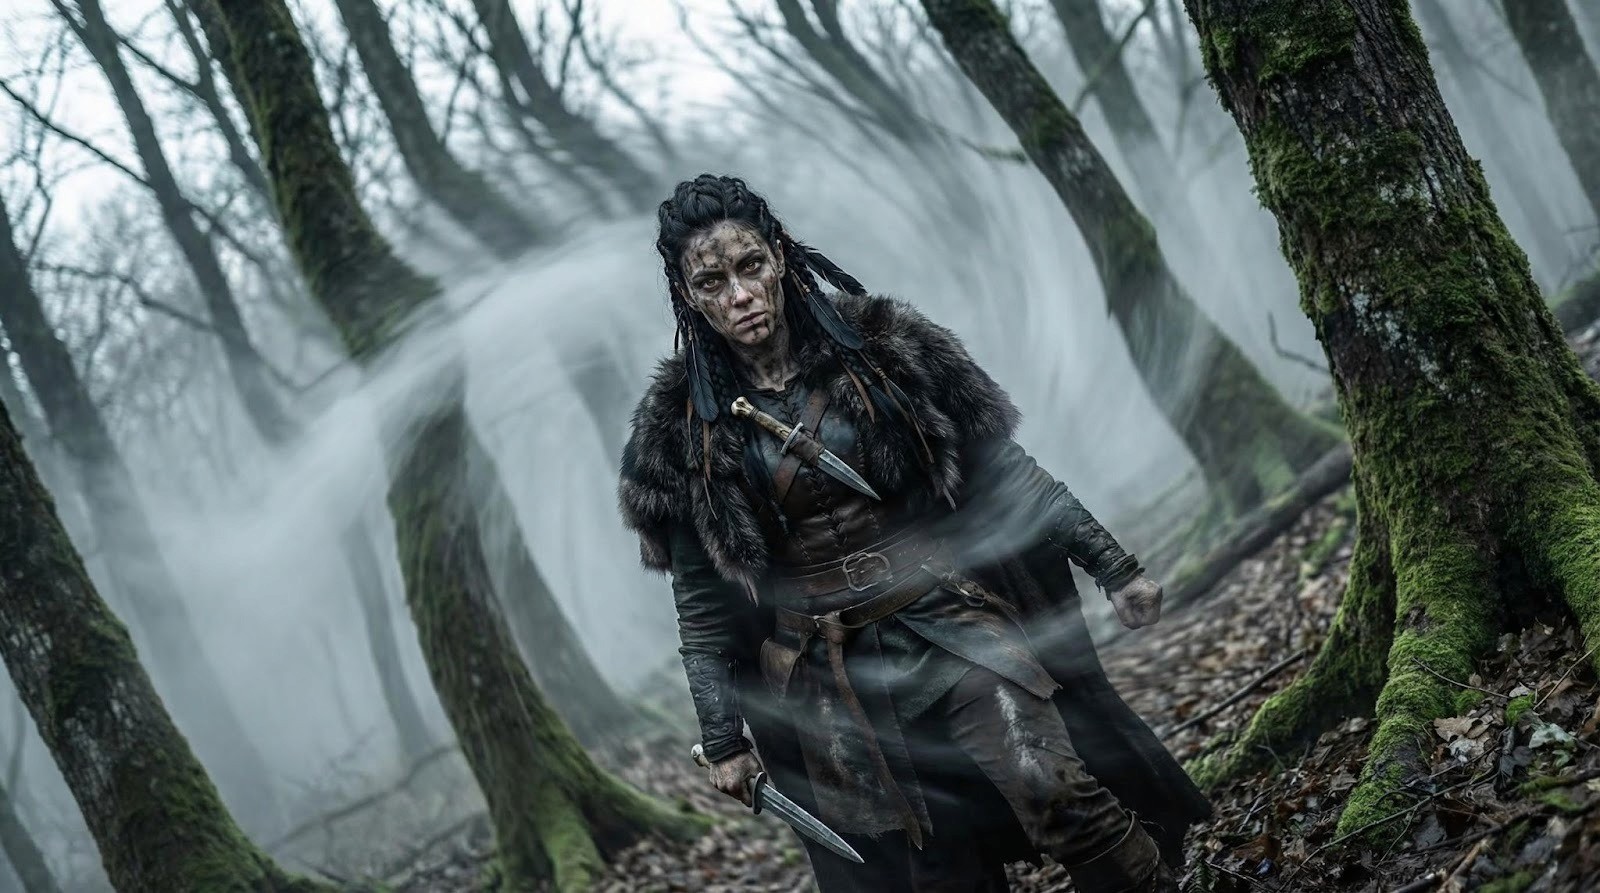
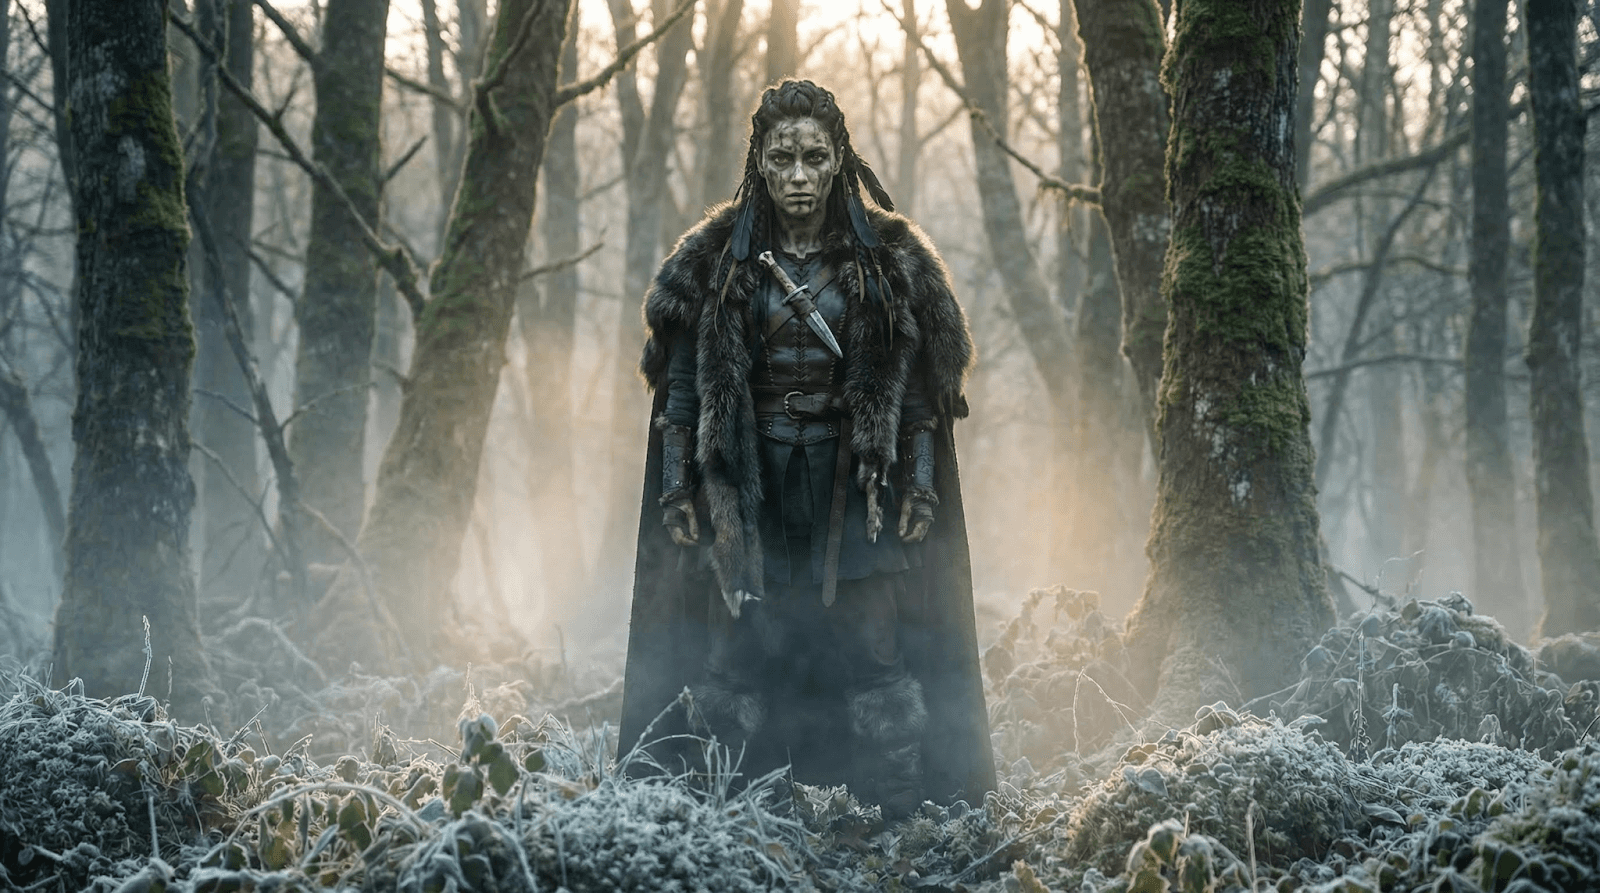
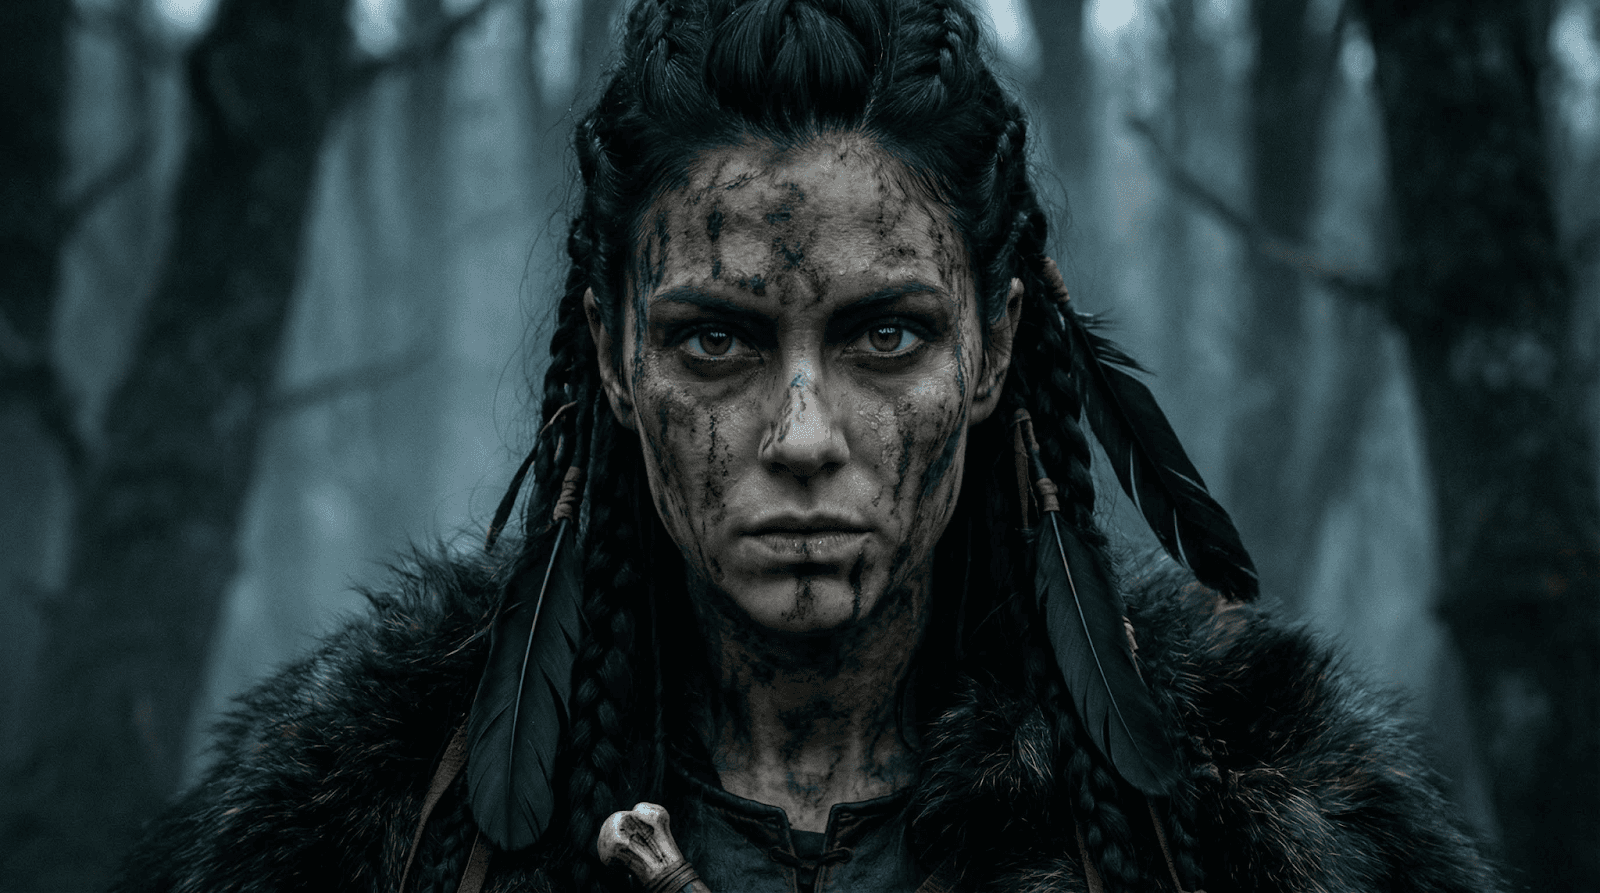
5. MEDIUM SHOT — Realization
Prompt:
medium shot,Viking woman facing camera withtensioninher eyes,mud war paint cracked,braids withfeathers,consistent soft diffused lighting,forest bokeh behind her,mist particles catching light,slight wind movementinhair,cinematic crisp detail
medium shot,Viking woman facing camera withtensioninher eyes,mud war paint cracked,braids withfeathers,consistent soft diffused lighting,forest bokeh behind her,mist particles catching light,slight wind movementinhair,cinematic crisp detail
medium shot,Viking woman facing camera withtensioninher eyes,mud war paint cracked,braids withfeathers,consistent soft diffused lighting,forest bokeh behind her,mist particles catching light,slight wind movementinhair,cinematic crisp detail
6. MEDIUM CLOSE-UP — Fear and Resolve
Prompt:
medium close-up,intense expression,moisture on skin from cold air,fog blurring background deeper,continuityof feathers and braids,pale dawn light creating subtle highlights on cheekbones,shallow DOF,filmic texture
medium close-up,intense expression,moisture on skin from cold air,fog blurring background deeper,continuityof feathers and braids,pale dawn light creating subtle highlights on cheekbones,shallow DOF,filmic texture
medium close-up,intense expression,moisture on skin from cold air,fog blurring background deeper,continuityof feathers and braids,pale dawn light creating subtle highlights on cheekbones,shallow DOF,filmic texture
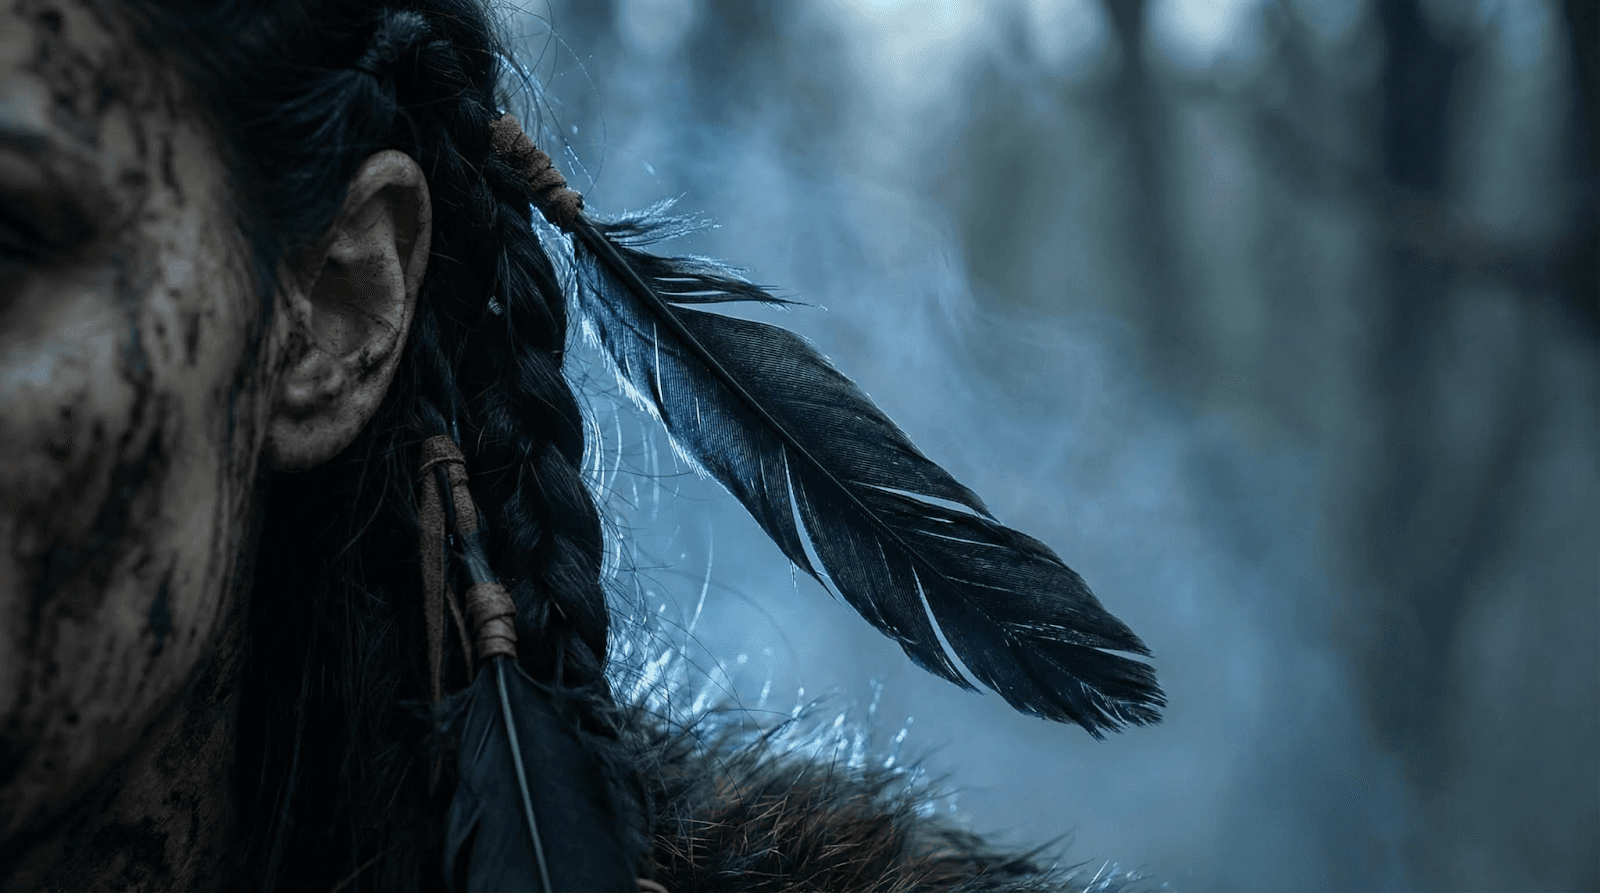
7. CLOSE-UP — The Feather Omen
Prompt:
close-up,single black raven feather braided into her hair,trembling,consistent lighting direction,soft blue backlight glow,fog drifting behind feather,ultra-shallow depth of field,85mm lens,cinematic bokeh
close-up,single black raven feather braided into her hair,trembling,consistent lighting direction,soft blue backlight glow,fog drifting behind feather,ultra-shallow depth of field,85mm lens,cinematic bokeh
close-up,single black raven feather braided into her hair,trembling,consistent lighting direction,soft blue backlight glow,fog drifting behind feather,ultra-shallow depth of field,85mm lens,cinematic bokeh
low angle,camera looking up at Viking woman,making her appear towering and heroic,tree trunks rising behind her into fog,soft rim light from dawn sky,cloak billowing subtly,continuityincostume and environment
low angle,camera looking up at Viking woman,making her appear towering and heroic,tree trunks rising behind her into fog,soft rim light from dawn sky,cloak billowing subtly,continuityincostume and environment
low angle,camera looking up at Viking woman,making her appear towering and heroic,tree trunks rising behind her into fog,soft rim light from dawn sky,cloak billowing subtly,continuityincostume and environment
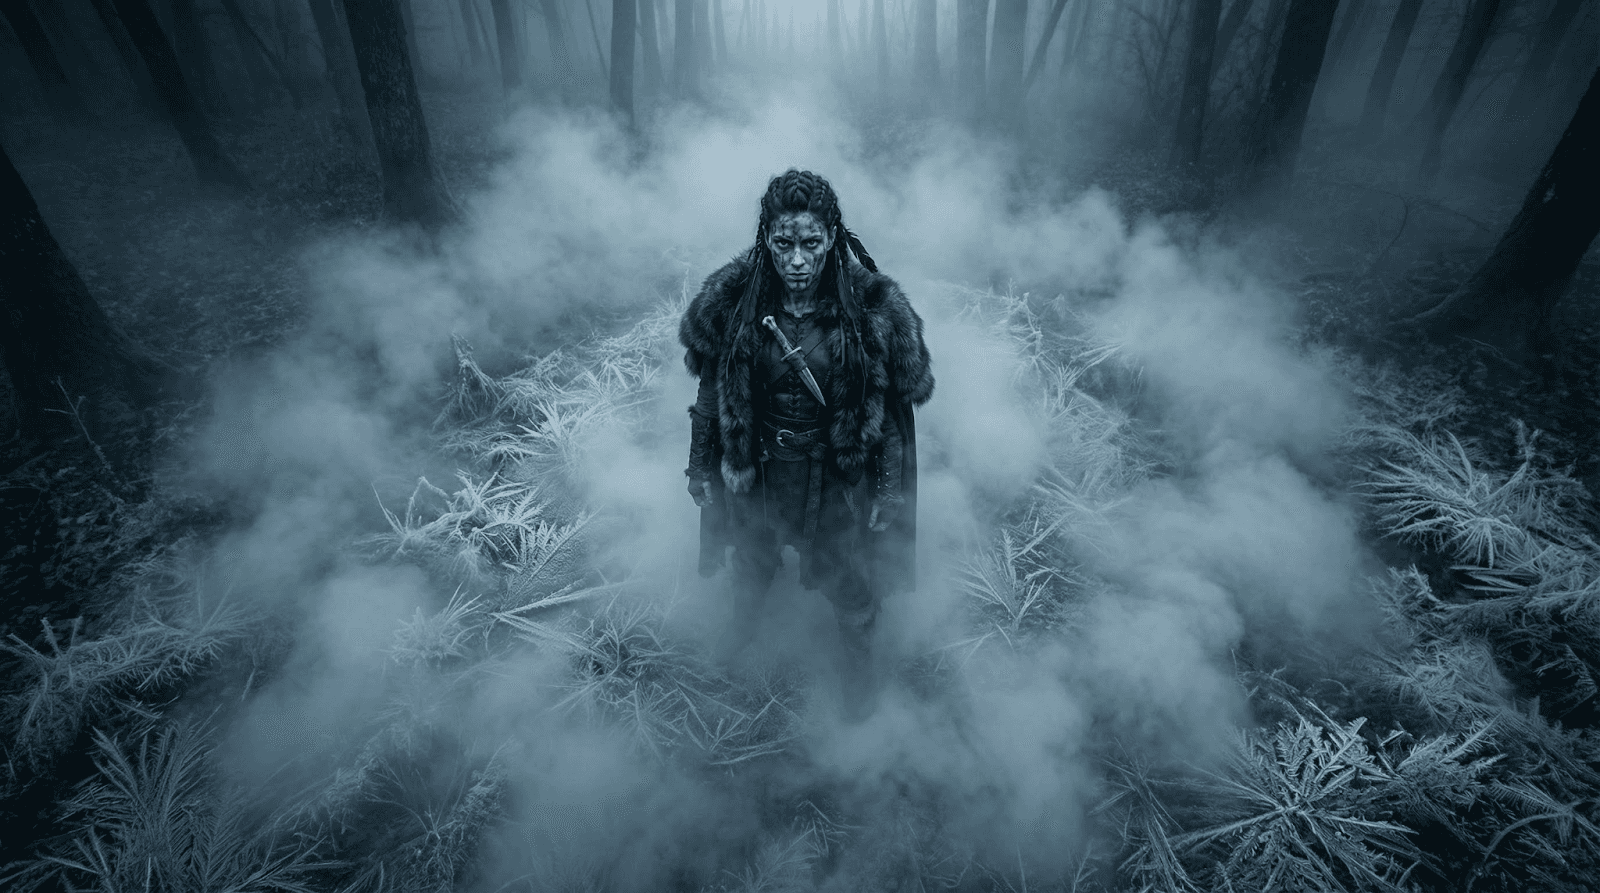
10. HIGH ANGLE SHOT — Her Solitude
Prompt:
high angle shot,looking down on her standing aloneina clearing,frost patterns visible on the ground,fog forming a circular drift around her,consistent lighting direction,cinematic depth maintained
high angle shot,looking down on her standing aloneina clearing,frost patterns visible on the ground,fog forming a circular drift around her,consistent lighting direction,cinematic depth maintained
high angle shot,looking down on her standing aloneina clearing,frost patterns visible on the ground,fog forming a circular drift around her,consistent lighting direction,cinematic depth maintained
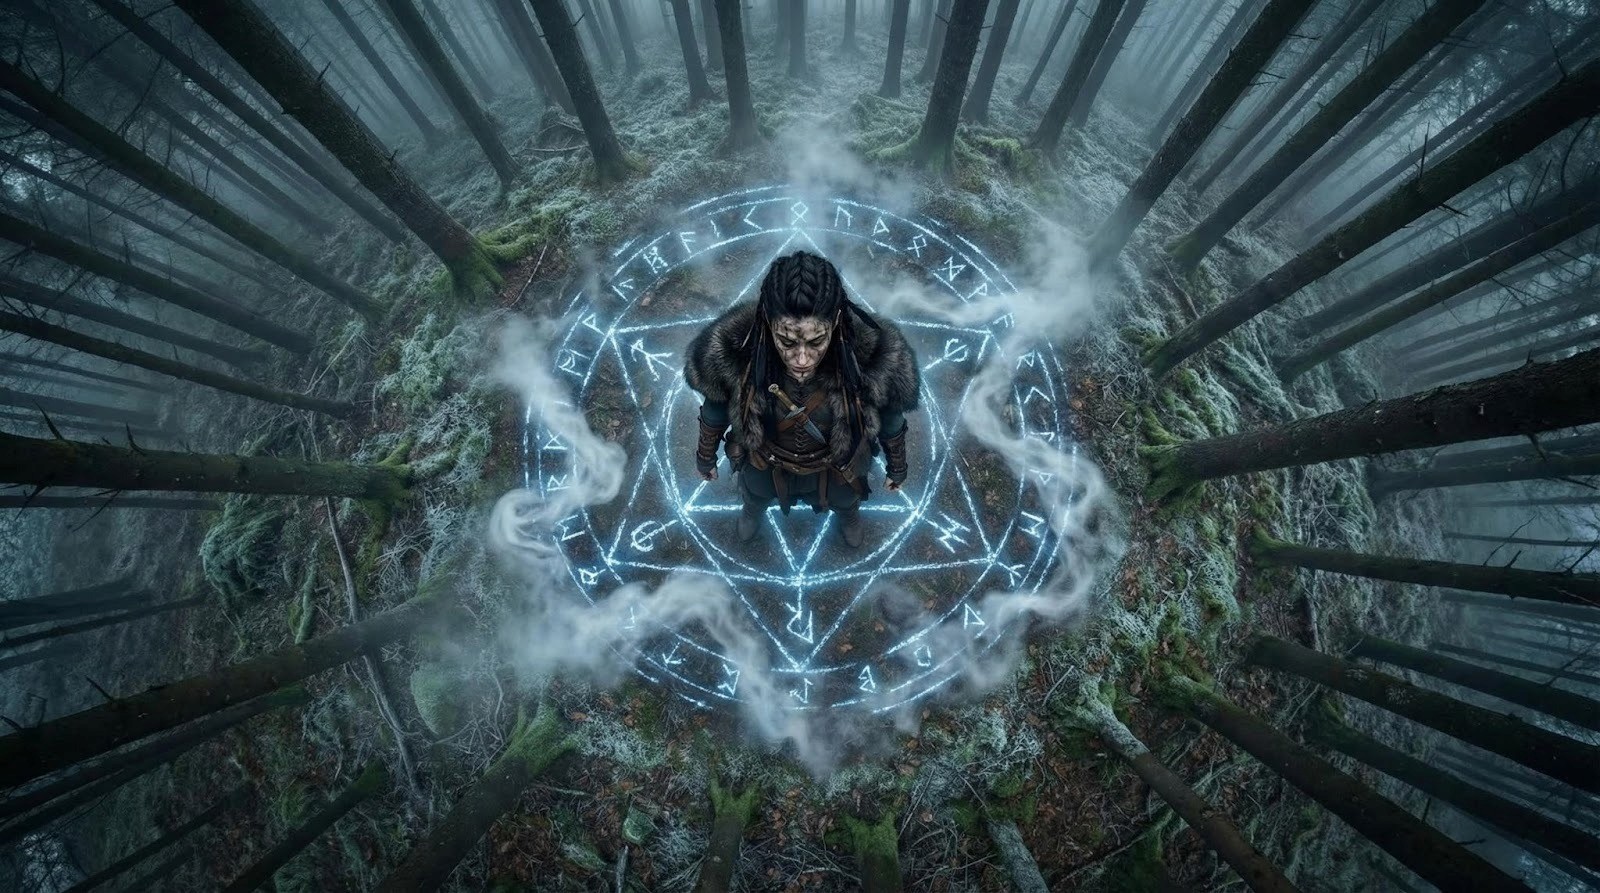
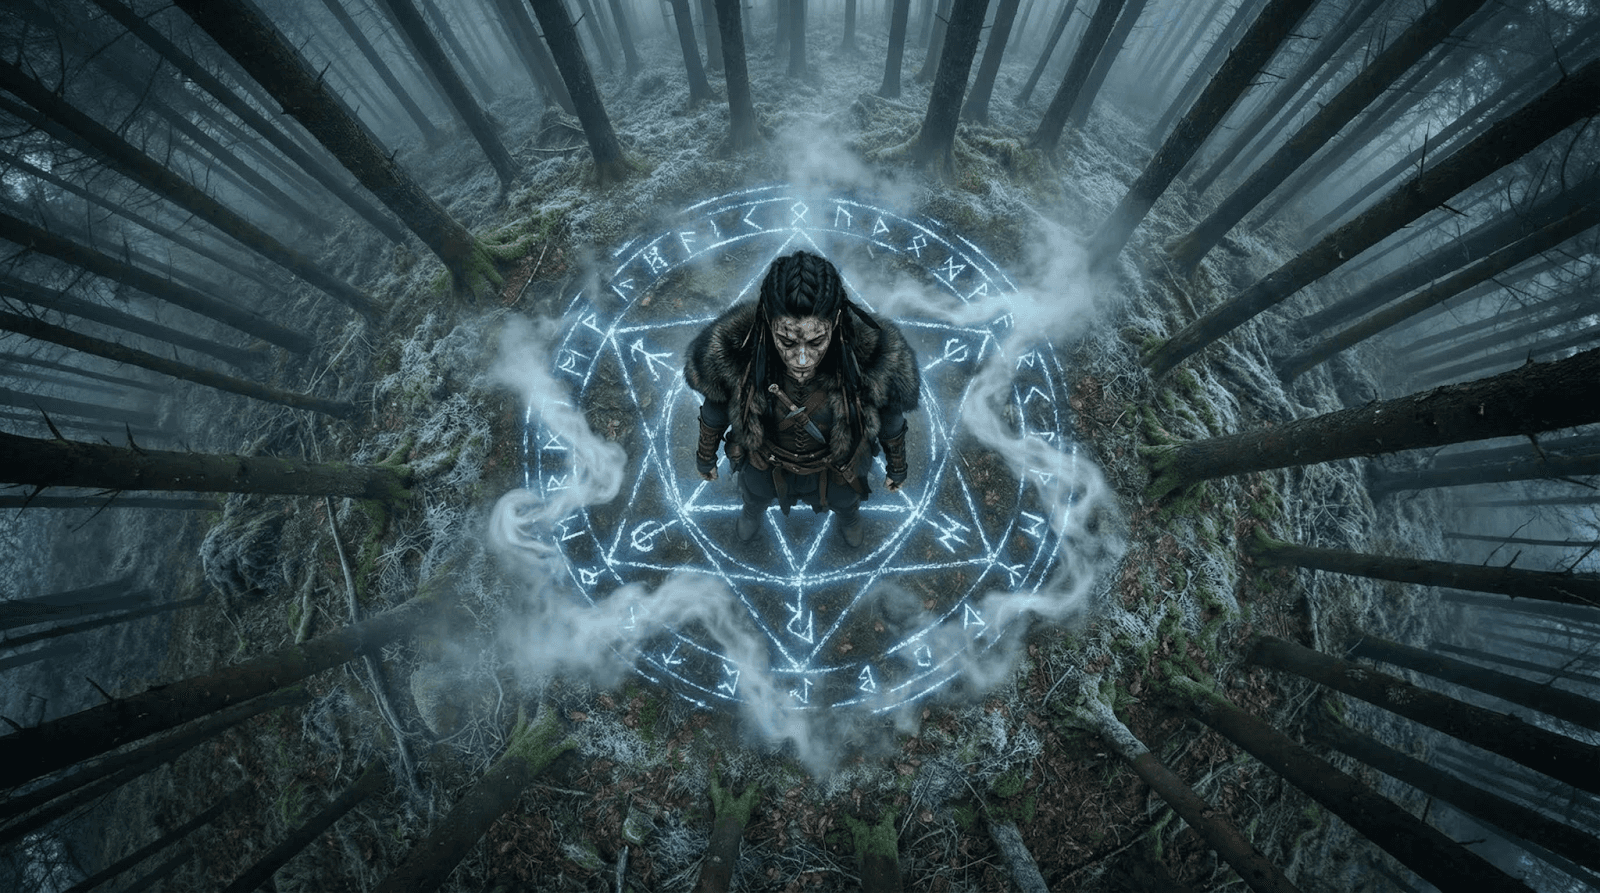
11. BIRD’S EYE VIEW — Rune Circle Awakens
Prompt:
overhead bird’s-eye,perfect top-down view,glowing circular rune appearing beneath her feetinthe frost,mist swirling around rune lines,trees forming radial texture around clearing,same lighting and environment tone
overhead bird’s-eye,perfect top-down view,glowing circular rune appearing beneath her feetinthe frost,mist swirling around rune lines,trees forming radial texture around clearing,same lighting and environment tone
overhead bird’s-eye,perfect top-down view,glowing circular rune appearing beneath her feetinthe frost,mist swirling around rune lines,trees forming radial texture around clearing,same lighting and environment tone
12. WORM’S EYE VIEW — The Earth Shifts
Prompt:
worm’s eye view,camera at ground level looking upas roots twist and earth trembles,Viking woman towering above,fog cutting across frame,cold light filtering through branches,dynamic cinematic realism
worm’s eye view,camera at ground level looking upas roots twist and earth trembles,Viking woman towering above,fog cutting across frame,cold light filtering through branches,dynamic cinematic realism
worm’s eye view,camera at ground level looking upas roots twist and earth trembles,Viking woman towering above,fog cutting across frame,cold light filtering through branches,dynamic cinematic realism
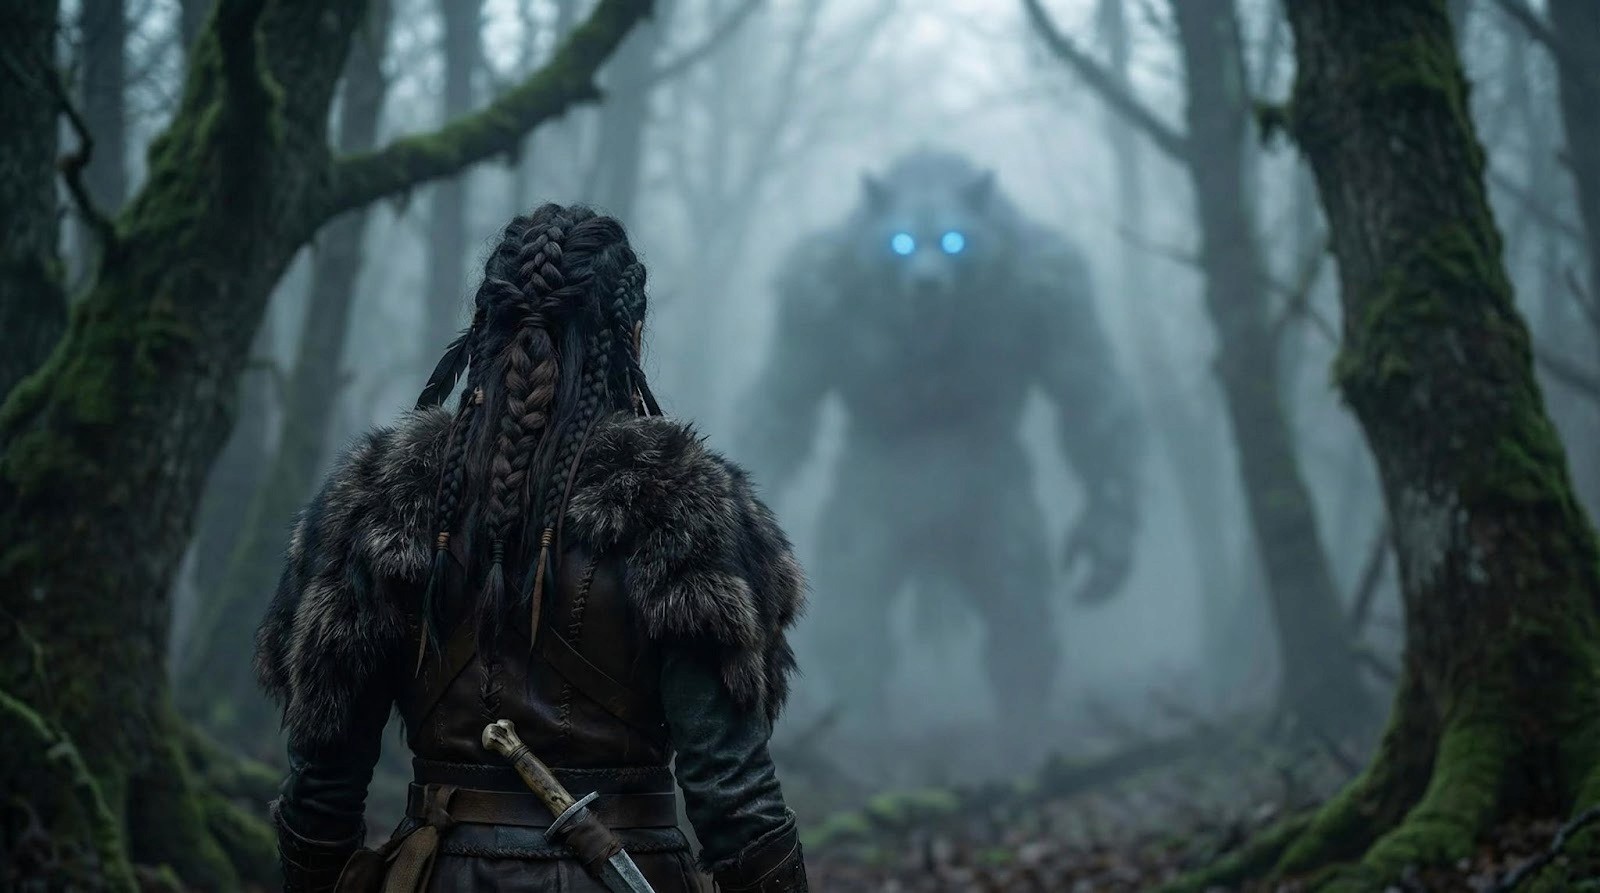
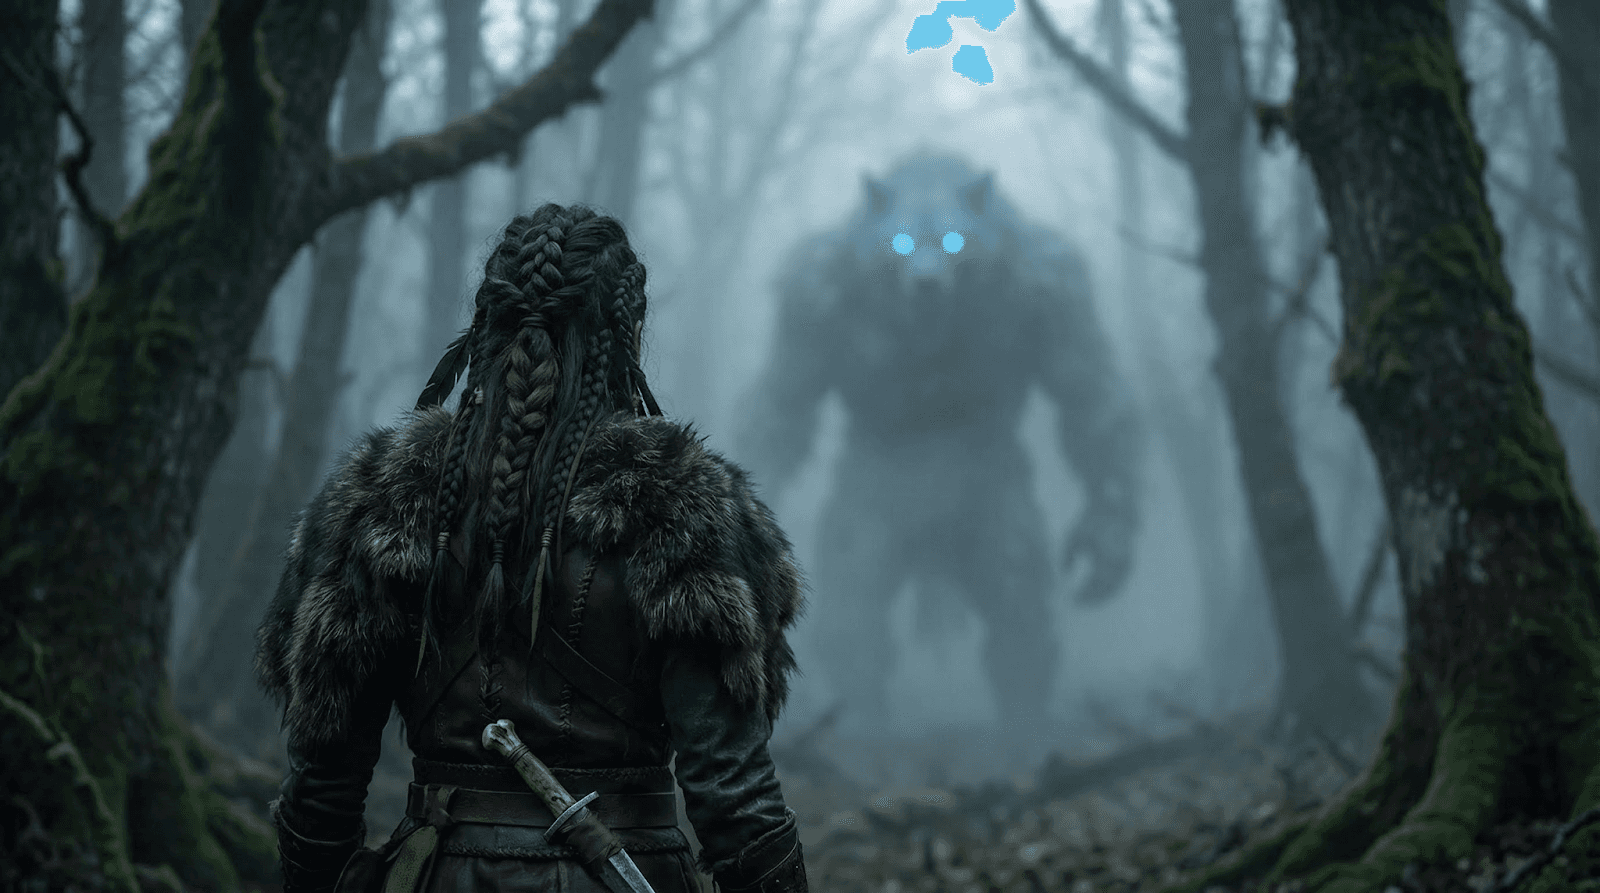
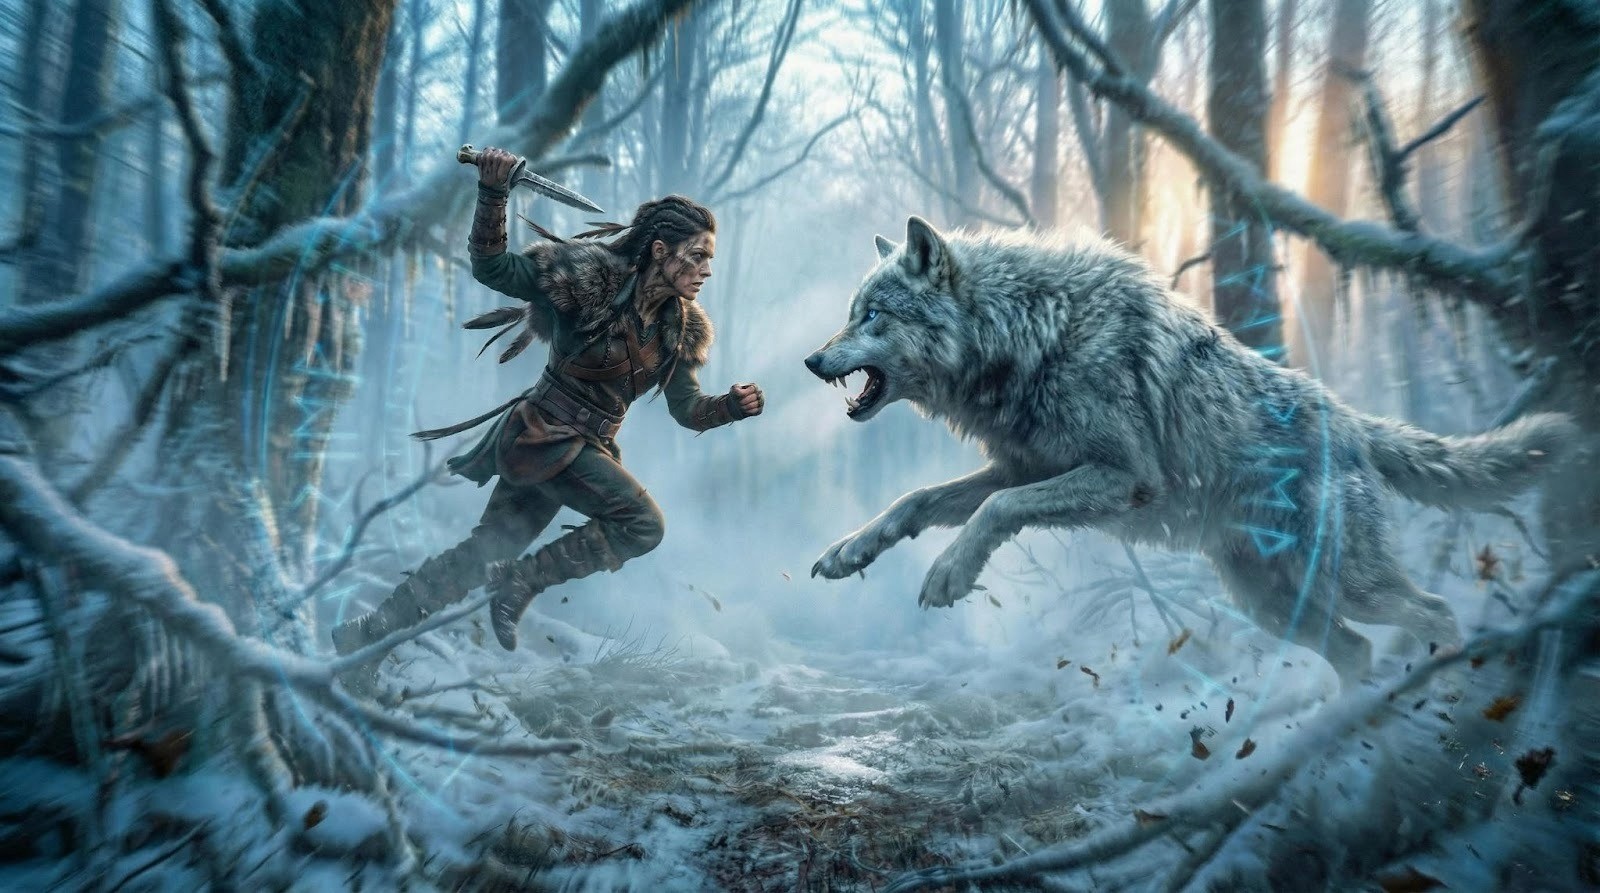
13. OVER-THE-SHOULDER — The Beast Appears
Prompt:
over-the-shoulder,from behind,Viking woman looking at a massive frost-beast silhouette emerging through dense fog,glowing blue eyes,forest continuity maintained,shallow DOF,atmospheric depth,same lighting direction
over-the-shoulder,from behind,Viking woman looking at a massive frost-beast silhouette emerging through dense fog,glowing blue eyes,forest continuity maintained,shallow DOF,atmospheric depth,same lighting direction
over-the-shoulder,from behind,Viking woman looking at a massive frost-beast silhouette emerging through dense fog,glowing blue eyes,forest continuity maintained,shallow DOF,atmospheric depth,same lighting direction
14. POV SHOT — The Charge
Prompt:
POV shot,from her eyes,frost-beast charging forward,branches whipping past,fog thickening,cold dawn light streaking,high-intensity motion blur balanced withclarity,immersive first-person realism
POV shot,from her eyes,frost-beast charging forward,branches whipping past,fog thickening,cold dawn light streaking,high-intensity motion blur balanced withclarity,immersive first-person realism
POV shot,from her eyes,frost-beast charging forward,branches whipping past,fog thickening,cold dawn light streaking,high-intensity motion blur balanced withclarity,immersive first-person realism
15. SELFIE ANGLE — Her Defiance
Prompt:
selfie-style angle,Viking woman holding dagger close,fierce expression,breath fogging the lens,consistent lighting on face,forest blurred behind,gritty and intimate framing,cinematic handheld feeling
selfie-style angle,Viking woman holding dagger close,fierce expression,breath fogging the lens,consistent lighting on face,forest blurred behind,gritty and intimate framing,cinematic handheld feeling
selfie-style angle,Viking woman holding dagger close,fierce expression,breath fogging the lens,consistent lighting on face,forest blurred behind,gritty and intimate framing,cinematic handheld feeling
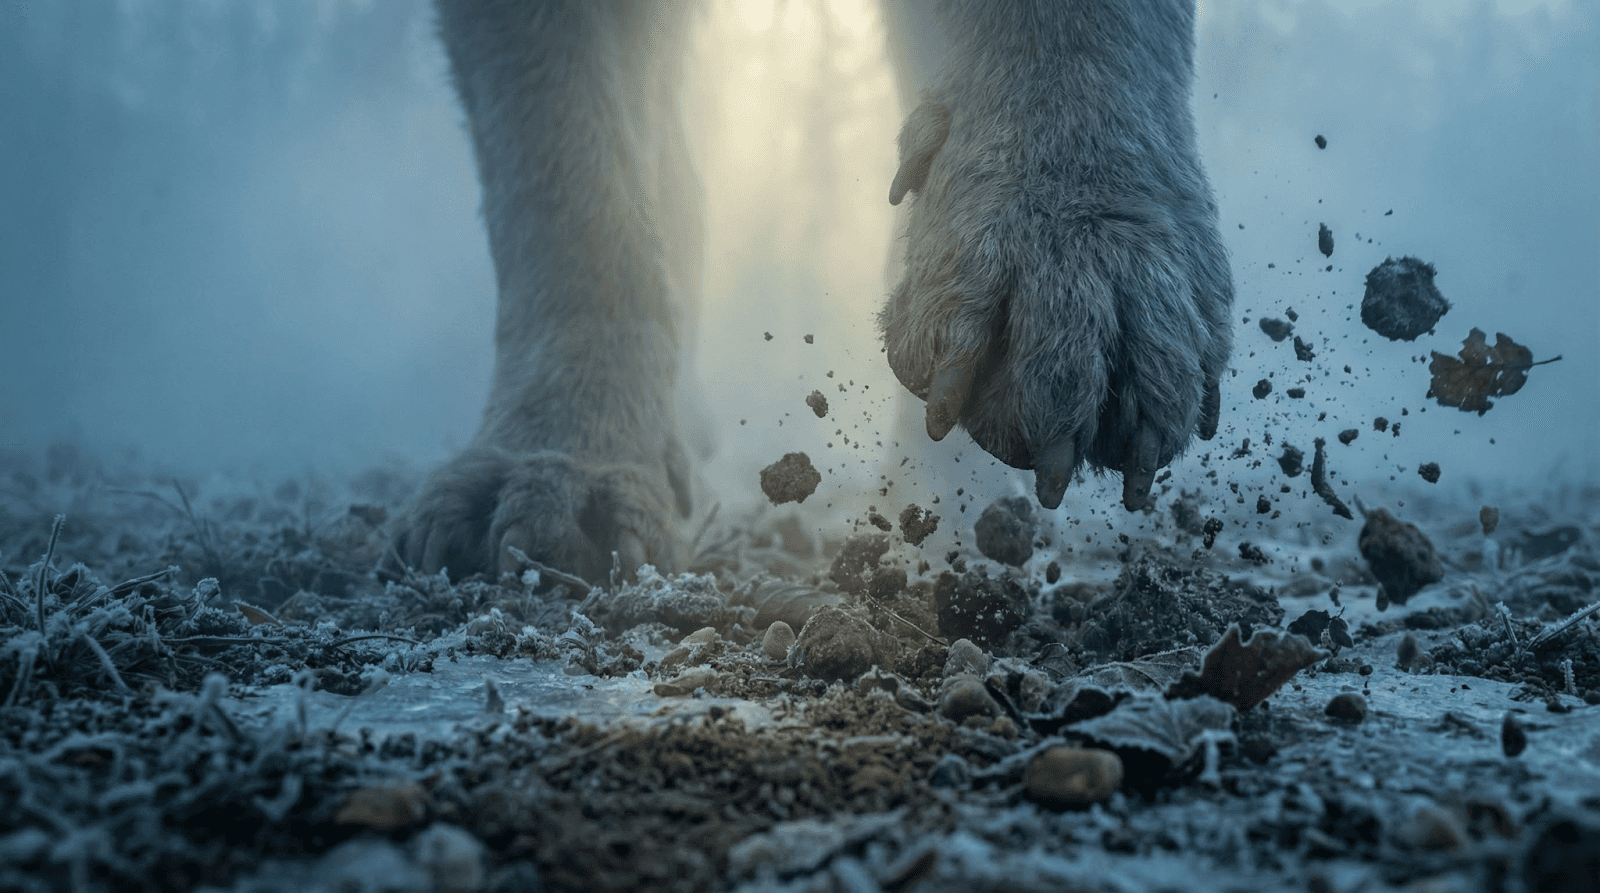
16. GROUND LEVEL — Approaching Impact
Prompt:
ground-level shot,beast’s massive feet pounding frost-covered earth,debris scattering,consistent color palette,fog illuminated from above,dramatic tension,24mm lens ground perspective
ground-level shot,beast’s massive feet pounding frost-covered earth,debris scattering,consistent color palette,fog illuminated from above,dramatic tension,24mm lens ground perspective
ground-level shot,beast’s massive feet pounding frost-covered earth,debris scattering,consistent color palette,fog illuminated from above,dramatic tension,24mm lens ground perspective
17. SHAKY HANDHELD — Final Charge
Prompt:
shaky handheld shot,Viking woman sprinting toward the charging beast,camera vibrations,fog swirling around movement,cold dawn light breaking through branches,raw kinetic energy,film-grain intensity
shaky handheld shot,Viking woman sprinting toward the charging beast,camera vibrations,fog swirling around movement,cold dawn light breaking through branches,raw kinetic energy,film-grain intensity
shaky handheld shot,Viking woman sprinting toward the charging beast,camera vibrations,fog swirling around movement,cold dawn light breaking through branches,raw kinetic energy,film-grain intensity
Step 3: Turning Stills into Cinematic Video
Once you have your storyboard of consistent images (Wide, Close-up, Action, POV), it’s time to animate them using Google Veo inside Atlabs.
Start from Scratch: Go to the Atlabs dashboard and select "Start from Scratch."
Upload Your Shots: Import the images you just created with Nano Banana Pro.
Add Motion: Click the Motion Icon on a scene.
Select Model: Choose Google Veo 3.1 Fast for realistic movement.
Prompt the Motion: Tell the AI how to move. (e.g., "Slowly zoom in" or "Camera tracking forward").
Add Sound & Lip Sync: Use the built-in voiceover tool to generate dialogue and sync it to your character’s lips.
The "Doodle" Hack: Controlling Composition
Want a dragon exactly on the left and a fireball on the right? Nano Banana Pro allows you to sketch your composition.
How to do it: Upload a crude drawing (stick figures or basic shapes) as your reference.
The Prompt: Turn this into a realistic fighting scene...
The Result: The AI respects your exact positioning, turning stick figures into high-fidelity warriors while maintaining the composition you drew.
Why This Workflow Changes Everything
By moving from random generation to Reference Image + Camera Prompting, you stop being a user and start being a director.
Consistency: The character looks the same in the close-up as she does in the wide shot.
Control: You decide the angle, not the AI.
Storytelling: You can build a narrative arc (Establishing -> Tension -> Action -> Climax).
Ready to direct your first AI masterpiece? Log in to Atlabs AI and start experimenting with Nano Banana Pro today.