Fashion is not about fitting in. The accessories getting the most attention right now are the ones that make people stop mid-scroll and ask: wait, is she really wearing that? This guide shows exactly how four of those accessories were built inside Atlabs, from the first image prompt to the finished video clip. Every prompt is included. Every decision is explained.
Whether you are a content creator, a brand account, or just someone who wants to see how far AI styling has come, the workflow in this guide is the one. Four concepts, one platform, a session that would have taken a full production team a week.
Why Weird Accessories Work: The Logic Behind the Concept
Before the how, it is worth understanding the why.
Social content that performs is content that creates a pattern interrupt. The feed is an unbroken stream of things that look exactly like other things. The moment something appears that does not fit any existing template, the viewer stops. That pause is the entire game.
Weird accessories are one of the most reliable ways to create that pause. A skirt made from lettuce leaves worn on a tennis court is not confusing because it is bad. It is confusing because it is too deliberate to be an accident. A handbag made from a baguette wrapped in translucent pink glass does not register as a mistake. It registers as a statement. That distinction matters. There is a difference between content that looks strange and content that looks intentionally strange. The second kind builds a very specific creative credibility.
AI makes this style available to anyone. Building these concepts the traditional way would require a prop designer, a stylist, a photographer, and probably a set builder. With Atlabs, it is a prompt and an afternoon.
Traditional Editorial Shoot | Weird Accessories with Atlabs |
Photographer: $500 to $2,000 per day | Included in subscription |
Studio rental: $300 to $800 per day | No location needed |
Prop design and fabrication: $200 to $1,500 | Described in a prompt |
Talent / model fees: $200 to $1,500 | No talent required |
Post-production: $200 to $600 | Instant, unlimited iterations |
Total per shoot: $1,400 to $6,400 | One flat monthly cost |
Turnaround: 1 to 2 weeks | Same session, same day |
The Four Concepts in This Walkthrough
Each concept in this guide was built using the same two-step workflow inside Atlabs: generate the image, then animate it. Here is a quick overview of each one before the breakdown:
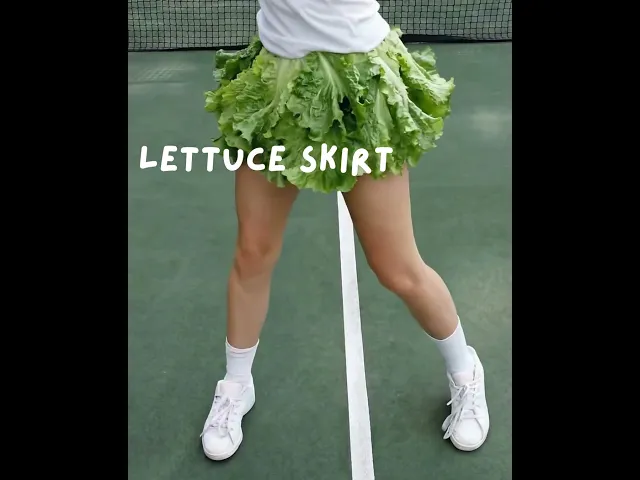
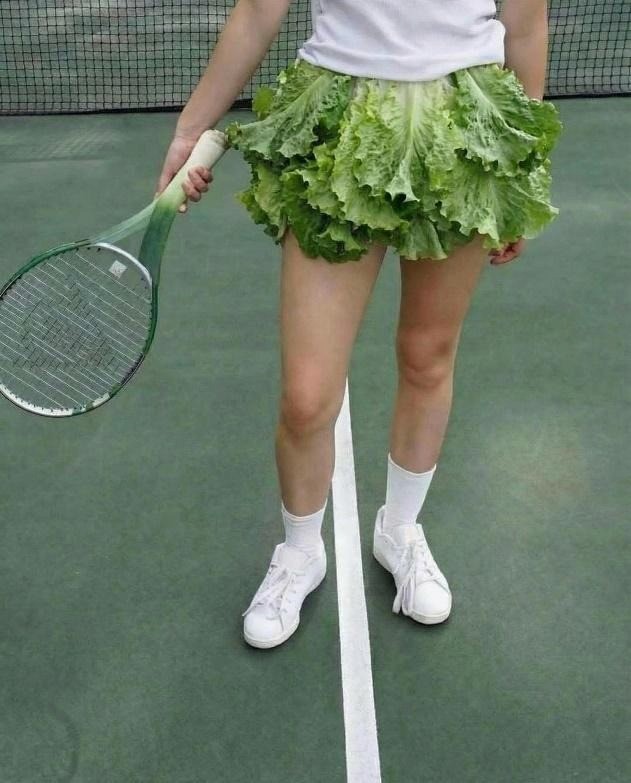
The Lettuce Skirt: A young woman on a tennis court wearing a skirt made entirely from layered lettuce leaves. White top, white sneakers, racket in hand. The skirt moves like fabric but reads like a vegetable. Calm, aesthetic, completely unhinged.
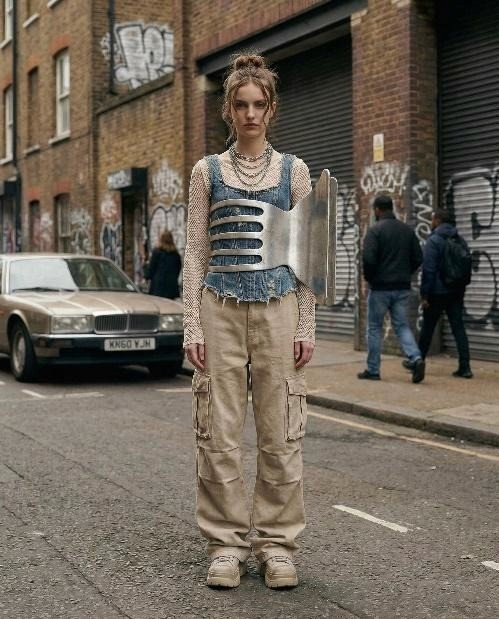
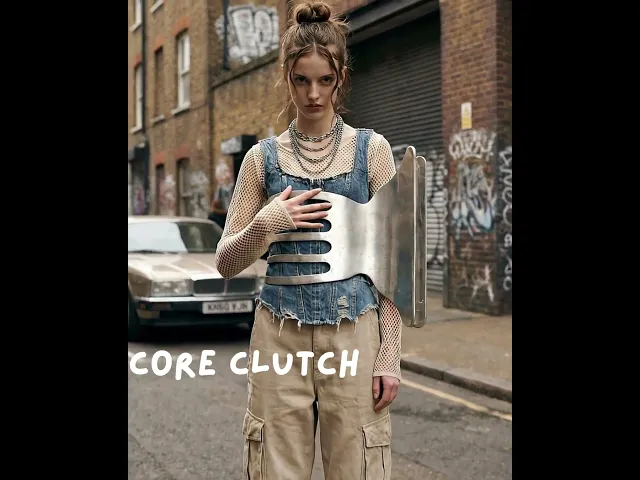
The Clutch Core: A metallic sculptural piece worn on the torso as a statement accessory, styled with layered Gen Z streetwear on an urban brick street. The accessory reads like armor crossed with avant-garde jewelry.
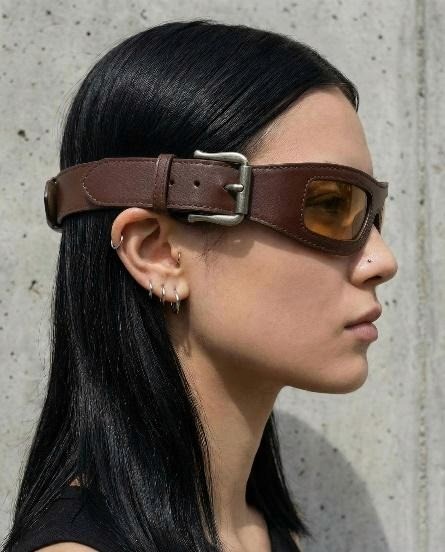
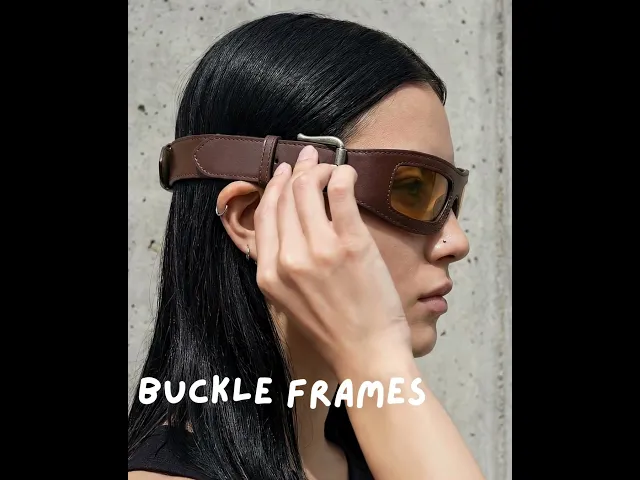
The Buckle Belt Goggles: A pair of eyewear made from a brown leather belt. The strap wraps around the head. The buckle sits at the temple. A rectangular amber lens is embedded directly into the leather. Shot against concrete in tight side profile.
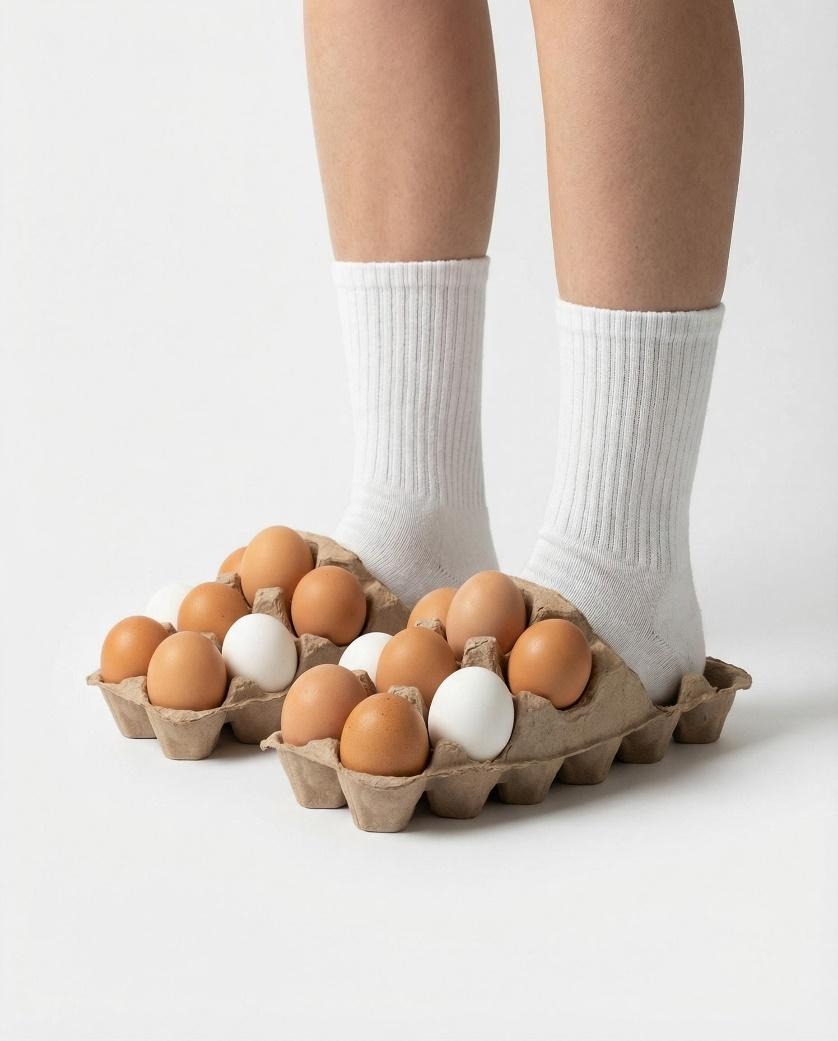
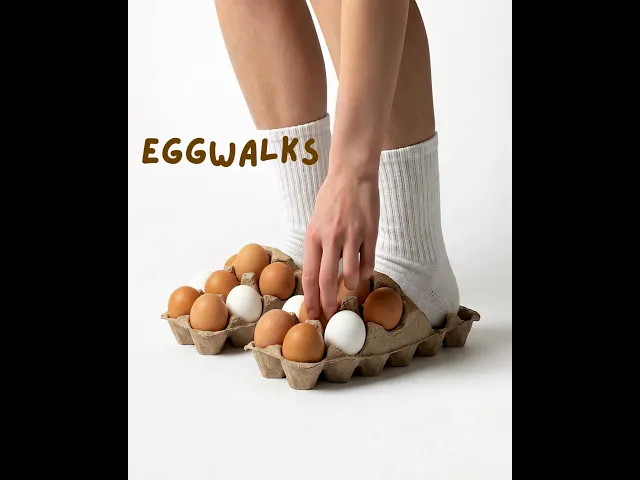
The Egg Walks: Egg cartons worn as slippers. Brown and white eggs still in the slots. White ribbed socks. Clean white studio floor. The absurdity is the concept and the concept is fully committed.
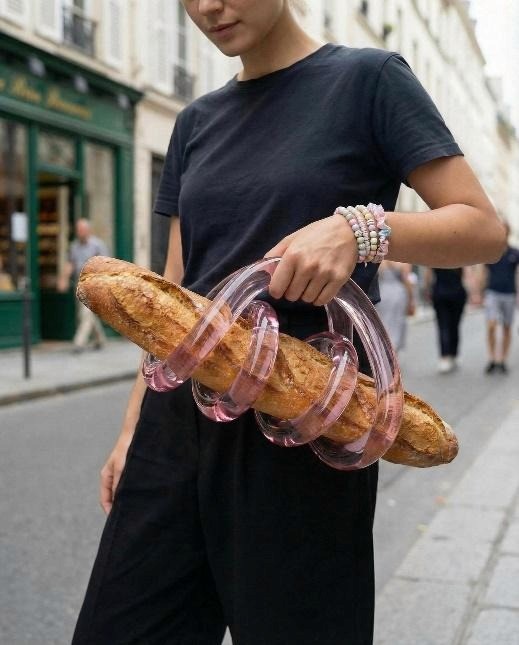
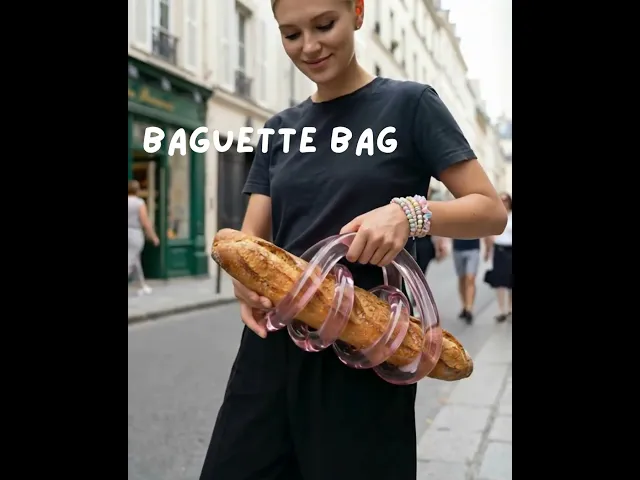
The Baguette Bag: A baguette held inside a translucent pink glass sculptural holder with tubular loops forming the handle. European street exterior. Fashion editorial framing. Bread as luxury accessory.
Each of these was built using the same workflow inside Atlabs. What changes is the creative direction.
Step 1: Generate the Accessory Image
Everything starts with an image prompt. This is the most important creative decision in the whole process. A weak prompt produces a generic result. A strong prompt produces something strange enough to be usable on the first or second try.
Atlabs uses your prompt to generate a high-resolution editorial image. That image becomes the visual identity of the concept. Get it right and everything downstream becomes easier. Get it wrong and you will spend the rest of the session trying to fix it in motion.
What a Strong Accessory Prompt Actually Contains
Looking across all five concepts, every high-performing image prompt shares the same structural logic. Here is how to think about each layer:
Layer 1: The Object Itself
Describe the weird object with total precision. Do not say leather glasses. Say brown leather belt strap sleek and precisely tailored around the head, matte brushed metal buckle positioned elegantly near the temple, rectangular tinted lens seamlessly embedded into the leather. Every word is doing work.
For the egg carton slippers, the description included cardboard trays shaped like oversized shoes with brown and white eggs placed in the slots. Not egg-inspired shoes. Actual egg cartons. The model needs to know the object is real and specific, not a metaphor.
For the baguette bag, the prompt specified a baguette threaded through smooth tubular glass loops forming a handle. The material of the glass was called out separately: smooth transparent glass, high gloss, reflective, slightly translucent pink. The contrast between hard glass and crusty bread was named explicitly as a design intention.
Layer 2: The Model and Styling Context
The model is the frame the accessory lives inside. Do not leave the styling to chance. Describe what she is wearing, how she is posed, and where in the frame she sits.
For the buckle belt goggles, the model had straight hair tucked behind ears, multiple subtle ear piercings, and a nose stud. Neutral expression. Side profile. These details are not decoration. They anchor the editorial tone of the image and prevent the model from defaulting to a generic pose that fights the accessory.
For the egg carton slippers, only legs from mid-calf down were included in the frame. This was a deliberate compositional choice. The crop puts 100 percent of the visual weight on the footwear and the socks. Nothing competes.
Layer 3: Environment and Lighting
The background and lighting define the world the accessory lives in. Keep this consistent with the concept energy.
Clean white studio backdrops work for concepts where the object itself is the entire story. The egg carton slippers needed nothing competing in the background. The object was already loud enough.
Concrete walls and urban streets work for concepts with a street-editorial energy. The buckle belt goggles were shot against a textured concrete wall because the industrial material language matched the accessory. The baguette bag was placed on a European street exterior because the location tension between luxury framing and absurd object is part of the joke.
Layer 4: Explicit Constraints
This is the layer most people skip, and it is often the difference between a clean first-generation result and a fifth-generation frustration. Add a negative prompt or constraints section that tells the model what failure modes to avoid.
For the buckle belt goggles, the negative prompt included: bulky belt, DIY look, messy construction, uneven stitching, warped proportions, cartoonish, costume. Every item on that list is a real failure mode that image models default to when they interpret an unusual brief.
For the baguette bag, balloon texture was called out as a negative. Without that constraint, the glass loops would have rendered as rubber or inflatable rather than hard transparent glass. Small words, large impact on the output.
The Full Image Prompt Examples
PROMPT: The Buckle Belt Goggles
|
PROMPT: The Egg Walks
|
PROMPT: The Baguette Bag
|
Generate three to five variations of each prompt. The model interprets even identical prompts slightly differently across generations. Small differences in material rendering, pose, or lighting can dramatically affect which image works best for animation. Pick the frame that looks most intentional before moving to the next step.
Step 2: Set Your Start Frame and Animate
Once you have your hero image, open it inside Atlabs and navigate to the Motion panel. This is where the static image becomes a video. The most important inputs here are the start frame and the motion prompt. Together they define the visual and physical logic of your clip.
Start Frame
Your generated image becomes the start frame. Upload it into the Motion panel under the first frame slot. This is the visual state the clip will begin from. The lighting, the pose, the expression, and the atmosphere set the tone for everything that follows.
One important note: the start frame should be the strongest, most intentional version of the image. If you generated five variations, pick the one where the accessory renders most clearly, where the model pose reads as editorial, and where the composition is cleanest. That frame is doing the creative heavy lifting.
End Frame (Optional but Useful)
The end frame controls where the clip resolves visually. You have two options.
Leave it empty and let the motion prompt drive the action. The AI generates movement within the world of the start frame. This works well for close-up accessory clips where you want organic, naturalistic motion rather than a directed transition.
Set a second image as the end frame to create a directed visual shift. Generate a second version of the character in a different state, a different angle, a different expression, and set that as the end frame. The AI will interpolate the movement between the two states. For the baguette bag clip, a slightly angled follow-up shot was used as the end frame to create a slow lateral drift.
Model and Duration Selection
Model | Best For |
Google Veo 3.1 Quality | Complex motion sequences, full-body movement, multi-step action with high fidelity |
Google Veo 3.1 Fast | Close-up portrait and accessory work, quick iterations, tight crop clips |
Kling 3.0 Pro | High skin texture and accessory detail fidelity, tight close-up preservation |
Kling 3.0 Standard | Full-body motion, dynamic action, scene transitions |
Duration guide:
4 seconds: standard clip, enough for a clean action sequence to unfold without overstaying
5 to 6 seconds: multi-step sequences with distinct action beats, like the egg carton clip
3 seconds: tight portrait loops, close-up reactions, ideal for social content
Step 3: Write and Run Your Motion Prompt
This is where the accessory comes alive. The motion prompt tells Atlabs how the character moves, how the camera behaves, what physical actions occur, and what the atmosphere of the clip should feel like.
There are two approaches used across these clips. Both work. Which you reach for depends on how much control you want over the output.
Approach 1: Plain Language Direction
Write the motion prompt the way you would direct someone on set. Describe the action in sequence, give physical and emotional cues, and be specific about the scale and intensity of movement.
This approach works best for natural, performer-driven clips where you want the character to feel present and spontaneous rather than cinematic and staged.
MOTION PROMPT: The Lettuce Skirt (JSON structure)
|
Approach 2: Structured JSON Direction
For clips where you want precise control over camera movement, subject behavior, and atmosphere as separate layers, a JSON-style structured prompt gives you that granularity. This is the approach used for the buckle belt goggles, the egg carton slippers, and the baguette bag, where the motion needed to follow specific step-by-step logic.
MOTION PROMPT: The Clutch Core
|
MOTION PROMPT: The Buckle Belt Goggles
|
MOTION PROMPT: The Egg Walks
|
MOTION PROMPT: The Baguette Bag
|
Universal Motion Prompting Principles for Accessory Clips
Across all five clips, a few practices consistently improved results:
Name the accessory and describe its physical behavior. The egg carton prompt specifically called out that eggs remain stable and no egg breaking should occur. The baguette prompt described rotating the baguette within the holder. Unnamed objects get simplified or ignored by the motion model.
Constrain movement scale explicitly. Words like subtle, slow, gentle, and very minimal consistently produced more naturalistic results. The buckle belt goggles motion sequence has no smile as an explicit constraint. Without it, the model often defaults to a smile as a natural ending beat, which would break the editorial tone entirely.
Separate camera direction from subject direction. Even in plain-language prompts, be clear about which movements belong to the camera and which belong to the character. Mixing them together produces confused output.
Use the sound toggle strategically. The motion panel has a sound ON/OFF toggle. Turn it ON for clips where ambient audio matches the scene energy. Turn it OFF when you plan to add music in post. For the egg carton clip, sound was left off to keep the visual focus entirely on the careful, deliberate movement.
Generate multiple versions. The same motion prompt produces meaningfully different results across generations. Always generate at least two or three versions before deciding which one to use in the final edit.
Step 4: Edit, Assemble, and Finish Your Video
With your motion clips generated, the final step is assembling them in the Atlabs timeline. This is where clips become a sequence, where pacing gets shaped, and where the production value of the final output gets established.
Timeline Assembly
The left panel inside Atlabs shows all your generated clips in order with their timestamps. Drag to reorder them. The sequence order shapes how the viewer experiences the overall piece.
For an accessory reel across multiple concepts, ordering by visual contrast works best. A tight close-up of the buckle belt goggles followed by a full-leg shot of the egg carton slippers followed by the full-body baguette bag creates visual rhythm. Two close-ups back to back risks monotony regardless of how strong each individual clip is.
Trim and Reverse
Trim is one of the most useful tools in the Atlabs edit panel. Generated clips often have the best action in the middle or toward the end, with a slightly static opening frame. Trimming in removes that and makes the clip feel energetic from the first frame.
Reverse runs a clip backward. A hand moving toward an accessory reversed becomes a hand withdrawing from it. A character leaning in reversed becomes a character pulling back. Reversing gives you a different read on the same generated moment without spending credits on a new generation.
Captions and Sound
Use the Captions panel to add auto-generated captions before export. The majority of video on Instagram, TikTok, and LinkedIn is watched without sound at some point in the viewing cycle. Captions keep the message intact regardless of whether audio is playing.
If the clips have ambient sound enabled, the Captions panel will auto-generate from that audio. If you added a voiceover using the Voiceover panel, captions will sync to the script. Either way, bake them in before export.
Export Settings by Platform
Platform | Recommended Settings |
Instagram Feed / TikTok / Reels | 9:16 vertical, captions baked in, 15 to 60 seconds |
Instagram Square Feed Post | 1:1 square, captions baked in |
YouTube Shorts | 9:16 vertical, captions optional, up to 60 seconds |
LinkedIn Feed | 1:1 square or 16:9, captions baked in, under 3 minutes |
Website / Portfolio Reel | 16:9 widescreen, no baked captions, MP4 |
Brand Pitch Deck Embed | 16:9, compressed MP4, loop-friendly |
Atlabs exports directly in the format you select. For content that needs to live across multiple platforms, export the same sequence in multiple aspect ratios in a single session rather than re-editing separately for each.
More Weird Accessory Concepts to Try
Once the two-step workflow is internalized, the range of concepts you can build expands quickly. Here are five more directions worth trying:
The Cloud Collar
A collar made from a soft sculptural cloud formation sitting directly against the neck. Everything else about the outfit is completely normal and grounded. Warm golden studio light. Motion prompt: cloud shifts very slowly, model maintains still, neutral expression throughout.
The Fruit Necklace
A heavy statement necklace made from hyperrealistic oversized fruit. Cherries, strawberries, and grapes rendered in fine jewelry material. Gold chain. Shot against a deep black background. Motion prompt: very slow camera push-in while model holds still, fruit catches light.
The Keyboard Bracelet
A chunky cuff bracelet made from a full keyboard layout, the keys rendered in gold or chrome. Shot on a close-up wrist crop with soft studio lighting. Motion prompt: hand slowly rotates to show the keys from different angles, very subtle wrist movement.
The Soda Can Heels
Platform heels where the heel is a full soda can, intact label and all. Shot from the knees down on a clean tile floor. Motion prompt: slow walk in place, camera stays static, focus on the cans hitting the floor with each step.
The Sunglasses Made of Bread
Thick croissant-shaped frames with tinted lenses embedded in the pastry. Golden brown baked texture. Shot in tight side profile against a warm cream background. Motion prompt: model slowly turns from profile to three-quarter view, one hand adjusts the bread frames.
Why Atlabs Is the Right Tool for This Kind of Work
There are other AI image and video tools. Most of them do one part of this workflow. Atlabs does all of it in the same session, which matters more than it sounds.
The typical alternative workflow involves generating images in one tool, animating them in a second, editing in a third, adding audio in a fourth, and captioning in a fifth. Each handoff introduces friction, format conversion time, and quality loss. More importantly, each separate tool has its own prompt logic and its own quirks.
Atlabs keeps image generation, motion prompting, timeline editing, voiceover, captions, and export inside one interface. The result is that creative momentum does not get interrupted by tool-switching. When a motion clip comes back and does not quite land, you adjust the prompt and regenerate in the same workspace. That immediacy is what makes rapid creative iteration possible.
A single concept built in one session can produce five to ten usable clip variations across different motion prompts. Those clips become a content library. Post one today. Schedule three for the week. The production capacity changes the creative ambition.
The Bottom Line
Weird works. Conceptually strange, visually unexpected content consistently outperforms safe and polished content in organic reach, engagement, and memorability. The only thing that has historically limited how many creators could execute at that level was production cost and access to equipment and talent.
AI removes that constraint entirely. The workflow in this guide, two steps inside Atlabs, produces editorial-quality content that would have taken a full creative team to build. It now takes a few hours.
The accessories in this guide are not the ceiling. They are the starting point. Build something stranger.
Start creating at atlabs.ai. Free to start, no credit card required.