How do I make a whiteboard explainer video with AI?
Use the Stick Style workflow in Atlabs: paste a script, finalise your cast, and generate the video. There is no drawing tablet, no hand animation timeline, and no voiceover booth, because the script drives the scenes, the characters, and the narration. Stick Style is built for whiteboard style explainers and low fidelity narrative content, and the whole flow comes down to three steps: Script, Cast, and Finalise Video.

Start a Whiteboard Explainer on Atlabs →
What You'll Need
Before opening the workflow, have a script or a clear idea of the one concept you want to explain. Whiteboard explainers work best when they teach a single idea, such as how a process works, why a problem happens, or what a product does. Know your audience too, since a classroom lesson and a sales explainer need different pacing and vocabulary. If you do not have a script yet, the workflow includes an AI Script Writer that drafts one from your idea.
Full Step-by-Step Walkthrough
Step 1: Add Your Script
Open the Stick Style workflow in Atlabs and start with the script. You can paste or type your own, use the AI Script Writer, or pick one of the suggested scripts. Choose the language from the dropdown, then click Next.

Give every distinct idea its own paragraph. Atlabs matches scenes to the script paragraph by paragraph, so a clean break between ideas gives you a clean break between scenes.
Step 2: Finalise the Cast
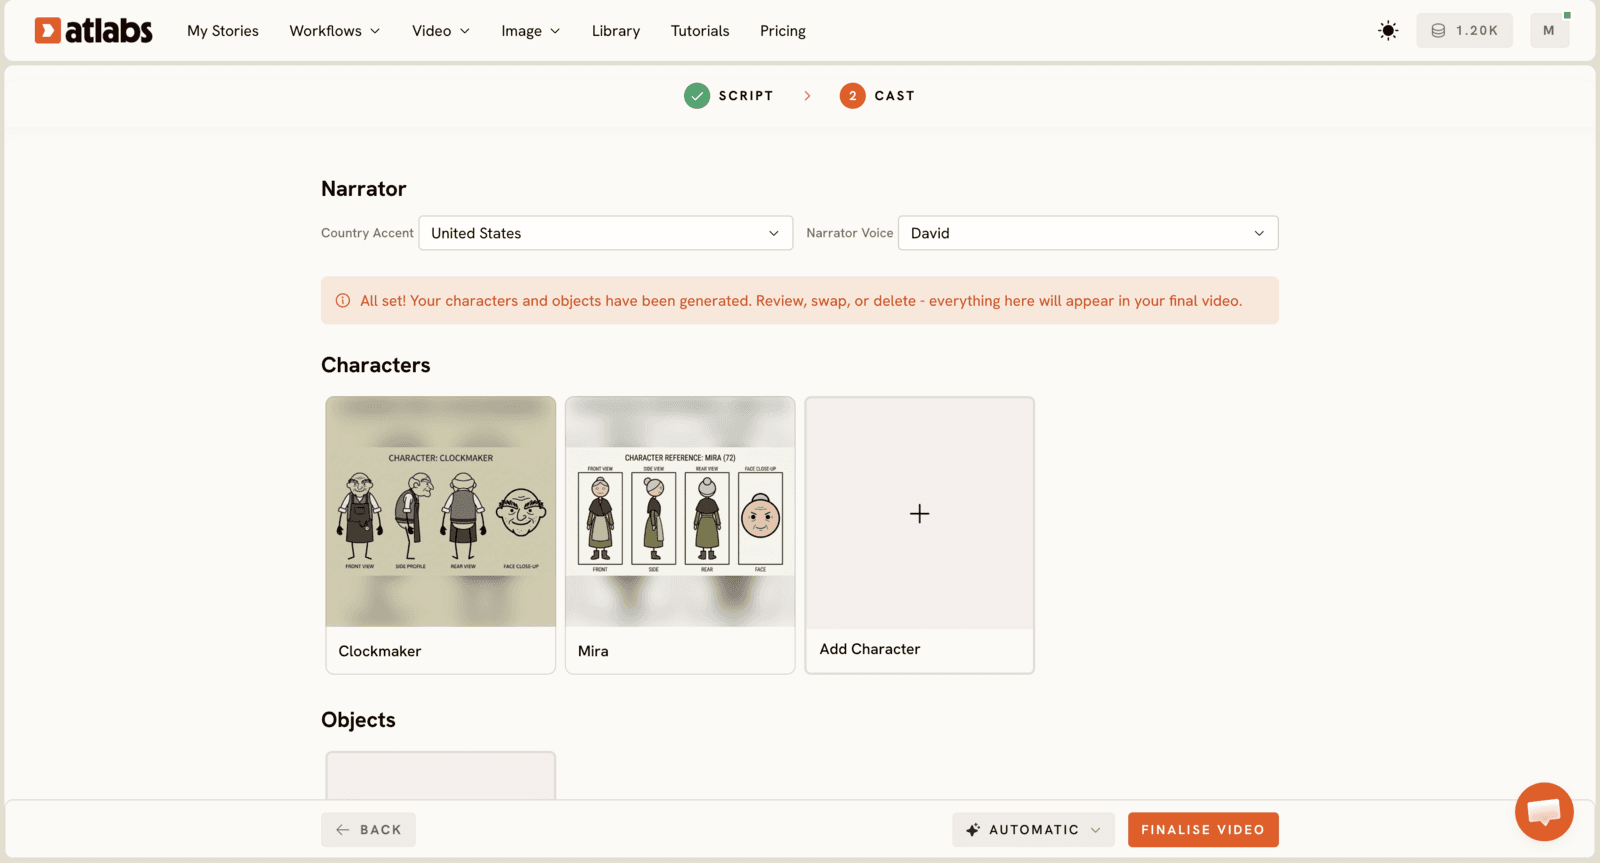
The cast step is where the narrator and the characters get locked in. Select a country accent and a narrator voice first. Atlabs then auto-detects the characters from your script, and you can click Click to Edit on any of them to adjust the name, age, gender, ethnicity, visual appearance, clothing, and voice settings, then save.
Locations and objects work the same way, so a recurring whiteboard, desk, or product can be defined once. You can also upload reference images or pull from the Characters Library instead of describing everything from scratch. The more detailed the visual description, the more consistent each character stays from scene to scene.
Step 3: Finalise Video

Click the Finalise Video button and choose how much to generate. There are three output options, each with its own credit cost:
Storyboard: still images only, a quick way to check that every scene matches the script.
Preview Video: the first 25 seconds with motion and lip sync, enough to judge the style and pacing.
Full Video: the complete video with visuals, motion, and lip sync.
Atlabs crafts your characters first, then builds the scenes paragraph by paragraph. A good habit is to start with the Storyboard or Preview, fix anything that looks off in the script or cast, and only then generate the Full Video.
Step 4: Edit and Export
Once the storyboard is ready, the top bar gives you the finishing tools: Edit Video, Export, Translate, Music, Captions, and Characters. Add Captions for viewers who watch with the sound off, use Translate to publish the same explainer in another language, add a Music bed under the narration, then Export the final file.
Pricing starts free, with paid plans from Atlabs at $19 per month, Trustpilot rating 4.5 out of 5.
Build Your Whiteboard Explainer on Atlabs →
Watch It In Action
Watch how a script becomes a finished explainer in this Atlabs explainer video tutorial.
Tips for Better Results
Teach one idea per video. A whiteboard explainer holds attention for about a minute or two, and a spoken script runs at roughly 150 words per minute, so aim for a script between 150 and 300 words. Open with the problem the viewer already has, then explain the fix, then close with one clear action. Write in short, spoken sentences, since the narrator will read every word aloud. Keep each paragraph to one scene's worth of content, and describe recurring characters in the same words every time so they stay visually consistent. Finally, review the Storyboard before paying for the Full Video, because the script is much cheaper to fix than a finished render.
Example Outputs and Prompts
Prompt 1: Product Explainer for a SaaS Onboarding Feature
Try this script in the Stick Style workflow on Atlabs. Each line break is a new scene.
Prompt 2: Classroom Explainer for Why Seasons Change
Run this in the same Stick Style workflow, and keep the narrator voice consistent if you plan a series of lessons.
Create Your Explainer on Atlabs →
FAQ
Do I need drawing or animation skills to make a whiteboard explainer?
No. In Stick Style the script drives everything, from the scenes to the characters to the narration, so you only write or paste the script and finalise the cast in Atlabs.
Can I use the AI Script Writer if I don't have a script yet?
Yes. The first step lets you paste your own script, use the AI Script Writer, or pick a suggested script, so you can start from just an idea.
How do I keep characters consistent across scenes?
Edit each character in the Cast step and write a detailed visual description covering appearance and clothing. More detail in the cast means more consistency in every scene, and you can reuse the same cast for future videos.
Can I check the video before generating all of it?
Yes. When you click Finalise Video you can choose a Storyboard of still images, a Preview Video of the first 25 seconds, or the Full Video, so you can review the scenes and style before committing to the full render.
Final Verdict
A whiteboard explainer works because it makes one idea easy to follow, and that is a script problem before it is an animation problem. With AI, the production work shrinks to three steps: write the script with one idea per paragraph, finalise a cast that stays consistent, and generate. Starting from the Storyboard or Preview keeps mistakes cheap, and the editing tools for captions, translation, and music cover the finishing touches. If your goal is a clear, repeatable whiteboard style video for training, teaching, or product education without hand animation, Stick Style on Atlabs is a fast way to get there.