Most teachers who hear the words AI video picture something complicated, something built for designers or developers with months to spend on a learning curve. The reality is different. If you can write a short paragraph describing what you want a narrator to say and what you want a character to do, you can produce an animated educational video on Atlabs. This guide is written for preschool and early years teachers who have never produced a video before, have no design or animation background, and want to understand what AI video is, how it works, and how to use the Atlabs platform to build their own classroom content. Every step is explained in plain language. No technical background required.
What Is an AI Video and How Does It Actually Work
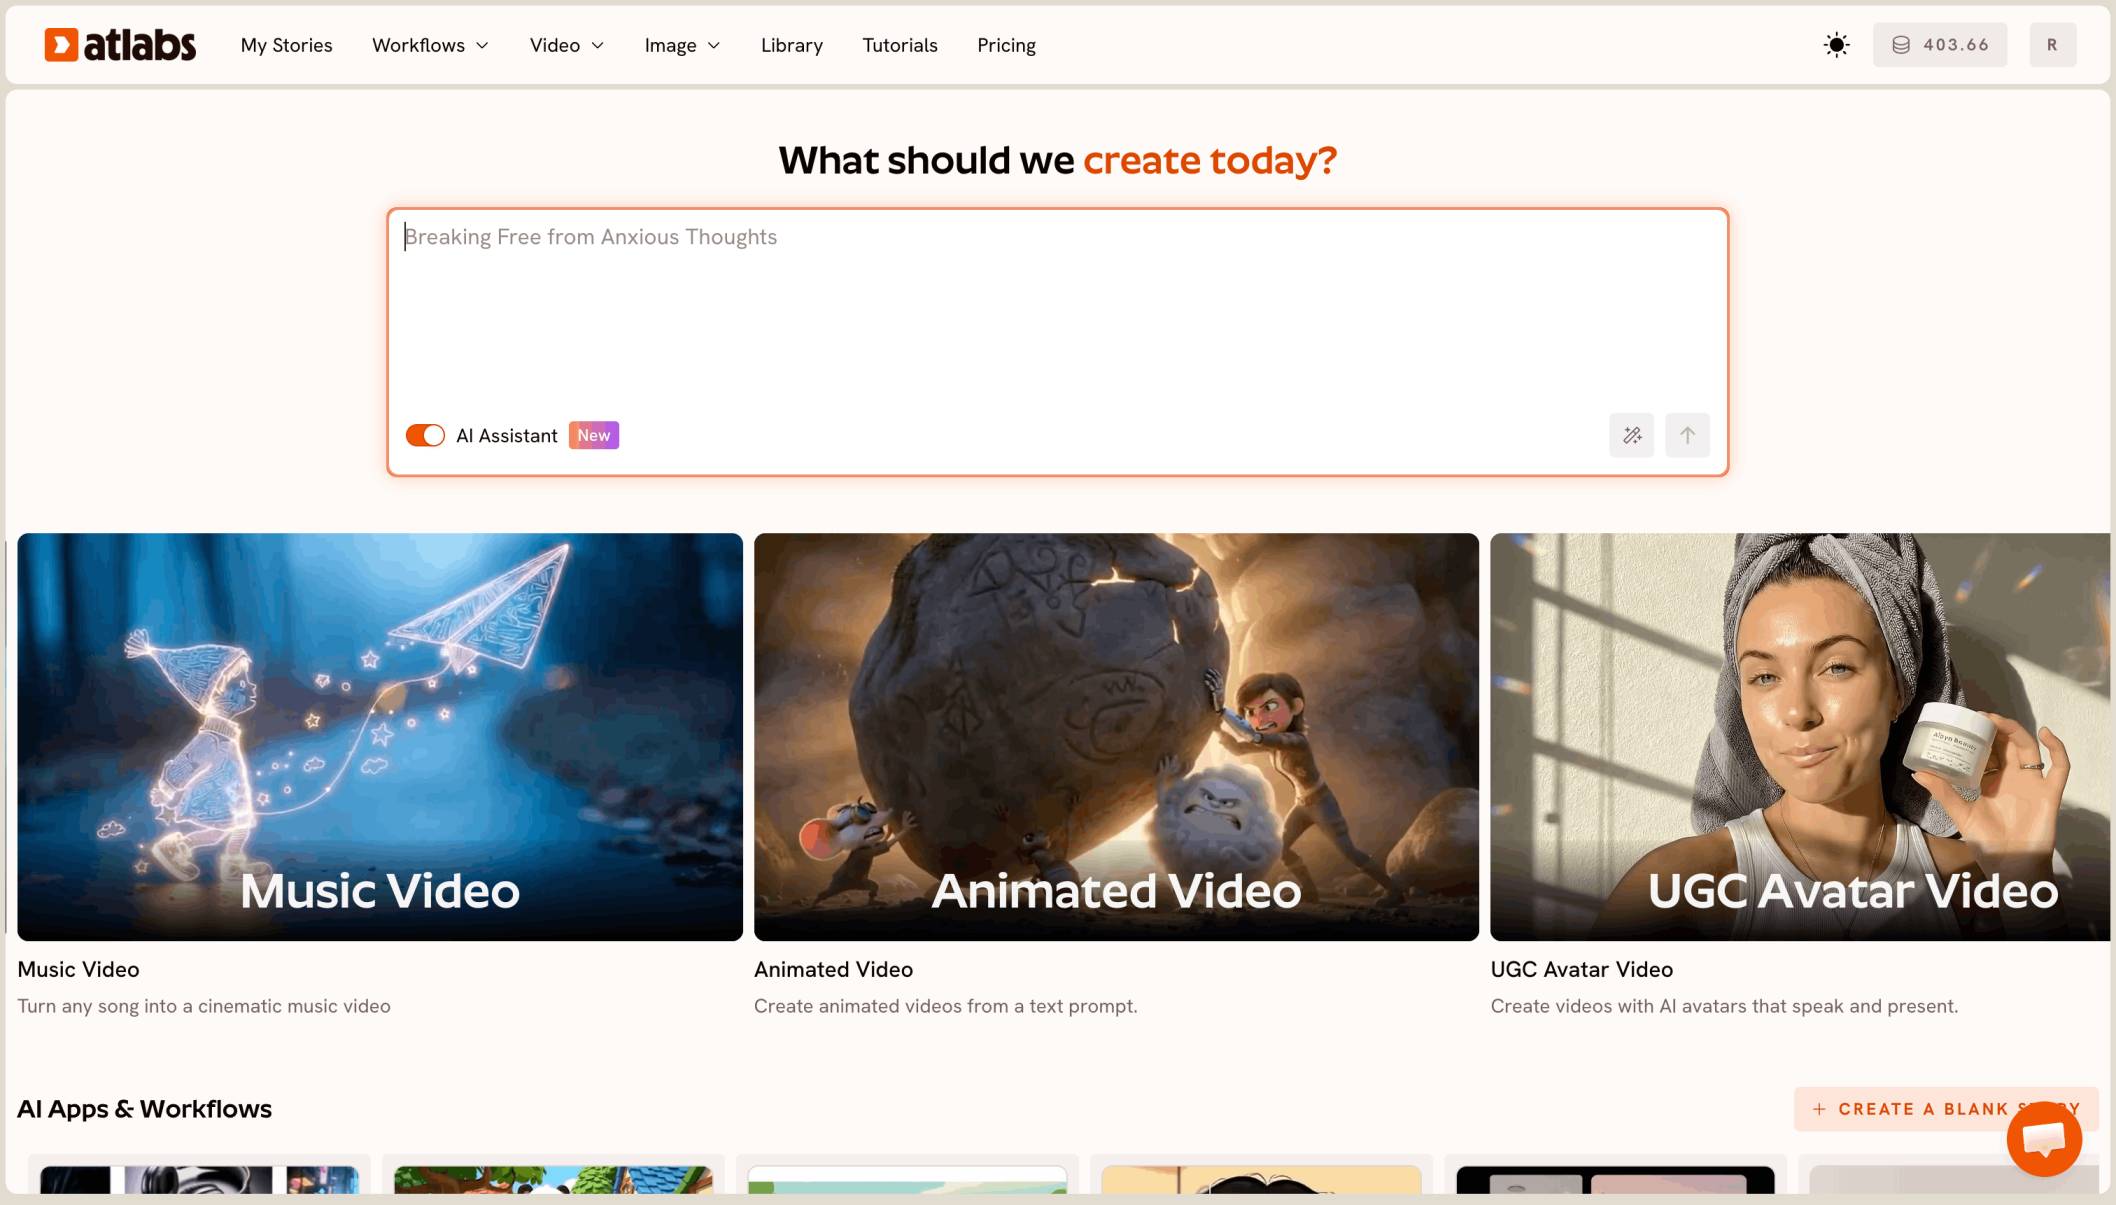
When most people hear the words AI-generated video, they picture something technical and expensive. They imagine artists drawing frame by frame, or a film production team replaced by a machine. The actual experience of generating an AI video on Atlabs is much simpler. You type words describing what you want. You choose from a visual style menu. You click Generate. The AI handles everything between your input and the finished video.
Here is what happens inside Atlabs when you click Generate. The platform reads the script you typed into the Script editor and uses it to determine what the narrator should say, what events should happen in each scene, and what the characters should be doing at each moment. It then draws on AI animation models to produce short animated video clips that match the scenes described in your script. Those clips are assembled into a sequence that follows your script from beginning to end. A narrator voice reads your script aloud over the footage. The result is a complete, watchable, downloadable animated video. No human animator was involved. No camera was used. No editing software was opened at any point. The entire video was produced from the words you typed.
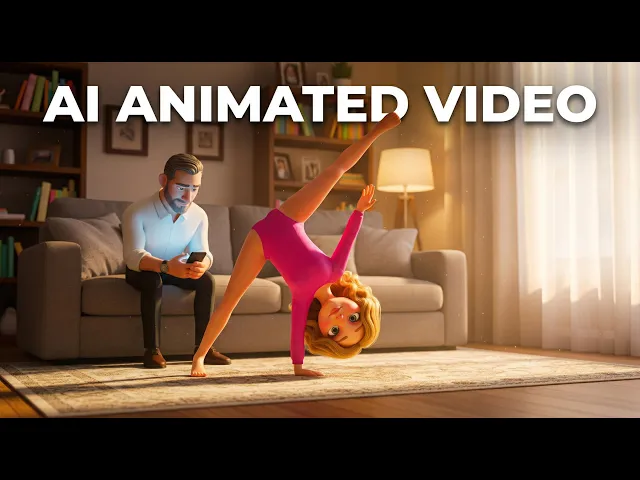
The output from an Atlabs generation is a real video file, not a slideshow with music over still images and not an illustrated PDF with a voiceover. The characters move, gesture, react, and exist within animated scenes that shift as the story progresses. The narrator speaks in a clear, human-sounding voice that follows the pacing of your script. For a preschool teacher, this means you can produce content that looks and functions like the animated educational videos children already watch at home or on classroom screens, and you can produce it in under ten minutes from your very first attempt.
Preschool content is one of the strongest use cases for AI video production for a specific reason: the videos are short, the concepts are concrete, and the scripts do not require complex narrative structure. A ninety-second video about the letter B with a bear character, two objects starting with B, and a narrator asking the child to repeat the letter is a complete and valuable piece of classroom content. Writing that script takes about two minutes. Generating it on Atlabs takes three to eight minutes. The total time from a blank screen to a finished downloadable video is under ten minutes. That is the production timeline for every content type covered in this guide.
What You See Inside Atlabs: A First Look
To begin, open atlabs.ai in any web browser on your computer, tablet, or phone. Click the Sign Up option and create an account using your school email address or your personal Google account. The signup process takes about ninety seconds. Once you are logged in, you arrive at the Atlabs dashboard. The main heading on the page reads 'What should we create today?' Below that heading is a section called Featured Workflows. This section contains the different types of video production available on the platform. For all preschool classroom content in this guide, click the workflow labelled Animated Video.
When you click Animated Video, a three-step workflow opens. At the top of the screen, a progress bar shows three labels: SCRIPT, SET STYLE, and CAST. These three steps are the only things standing between you and a finished animated video. The platform shows you exactly which step you are on at all times. Each step has one primary task. You complete it and move to the next. There are no hidden advanced settings to configure before starting and no technical decisions the platform does not guide you through. If you have ever filled out a step-by-step online form, you already know how to navigate this workflow.
The Atlabs Animated Video Workflow: What Each Step Does
The Animated Video workflow has three steps. Every video produced on Atlabs passes through these same three stages regardless of topic, visual style, or character count. Learning these steps once means you can produce any of the six content types covered in this guide without starting from zero each time.
Step 1: Add Your Script

The Script screen shows a plain text editor with two tabs at the top. The tab you will use for all preschool content is the first one, labelled 'Add your script.' This tab accepts plain paragraph text, the same kind you would type into a word processor or notes app. No special formatting is required. You type the words you want the narrator to speak, and you describe what you want to happen in each scene using the same natural language you would use to explain something to a colleague. The AI reads both the narration and the scene descriptions and generates visuals to match.
If you do not yet have a script written, which is the case for most first-time users, click the button labelled AI Script Writer at the bottom right of the screen. A text input box opens. Type a description of what you need in one or two sentences. For example: a 90-second preschool video introducing the letter B, with a friendly bear character named Bella, for children aged 3 to 5. Click the Generate button inside the Script Writer. Within a few seconds, the platform returns a complete starting script. Read through it, adjust one or two sentences if you want to change the tone or add a specific detail, and it is ready to use. Most teachers adjust the returned script lightly before proceeding to Step 2.
At the bottom left of the Script screen there is a Language selector set to English by default. If you teach in a multilingual classroom or want to produce content in a second language, click the Language selector and choose from the available options. The narrator delivers the entire video in that language. This feature makes Atlabs practical for bilingual preschool programs, international early years settings, and teachers who serve families whose home language differs from the classroom language. When your script is ready, click the button at the bottom right of the screen to advance to Step 2.
Step 2: Set Style

The Set Style screen controls how your video looks. The first setting is Aspect Ratio, which determines the shape of the video frame. For classroom use, choose 16:9. This is the standard wide horizontal format used by classroom projectors, desktop screens, laptops, and YouTube. The 9:16 vertical format is designed for tall phone screens and social media Stories. The 1:1 square format is used for WhatsApp parent groups and Facebook feeds.
The second setting is Video Style. There are three options: AI Video, AI Storyboard, and Upload. For animated classroom content, always choose AI Video. This option generates actual animated motion clips with characters in movement and scenes that change as the script progresses. AI Storyboard generates illustrated still images with light motion effects applied rather than true animation. Upload is for teachers who have already filmed or sourced footage they want to incorporate.
The third setting is the Visual Style library, and this is the most impactful choice on this screen. It determines the overall look and feel of your video. For preschool content, four styles consistently produce the best results. 3D Cartoon is warm, expressive, and versatile, working well across alphabet, counting, story time, and community helpers videos. Cozy Plush produces a soft, rounded, stuffed-animal aesthetic ideal for calming content and emotions videos. Flat 2D Modern creates a clean, uncluttered look suited to concept-focused videos like science and phonics where clarity matters more than character expressiveness. Soft Pastel 2D creates a gentle, watercolor-adjacent atmosphere best suited to nature topics and emotional content. The guide for each content type below tells you which style to select.
Step 3: Cast Your Characters and Narrator

Cast screen has three sections. The Narrator section at the top has two dropdown menus. The Country Accent dropdown sets the regional accent of the narrator voice. The default is United States, with United Kingdom, Australia, India, and other options available. The Narrator Voice dropdown presents specific voice options you can audition by clicking each name. For preschool content, choose the voice that sounds warmest, speaks most clearly, and moves at the slowest natural pace. Children aged two to five need more processing time between sentences than older learners. A narrator who rushes is the most common quality issue first-time Atlabs users encounter, and selecting a naturally slower voice in this step prevents it entirely.
The Characters section shows character cards that Atlabs generated automatically by reading through your script for named characters. Each card shows the character from multiple angles. Click any card to open the character editor and type a new description to adjust how the character looks. The more specific your description, the more consistently the character appears across all the scenes of your video. A description that includes color, size, and one or two distinctive features always produces a more recognizable character than a vague one. If a character you need did not appear in the auto-generated cards, click an empty slot to add them manually with a name and physical description.
The Objects section at the bottom is often skipped by first-time users but consistently improves visual consistency. If your script mentions a specific prop that appears in multiple scenes, such as a basket of apples, a counting jar, or a particular book, add a brief description of that object here. For example: a small round red apple, bright and shiny. This helps Atlabs produce the same version of the prop across every scene where it appears rather than generating a slightly different version each time. When the narrator, characters, and objects are set, click Generate. A ninety-second to two-minute video typically finishes in three to eight minutes.
Six Preschool Content Types and How to Build Each on Atlabs
Below are six of the most common preschool content types and a complete guide to building each one on Atlabs. Each guide explains what the video type is and what it teaches, why the animated format works particularly well for that specific content, exactly what settings to use in the Atlabs workflow, what to check after the video generates, and an example script ready to paste directly into Step 1 and use today.
1. Alphabet and Letter-Sound Videos
An alphabet video introduces one letter, demonstrates its sound, and connects that letter to two or three words children already know. Letter-sound knowledge is the entry point to reading, which makes this one of the most foundational content types in early years education. The animated format does something a flashcard or verbal explanation cannot do: it presents the letter symbol, demonstrates the sound through narration, and shows a character interacting with objects whose names start with that letter, all within the same ninety-second window. Seeing the letter B, hearing 'buh,' and watching a bear pick up a ball while the narrator says 'ball starts with B' creates three simultaneous inputs that reinforce each other. For children aged two to four, this kind of multi-channel repetition produces better letter retention than any single-channel method.
The most effective way to produce alphabet content on Atlabs is as a series of twenty-six individual videos, one per letter, all using the same character. A bear character who appears in every episode and greets children at the start creates a familiar routine that children in this age group respond to strongly. They learn to anticipate seeing the character, and that anticipation makes them more receptive to the new letter content. Plan all twenty-six episodes before producing the first one so the character name, description, and Visual Style are locked in from the beginning. This prevents the character from looking different across early and later episodes.
In Atlabs, open the Animated Video workflow and select 3D Cartoon as your Visual Style in Step 2. This style produces expressive character faces and warm, saturated colors that work well for alphabet content. In the AI Script Writer in Step 1, type: 'Write a 90-second preschool script introducing the letter B, with a friendly bear character named Bella who finds a ball and a butterfly, for children aged 3 to 5, asking the child to say the letter twice.' Adjust the letter and objects for each episode. In the Cast step, write your character description in full and save the exact text. Copy and paste it identically into every subsequent episode of the series.
When the video generates, the character appears in animated scenes alongside the letter and the objects described in your script. The letter typically appears as a large visual element on screen when the narrator names it. If the character does not look the way you intended, open the Cast step, add more specific physical detail to the description, and regenerate. A description that includes color, size, and one or two distinctive features always produces a more recognizable character than a vague one.
Hello, young learners! Today we are visiting the letter B. B says 'buh.' Meet Bella the Bear! Bella holds up a big brown Ball. Ball starts with B. Can you say B? B is for Ball! Now Bella finds a Butterfly. A beautiful blue Butterfly lands on Bella's nose! Butterfly starts with B too. Ball and Butterfly and Bella herself all begin with the letter B! Can you say B one more time? Wonderful! See you soon for the letter C!
2. Number and Counting Videos
Counting videos address one of the most common gaps in early numeracy: the difference between knowing number names and understanding what those names mean as quantities. A preschool child who can recite one through five has memorized a sequence of sounds. That is useful, but it is not yet numeracy. Numeracy begins when the child connects the word 'four' to the physical reality of four separate objects. Animated counting videos close this gap by showing the written numeral, counting out that many objects one at a time with a character, and inviting the child to count along out loud. Each count happens visually and verbally at the same time, which builds the numeral-to-quantity connection that verbal repetition alone does not reliably produce.
Produce one video per number for the range from one to ten. Each video should open with the narrator announcing the number and showing the numeral on screen. A character then counts out that many clearly separated objects, speaking each count aloud with audible enthusiasm. The count should pause between each number to give the child time to follow along. After the count, the narrator invites the child to hold up that many fingers and count along. The video closes with a recap of the number and the character celebrating. This structure takes about ninety seconds and covers all the essential learning beats for one number.
In Atlabs, choose 3D Cartoon as the Visual Style. A character who reacts with visible excitement each time a new object appears in the count adds emotional quality that makes counting feel exciting rather than mechanical. Children respond to this kind of expressive character animation positively and are more likely to count along. In the AI Script Writer, type: 'Write a 90-second preschool counting script for the number 4, with a panda character named Pip who counts four bamboo shoots one at a time and invites the child to hold up four fingers and count along, for children aged 3 to 5.' Change the number and object for each episode. In the Cast step, enter Pip's full description and save the exact text for reuse across all ten episodes.
After generation, check that the numeral appears clearly on screen when the narrator first says the number, and that the counted objects are visually distinct from one another so the child can see each individual item. If the objects appear crowded or overlapping, add the word separate to the script description of the counting scene: Pip places four separate bamboo shoots in a row on the ground. This simple addition consistently produces more visually clear counting scenes on regeneration.
Hello, young counters! Today we are meeting the number four! Four! Pip the Panda is collecting bamboo shoots. Watch Pip count them carefully. One bamboo shoot... two bamboo shoots... three bamboo shoots... four bamboo shoots! Pip has four! Can you hold up four fingers with me? One, two, three, four! You did it! Four is a wonderful number and Pip says thank you for counting today!
3. Nursery Rhyme and Song Videos
Nursery rhyme videos sit at the intersection of language learning, memory development, and the kind of enjoyment that makes children ask to watch the same thing again. Children aged two to five have a natural affinity for rhyme and rhythm. These patterns are not decorative: rhyme and rhythm provide structure that makes language easier to hold in memory. A child who knows twenty nursery rhymes has internalized a large number of phonological patterns, word-sound associations, and vocabulary items in a form that feels entirely like play. Animated nursery rhyme videos extend this learning by adding a visual layer. Children see the events of the rhyme acted out at the same moment they hear the words, which connects abstract language to concrete images and deepens both comprehension and the speed of memorization.
The structure for a nursery rhyme script on Atlabs is different from a concept video. Instead of writing fresh narration, paste the rhyme text itself directly into the Script editor and add short scene descriptions in parentheses after each couplet to guide the AI in generating the correct visuals. For the line 'Jack and Jill went up the hill,' you add in parentheses: '(Jack and Jill are two small round children, Jack in blue overalls and Jill in a yellow dress, climbing a steep green hill together with a wooden bucket).' These descriptions are not read aloud by the narrator. They are read only by the AI to determine what to show on screen. The more specific your visual descriptions, the more accurately the generated scenes match the familiar imagery of the rhyme.
In Atlabs, choose Soft Pastel 2D for a classic illustrated-book aesthetic that feels timeless and familiar. This style suits the traditional imagery of nursery rhymes well. If you prefer a more energetic feel for a livelier rhyme, 3D Cartoon is the alternative. In the AI Script Writer, type: 'Write a 60-second animated preschool video script for the nursery rhyme Hickory Dickory Dock, with scene descriptions in parentheses after each line showing a small brown mouse climbing and descending a grandfather clock, for children aged 2 to 4.' In the Cast step, name and describe each character from the rhyme and make them visually distinct from one another so children can tell them apart on screen.
When the video generates, play it through and check that the visual events match the rhyme narrative in sequence. The most common adjustment needed for nursery rhyme videos is to character designs when multiple characters appear in the same scene and look too similar. If two characters are hard to distinguish, return to the Cast step and make their descriptions more distinct: different heights, different hair colors, clearly different clothing. Then regenerate.
Hickory, dickory, dock. A small brown mouse scurries across the floor and begins to climb a tall grandfather clock standing against the wall. The mouse runs up, up, up the side of the clock. The clock strikes one! Bong! The clock face shows the hour hand pointing straight up. The mouse, startled by the loud sound, runs back down the clock as fast as its tiny legs will carry it. Hickory, dickory, dock. The mouse is safe at the bottom, whiskers twitching, ready to try again.
4. Story Time and Narrative Videos
Story time videos are different from concept videos in one fundamental way: they develop sustained attention rather than a single piece of knowledge. A counting video teaches the number four. A story video teaches a child how to follow a narrative, understand what a character is feeling, predict what might happen next, and absorb a gentle takeaway. These are the foundational skills of reading comprehension, and they begin developing in the preschool years through repeated exposure to stories in any format. Story time videos also introduce vocabulary naturally through context, which is the most durable way for young children to absorb new words. A child who hears the word enormous while watching an elephant fill the entire screen absorbs its meaning in a way that a vocabulary list cannot replicate.
The structure for a preschool story video has three parts. The opening introduces the main character and their world in two to three sentences: who they are, where they live, and one defining trait. The middle presents one problem the character faces across two or three scenes. The resolution shows how the character responds and what happens as a result, ending with a gentle observation from the narrator. For children aged four to five, keep the total runtime to two to two-and-a-half minutes. Keep every sentence in the script under twelve words so the narrator stays clear and the child can follow along without losing the thread.
In Atlabs, choose 3D Cartoon as the Visual Style for expressive character animation. In story content, the emotion on a character's face carries as much narrative information as the words being spoken. A character who visibly droops when sad, brightens when happy, or looks uncertain when facing a problem communicates emotional information to children who are still building the vocabulary to name those feelings. In the AI Script Writer, type: 'Write a 2-minute preschool story about Mia, a young elephant who feels left out because she has not learned to use her trunk, and who discovers her own ability when a small bird needs help only she can give. Gentle moral: everyone has something valuable to offer. For children aged 4 to 5.' In the Cast step, define the main character and one supporting character and save both descriptions to reuse across a story series.
When the video generates, watch it through and check that the emotional arc is visible in the character animation. If the character appears to look the same whether they are sad, happy, or nervous, add specific physical cues to the character description in the Cast step: 'Mia has large expressive eyes and ears that droop when she is sad and perk upward when she is happy or excited.' Emotional description in the Cast step directly shapes the quality of the character animation in the generated output.
Mia the little elephant had never learned to use her trunk. While her friends splashed water and carried things, Mia watched sadly from a mango tree. One afternoon a small sparrow fell from its nest high above. None of her friends could reach high enough. But Mia stretched her long trunk slowly upward, all the way to the nest, and lifted the tiny sparrow to safety. The sparrow chirped happily. From that day on, Mia never felt behind again.
5. Social-Emotional Learning Videos
Social-emotional learning covers skills that preschool teachers work on every single school day: naming feelings, understanding what causes them, responding to them in ways that do not harm yourself or others, navigating conflict, taking turns, and building friendships. Animated video is particularly effective for this content type because of how young children learn from watching others. A child who watches a character feel sad, name the feeling out loud, take a breath, and then try one specific response has seen a complete emotional process modeled at a safe observational distance. They did not have to be in the uncomfortable situation themselves. They observed it, processed it, and absorbed the model. This kind of observational learning is one of the primary mechanisms through which children in the preschool years develop social and emotional competence.
Produce one video per emotion or one per social scenario. For emotions, start with the foundational set: happy, sad, angry, scared, excited, proud, lonely, and worried. For social scenarios, cover the situations children encounter most in early years settings: not being included in a game, making a mistake in front of others, waiting when they want to go now, and sharing something they do not want to share. Each video should name the emotion or situation clearly, show a character experiencing it in a setting children recognize, demonstrate one simple age-appropriate response, and close with a statement from the narrator that normalizes the feeling.
In Atlabs, choose Cozy Plush or Soft Pastel 2D as the Visual Style. These styles create a visually warm and gentle atmosphere that is important for emotional content. High-contrast or energetic styles can work for positive emotions like excitement and pride, but for vulnerability-adjacent emotions like sadness, loneliness, or fear, a softer visual environment reduces sensory intensity and makes the content more accessible to young children. In the AI Script Writer, type: 'Write a 90-second preschool script where a small rabbit character named Leo feels left out when his friends are already playing without him, names the feeling aloud, takes a deep breath, and asks if he can join next time. Affirming closing message. For children aged 3 to 5.' In the Cast step, choose the warmest narrator voice available and add two characters: the main character and the friend.
When the video generates, pay attention to the body language of the character in the emotional scenes. Cozy Plush and Soft Pastel 2D characters convey emotion through physical cues: head position, posture, and proximity to other characters. If the character does not appear visibly sad or downcast in the key scene, add specific physical description to the script at that point: 'Leo's ears droop and he looks down at the ground.' Physical description written into the script text influences what the AI generates in the corresponding scene more reliably than any other adjustment available to first-time users.
Today we are talking about feeling left out. Leo the small rabbit wants to play with his friends. But when he runs over, they are already playing and say there is no room. Leo feels sad. His ears droop and his tummy feels heavy. That feeling is called being left out, and everyone feels it sometimes. Leo takes one big deep breath in... and one big deep breath out. Then Leo says quietly: Can I watch and join next time? His friends smile and say yes. Asking for what you need is always worth trying.
6. Science Exploration Videos
Science exploration videos for preschool answer questions children in this age group ask naturally and repeatedly: Why does it rain? What happens to a caterpillar? Why does the sun go down? Where do seeds come from? These questions are the beginning of scientific thinking, and the preschool years are the right time to honor them with clear, concrete answers that build accurate mental models without oversimplification. Animated video suits this content type because it can show things that a classroom environment cannot. A child can watch rain forming inside a cloud. They can watch a seed sprouting underground. They can see autumn color fading from a leaf in real time. These visual experiences extend science learning beyond what any classroom, picture book, or verbal explanation alone can provide.
The structure for a preschool science video is question, answer, character experience, and summary. Open with a question the child might ask, stated in natural child-level language: Why do leaves change color? Answer the question in three to four concrete sentences that avoid abstract scientific vocabulary. Include a character who experiences or observes the phenomenon directly, which grounds the information in a narrative the child can follow. Close with one sentence delivered slowly by the narrator that the child is invited to repeat aloud, giving them language to carry the concept into conversation.
In Atlabs, choose Flat 2D Modern for science videos about a process or sequence of events, such as the water cycle, plant growth, or seasonal change. This style keeps visual information clear and uncluttered, which is important when the sequence of steps is the content itself. Choose Soft Pastel 2D for nature-based science videos that are more observational, where the atmosphere of the environment contributes to the sense of wonder. In the AI Script Writer, type: 'Write a 90-second preschool science video answering the question Why do leaves change color in autumn, using a character named Zara who is a leaf experiencing the color change herself. Concrete language only, no scientific terminology, for children aged 3 to 5.' In the Cast step, consider making the natural subject itself a speaking character. A leaf who narrates her own seasonal change, a raindrop who describes falling from a cloud, or a seed who explains sprouting from underground produces more engaging output than a neutral outside observer.
When the video generates, check that the sequence of events in the science process is visually distinct and in the correct order. For process-based content the visual transitions between stages should be clear enough for a three-year-old to follow. If stages appear blurred together or in the wrong sequence, add explicit time-sequence words to the script at the start of each stage: First the seed absorbs water from the soil. Then the root pushes downward. Next a green shoot pushes up through the dirt. These sequencing words guide the AI in generating scenes that follow the correct order.
Why do leaves change color in autumn? Zara the leaf has been green and happy all through summer, soaking up sunshine every day. But when the days grow shorter and cooler, the tree stores its energy deep inside its roots. Zara stops receiving the green color called chlorophyll. Slowly her green fades and a beautiful orange appears. Then red. Then gold. Zara floats gently down to the ground, landing in a soft pile with her friends. The tree is resting now, saving strength for spring. And Zara becomes food for the soil below.
After Your Video Generates: What to Do Next
When your video finishes generating, it appears in the Atlabs interface ready to play. Watch it through from beginning to end before downloading. Check four things: that the narrator pacing is appropriate and does not rush between sentences; that the character matches the description you entered in the Cast step closely enough to be recognizable; that the visual scenes match the events described in your script; and that the overall tone and color palette feel appropriate for the content type. If any of these elements need adjustment, go back to the relevant step and make the change. If the narrator is too fast, add three-dot pause marks at natural breath points in the script and regenerate. If the character looks wrong, update the Cast step description with more specific physical detail and regenerate. Each regeneration takes the same three to eight minutes as the original.
When you are satisfied with the output, download the video file. Atlabs produces a standard video file format that plays on any device and uploads to any classroom platform, school channel, learning management system, or parent communication app. Before sharing the video with children, consider using the Caption Video feature. This adds on-screen text captions that appear in real time as the narrator speaks. For preschool content shown to children who are beginning to recognize written words, captions add a reading layer that supports early literacy development at no extra production effort on your part.
Tips for Getting Better Results on Atlabs
Before generating a full video, paste one scene from your script into the Script editor, select your Visual Style, and generate a short preview. This gives you a look at the narrator voice, character appearance, and visual rendering before committing to a full generation. If the narrator sounds wrong or the character looks different from what you intended, you can make adjustments at this stage in seconds rather than waiting for a full regeneration.
If the narrator sounds too fast for the age group you are targeting, add three-dot pause marks (...) at natural breath points in the script text. The Atlabs narrator reads these as brief pauses and slows the overall delivery without requiring any change to the word count or structure. This is the most reliable pacing adjustment available within the workflow and consistently produces better results for preschool content than searching for a different narrator voice after the fact.
When building a series using the same character, save the complete character name and visual description you entered in the Cast step after your first generation. Store it in a document alongside your episode list. Copy and paste this exact text into the Characters section for every episode you produce. Even small differences in how the description is worded from one episode to the next produce visible differences in how the character looks. Exact text repetition is the mechanism that produces visual consistency across a series.
Use the Objects section in the Cast step for any prop that appears in multiple scenes within a single video. If your counting video features a basket of apples throughout, add a description: a small woven basket filled with bright red apples. Without this, the same object may render differently from scene to scene. With it, Atlabs produces a consistent version of the prop throughout the entire video.
Watch the Atlabs Tutorial Before You Start
Watch the Full Tutorial on YouTube
Frequently Asked Questions
I have never used AI software before. Will I be able to use Atlabs without any training?
Yes. The Atlabs Animated Video workflow is designed for users with no prior AI, design, or video production experience. Each of the three steps is explained on screen as you complete it. The AI Script Writer in Step 1 generates a complete preschool script from a one-sentence description, which means you do not need to arrive at the platform with a finished script already written. Most first-time users produce their first complete animated video within thirty minutes of creating their account.
Which Visual Style should I choose for my first video on Atlabs?
Start with 3D Cartoon for your first video. It is the most versatile style on the platform and produces good results across all six content types covered in this guide. Once you have generated one video in 3D Cartoon and seen how the workflow moves from script to finished output, you will have enough context to try Cozy Plush for calming and emotional content, Flat 2D Modern for science and phonics, and Soft Pastel 2D for nature content, with a clear understanding of what each style produces.
How do I make the same character appear consistently in every episode of a series?
In the Cast step, give your character a specific name and a detailed visual description. After generating your first episode, copy the exact text of that description into a document. For every subsequent episode in the series, paste that identical text into the Characters section of the Cast step. The platform generates the character based on the description provided each time. Identical descriptions produce the most visually consistent results. Even minor rewording of the description will produce small visible differences in the character from one episode to the next.
Can I produce preschool videos in languages other than English on Atlabs?
Yes. The Language selector in Step 1 of the Animated Video workflow switches the narration language for the entire video. The Country Accent dropdown in Step 3 sets the accent of the narrator voice. Together, these two controls let you produce preschool content in a wide range of languages and accents. This makes Atlabs practical for bilingual preschool programs, multilingual family settings, international early years schools, and teachers who serve communities where English is not the primary home language.
What video length works best for different preschool age groups?
Children aged two to three absorb content best in videos under ninety seconds with one concept and one main character. Children aged four to five engage well with ninety seconds to two and a half minutes covering two to three connected ideas. Children aged five to six can follow narrative content up to four minutes. As a starting point, aim for ninety seconds regardless of the age group. A well-structured ninety-second video covering one specific concept almost always produces better learning outcomes than a longer video that covers multiple concepts in sequence.
Start Creating
The Atlabs Animated Video workflow handles the production. You bring the script and the knowledge of what your students need to learn. Every example script in this guide can be pasted into Step 1 of the Atlabs workflow today and will produce a complete animated video ready for your classroom.