Appearing in a music video used to require a director, a production crew, a shooting day, and a budget that most independent artists and creators could not justify. That barrier is gone. AI video tools have made it possible for anyone to cast themselves as a character in a music video, whether that means building an original video from scratch around their own track, or placing themselves inside the world of a video that already exists. Both paths are real, and both are achievable in a single session using Atlabs.
This guide covers both. If you have a song and want to build an original AI music video where you are the star, Path A is for you. If there is a specific famous music video whose aesthetic and performance energy you want to inhabit, Path B takes you there using motion transfer and lip sync. You do not have to choose one or the other before you start. Read through both and decide which fits what you are trying to make.
Why Creators Want to Be in Music Videos
The connection between a musician's face and their music is one of the most powerful signals of artist identity. Audiences who can picture the person behind a track form stronger associations with the music, follow more consistently, and share more broadly. For independent musicians, this used to mean either paying for a production shoot or settling for lyric videos and static artwork. Neither option gave them the character-driven, narrative visual content that streaming platforms and short-form video now reward.
For content creators who are not musicians, the appeal is different. Placing yourself inside the visual world of a famous music video is a format that drives strong engagement because it combines the familiarity of a recognisable piece of culture with the novelty of your own presence inside it. The viewer is watching two things at once: the reference they already know and the new character who has entered it.
For marketers building artist or brand personas, both paths matter depending on the brief. An original AI music video establishes a visual identity from zero. Casting a persona inside an existing video's aesthetic borrows the cultural weight of that reference to accelerate recognition. Atlabs handles both with distinct but complementary workflows.
Path A: Build Your Own AI Music Video with Yourself as the Star
Use this path when you have a track and want to create a fully original music video where a character representing you appears across every scene. The output is something you own entirely, built from your audio, your creative direction, and your character definition.
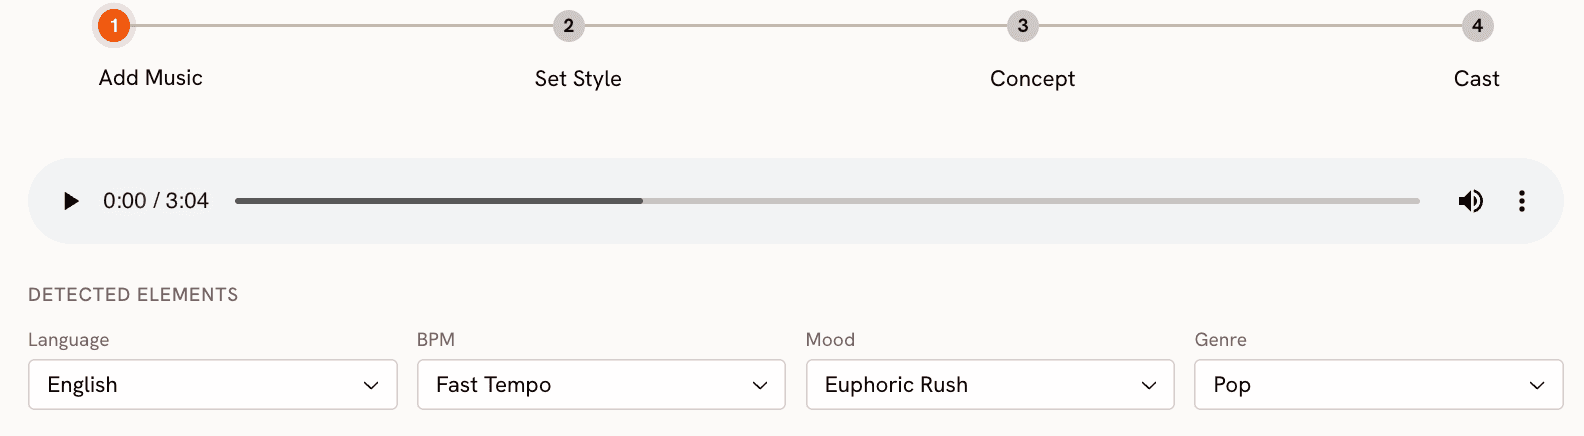
Step 1: Add Your Music
Go to the Music Video workflow at app.atlabs.ai/new-music and upload your track. Atlabs auto-detects Language, BPM, Mood, and Genre from the audio. Review each field and adjust if the detection does not match what you intended. The BPM options are Slow Tempo, Mid Tempo, Fast Tempo, and Very Fast Tempo. Mood options include Reflective Calm, Uplifting, Romantic, Nostalgic, Euphoric, Mysterious, Dark, and more. Genre covers Hip Hop, Pop, R&B, Electronic, Rock, Folk, Latin, Afrobeats, and others.
These values are not cosmetic labels. They feed directly into the Creative Direction step, where Atlabs generates scene concepts that fit your track's specific energy. A track tagged as Melancholic Mid Tempo Folk will produce completely different scene concepts than one tagged as Euphoric Fast Tempo Electronic. Getting the mood and genre right here determines whether the generated video feels like it belongs to your music.
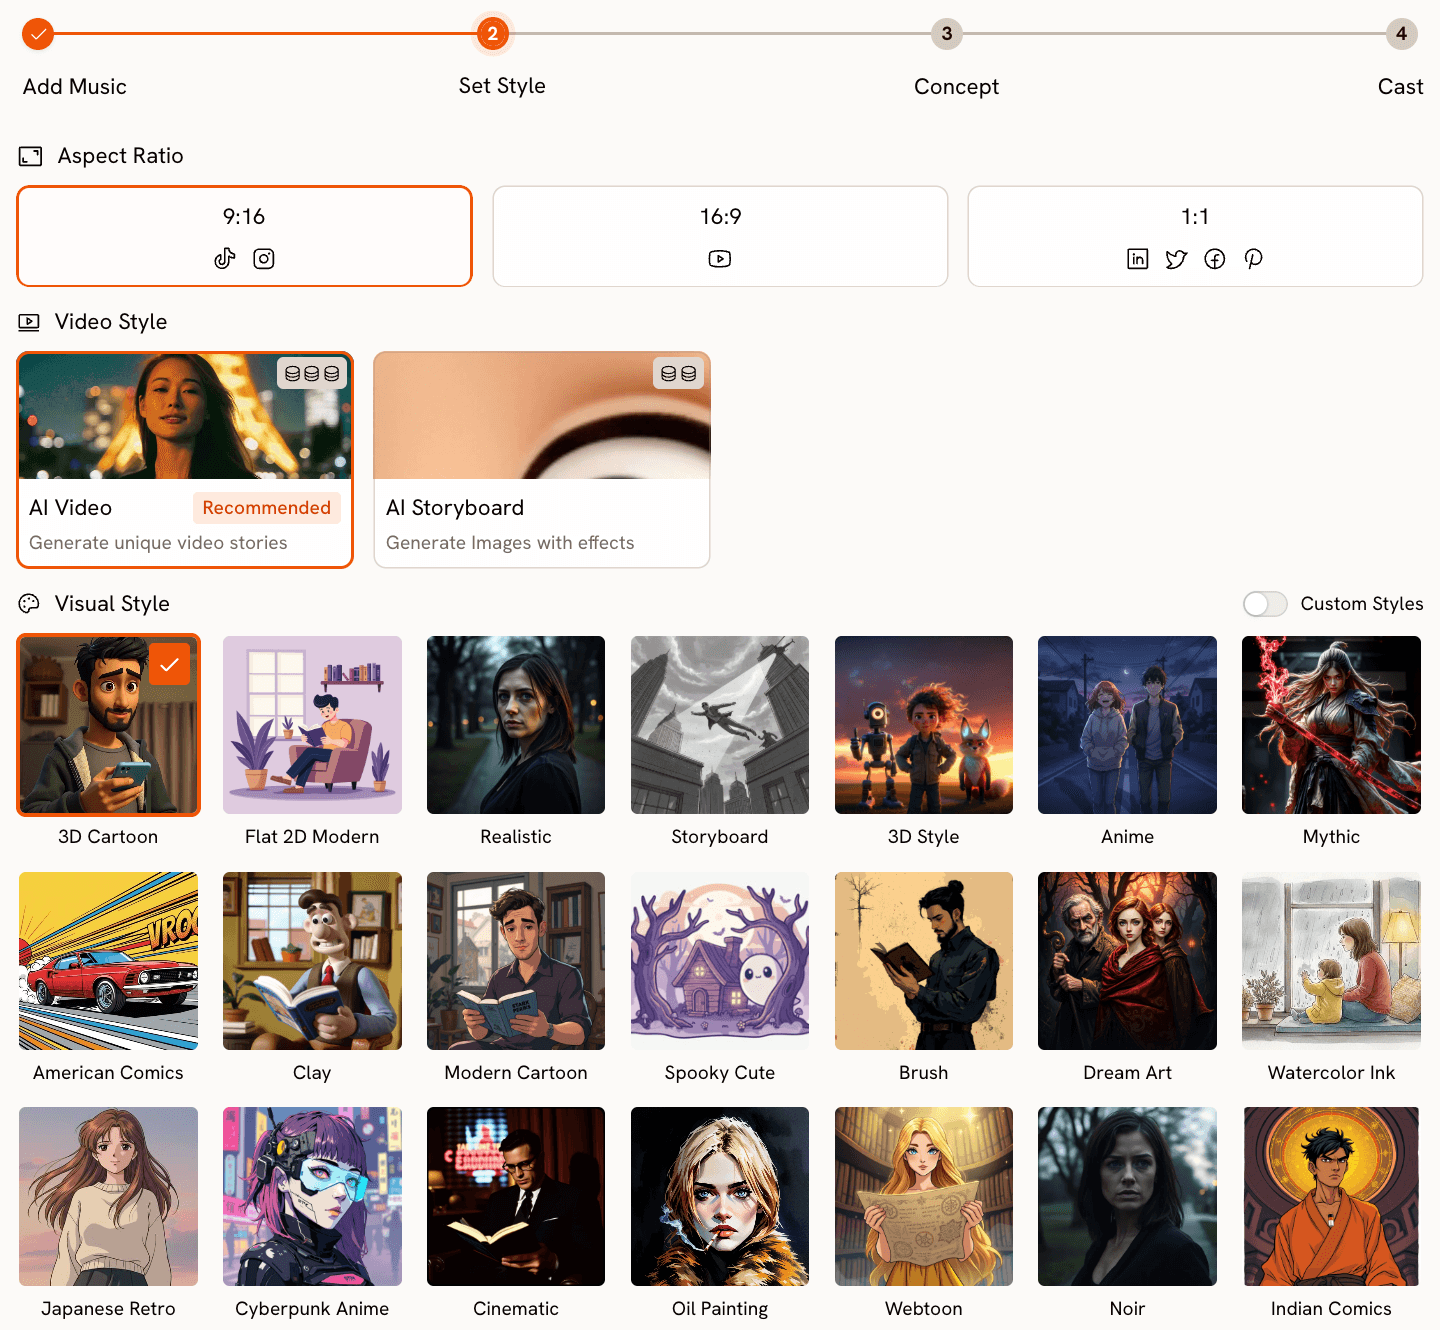
Step 2: Set Your Visual Style
Choose your Aspect Ratio based on where the video will live. 9:16 for TikTok and Instagram Reels, 16:9 for YouTube, and 1:1 for LinkedIn and Twitter. Set Video Style to AI Video, the recommended option, which generates scenes with real motion and narrative progression rather than static images with effects.
The Visual Style library is where you define how you will appear in the video. Realistic and Semi-Realism produce the most accurate visual representation of a character's described features, keeping your likeness recognisable rather than stylised. Cinematic gives you a filmic, high-production-value look. Anime, Cyberpunk Anime, Watercolor Ink, Oil Painting, Vintage Cinema, and Noir each place your character inside a distinct aesthetic world. The library has more than twenty options. Choose based on the genre and mood of your track.
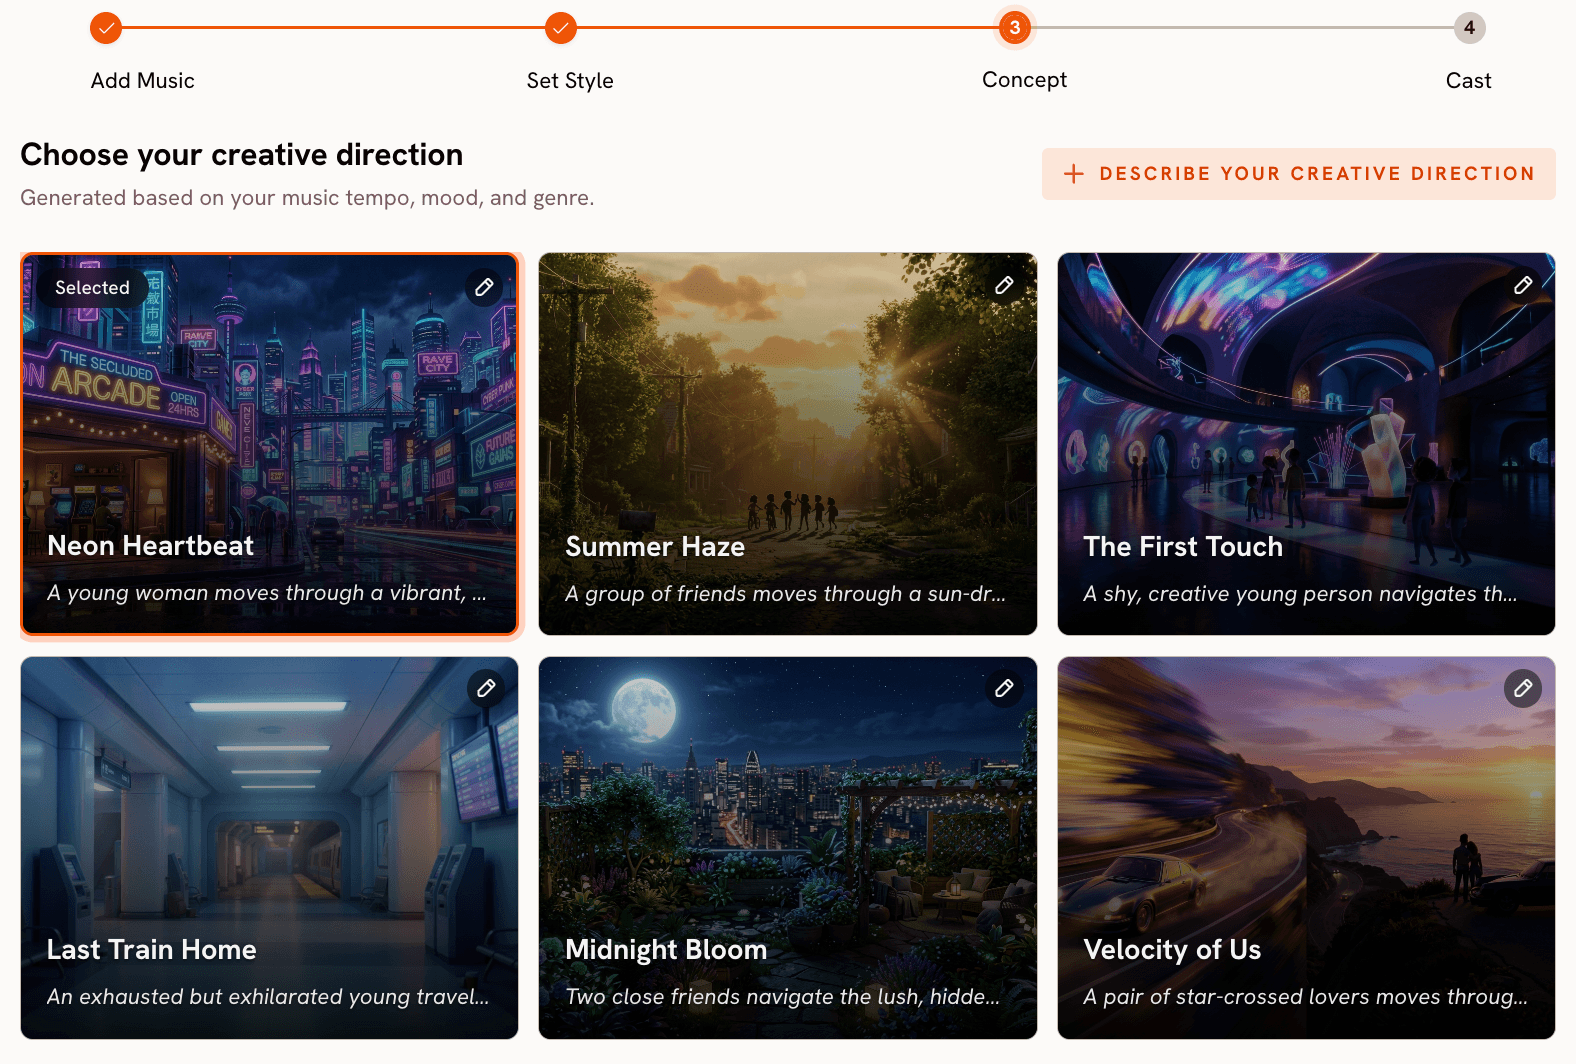
Step 3: Set Your Creative Direction
Atlabs generates six scene concepts automatically from your track's detected properties. Each concept has a title, description, and mood tags. Browse all six and select the one that fits the world you want the video to inhabit.
If you want something more specific, click "Describe your Creative Direction" to open the custom concept form. Write a title, a description of the visual world and narrative, your mood tags, and additional moods. The Enhance toggle applies AI refinement to your description before generation. This is the step where you define the environment, atmosphere, and story your character will move through.
Step 4: Cast Yourself in the Finalise Cast Step
Open the Music Video workflow at https://app.atlabs.ai/new-music
The Finalise Cast step is where you place yourself in the video. Name the first character after yourself and write a detailed description of your appearance. Include hair type and color, skin tone, face shape, build, typical clothing style, and any distinctive features or accessories. The more specific the description, the more consistently your character appears across every scene Atlabs generates.
Multiple characters are supported. If you want other people or figures in the video alongside you, add them here with their own names and descriptions. Each character is independently editable before you generate.
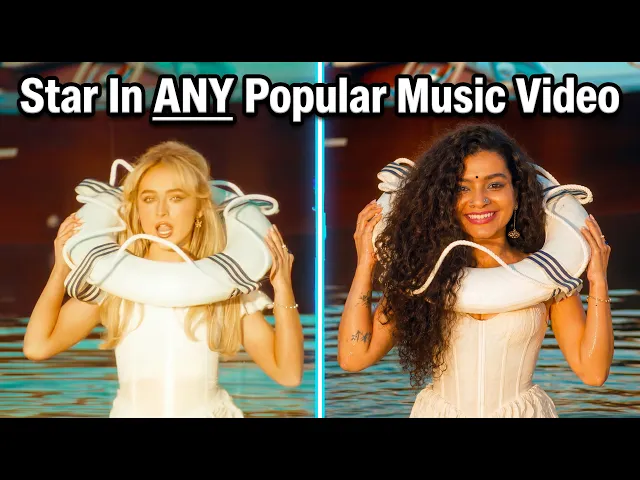
Here is a sample of a K-Pop video made exclusively through Atlabs -
Path B: Cast Yourself into an Existing Music Video
Use this path when there is a specific music video, with a particular performance, aesthetic, or scene, that you want to place yourself inside. The output inherits the movement and energy of the original while replacing the performer with a character of your choosing.
Step 1: Choose Your Scene and Prepare the Reference Clip
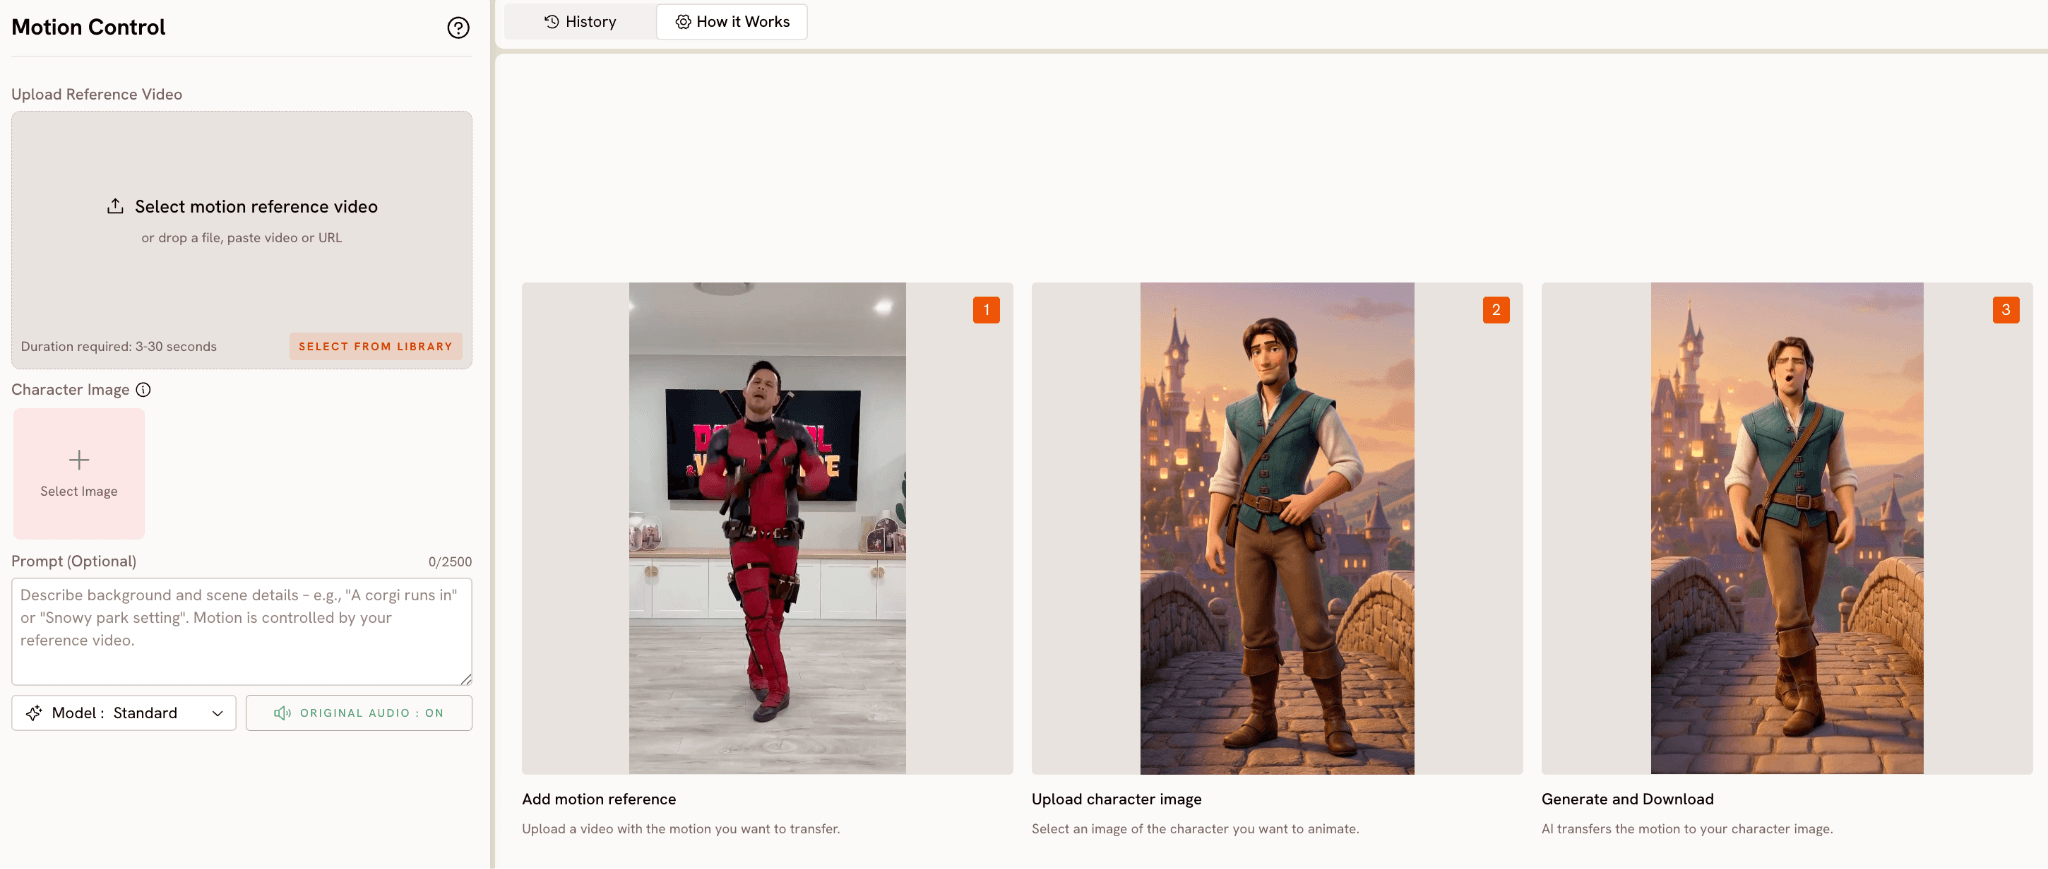
The core tool for this path is Motion Control at app.atlabs.ai/motion-control. It accepts a reference video clip between 3 and 30 seconds and transfers the movement from that clip onto a character image you provide. Choose a specific moment from the target music video: a signature dance sequence, a performance stance, a walk, or a camera-facing delivery.
Download or screen-record the clip at the highest quality available. A clear, well-lit segment with deliberate movement and minimal rapid cuts gives Motion Control the cleanest motion data to work from. The quality of your reference directly determines the accuracy of the motion transfer.
Step 2: Prepare Your Character Image
You need a single image of the character you want to cast into the scene. This can be a photo of yourself, an AI-generated image, or any front-facing image that clearly shows the subject from roughly waist up or full body. Good lighting and a clear separation between subject and background produce the best results. The motion transfer has more surface to work with when the character is well-defined and unobstructed.
Step 3: Run Motion Control with a Scene Prompt
Upload your reference clip into the Reference Video field in Motion Control. Upload your character image into the Character Image field. The optional Prompt field, which accepts up to 2500 characters, controls the background and environment of the output scene. The motion itself comes entirely from the reference clip and is not influenced by the prompt. Use the prompt to describe the setting: the location, lighting, time of day, and atmosphere you want your character to perform inside.
If the original video's setting is part of what you want to recreate, describe it in the prompt. If you want to transplant the same movement into a different environment entirely, describe that instead. Set Original Audio to OFF if you plan to add the song audio through Lip Sync afterward.
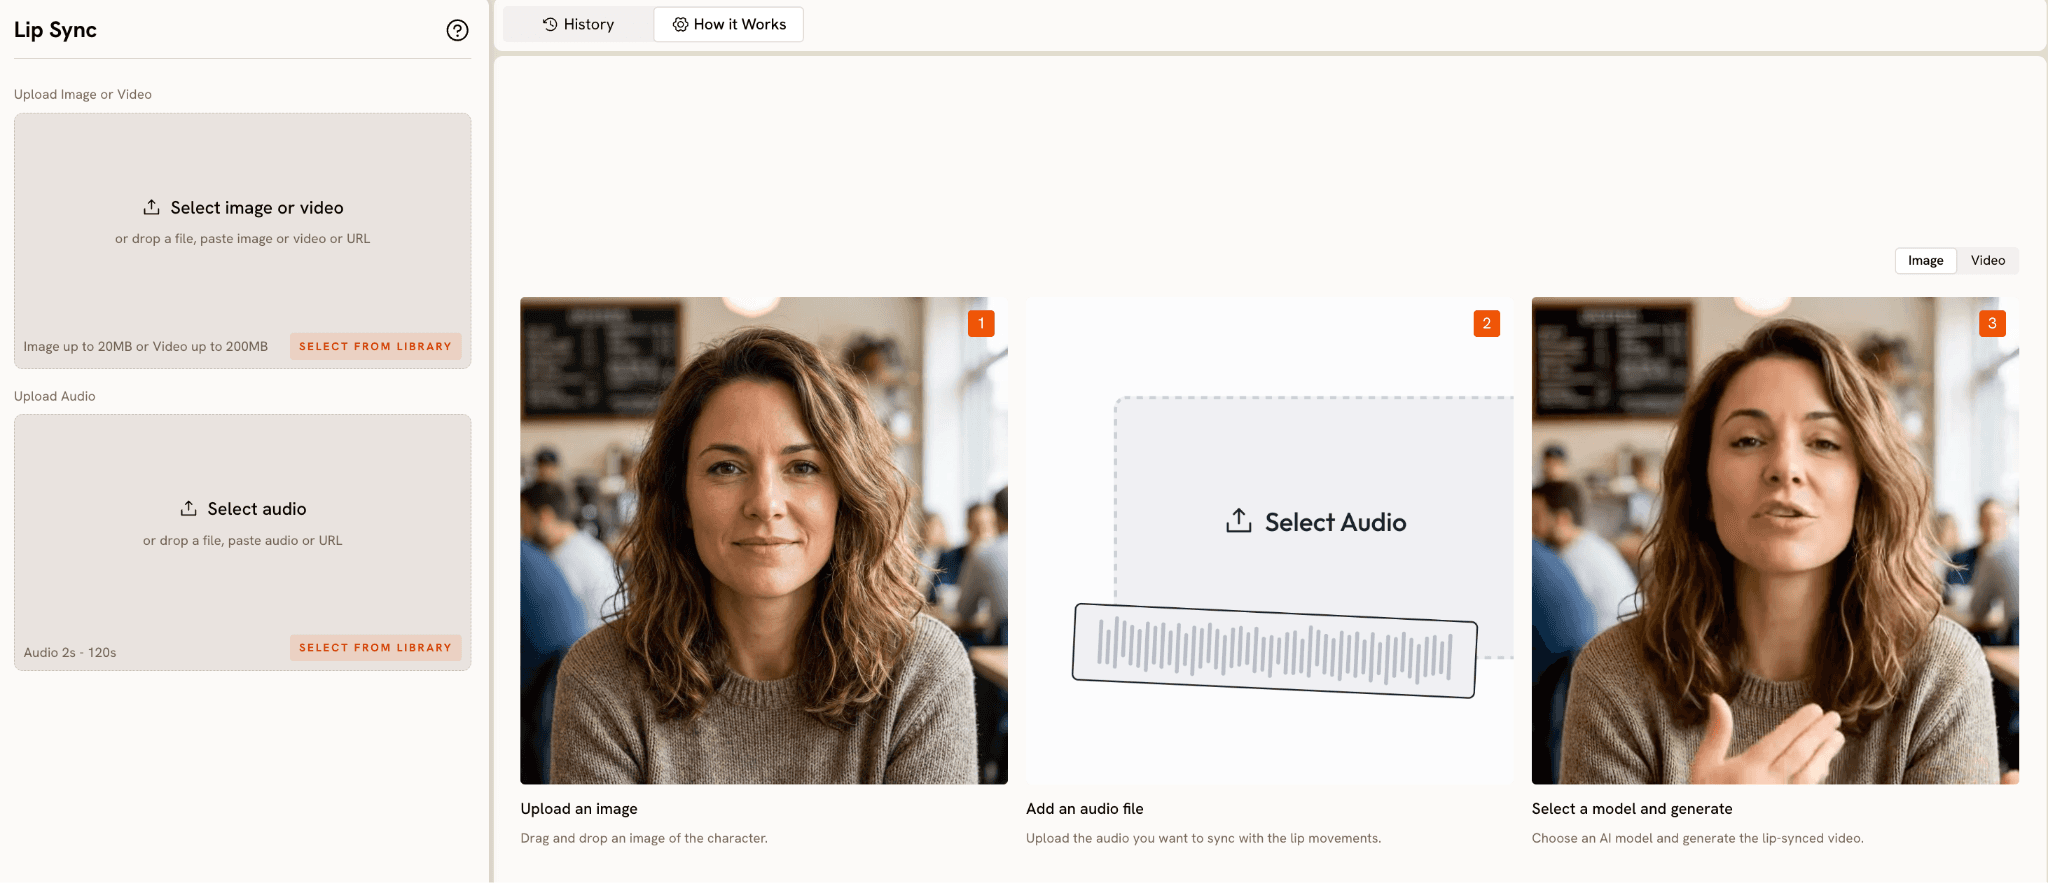
Step 4: Add the Song with Lip Sync
Take the Motion Control output into Lip Sync at app.atlabs.ai/lip-sync. Upload the video as the image or video input and upload the original track audio as the audio input. Lip Sync accepts video up to 200MB and audio between 2 and 120 seconds. Atlabs maps the vocal track to the character lips and outputs a synchronised video where your character appears to be delivering the actual vocal performance.
Step 5: Match the Visual Style with Modify Video (Optional)
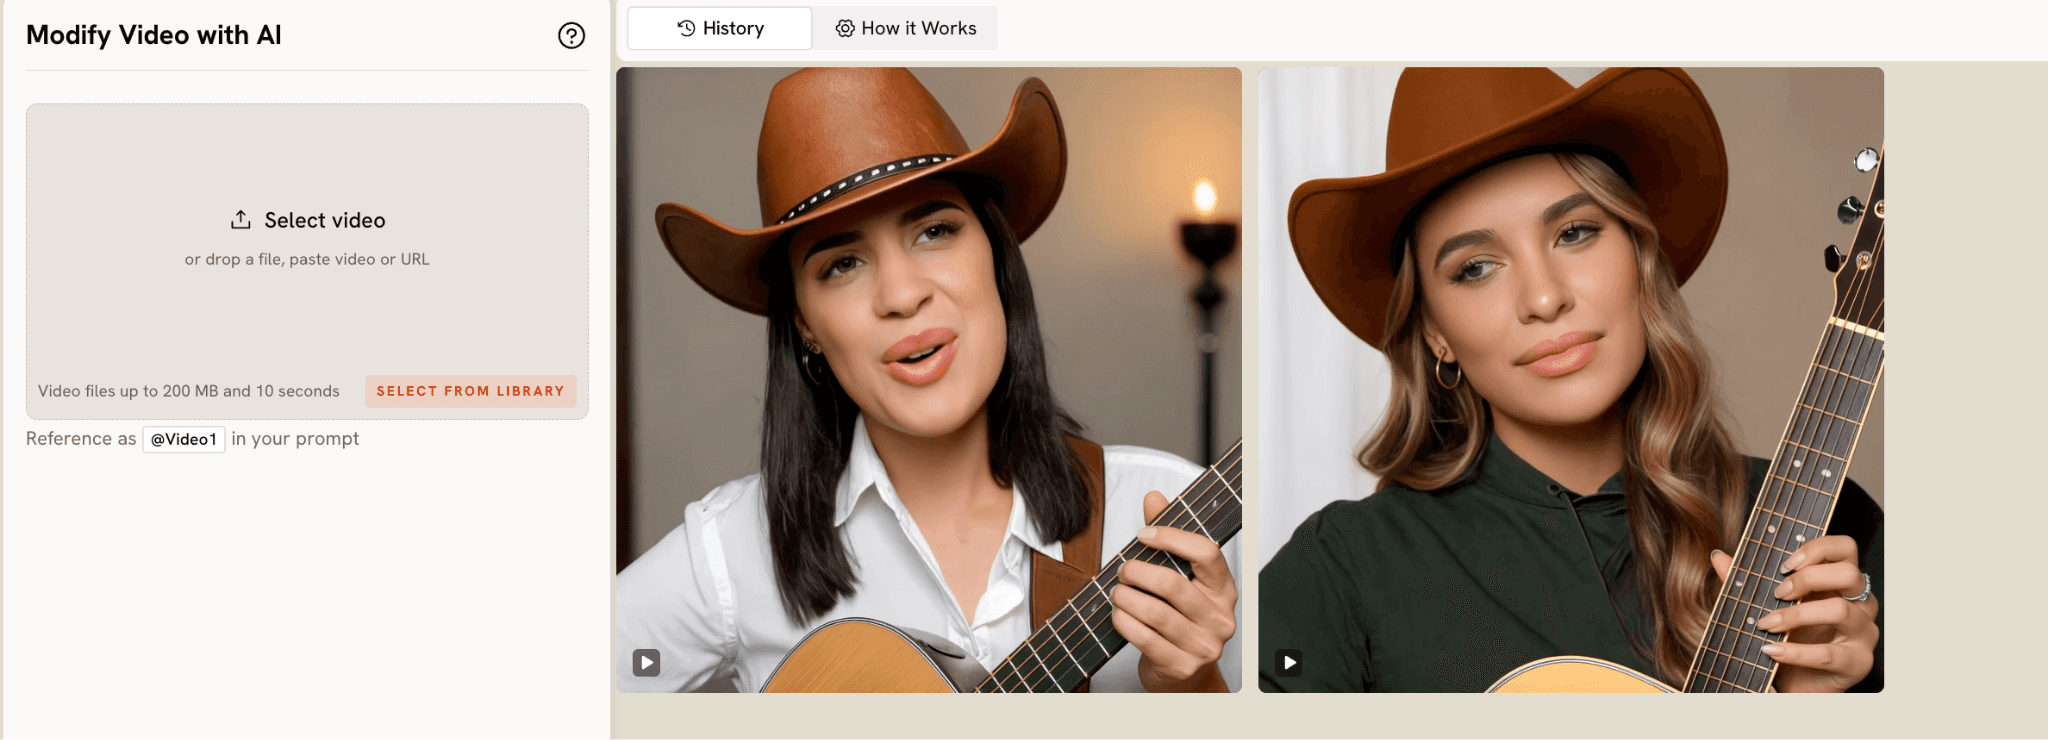
To close the visual gap between your output and the original video, bring the Lip Sync result into Modify Video at app.atlabs.ai/modify-video. Upload a 3 to 10 second clip, reference it as @Video1 in the prompt, and describe the color grade, texture, or lighting treatment you want applied. Modify Video also accepts up to four reference images, so you can drop in frames from the original video as style guides alongside your text description. Keep Original Audio ON to preserve the Lip Sync work.
Why Atlabs Handles Both Paths Well
The Music Video workflow's audio-first approach is what makes Path A distinct from other AI video tools. Most platforms let you generate a video and then add music afterward. Atlabs starts with the audio and derives everything else from it. The tempo, mood, and genre values from Step 1 shape the scene concepts generated in Step 3, which means the visual energy of the video is calibrated to your specific track before a single frame is generated. The Creative Direction step then lets you push that concept further with your own brief, and the Finalise Cast step anchors it to a character you define.
For Path B, the separation between motion and environment in Motion Control is the key capability. The reference clip controls the movement. The prompt controls the world. This means you can take a specific performance from a specific video and place it in any setting you choose, whether that is a faithful recreation of the original or something completely different. The motion itself remains grounded in a real human performance rather than being generated from a prompt, which is why the output has a physical specificity that AI-generated movement alone does not produce.
Lip Sync is the bridge between both paths. Whether your character was defined in the Finalise Cast step of a new Music Video generation or transferred via Motion Control from an existing clip, Lip Sync gives them a vocal performance. The tool accepts the vocal track and maps it to the character's mouth movements with enough accuracy to make the character feel present in the song rather than animated alongside it.
The ability to combine all four tools in sequence, Music Video for the original creation, or Motion Control for the reference transfer, then Lip Sync for the vocal, then Modify Video for the visual finish, is what makes Atlabs the complete workflow for both paths rather than a single-step solution that handles only one.
Custom Creative Directions to Use in Atlabs
The following prompts work directly as Creative Direction descriptions in the Music Video workflow (Path A) or as scene prompts in the Motion Control Prompt field (Path B). Each one is specific enough to produce a strong result on the first generation.
PATH A: A musician with long dark locs and a tailored black coat walks slowly through a foggy rooftop at dawn, the city spread out below, softly out of focus. The camera tracks alongside them at eye level. Mood is Mysterious and Reflective Calm. Visual style is Cinematic. Genre is R&B.
Try this in Atlabs Music Video
PATH A: A performer with a shaved head and silver earrings stands at the centre of a neon-drenched city street at night, rain on the pavement reflecting the signs above. The camera orbits slowly around them as the track builds. Mood is Euphoric and Powerful. Visual style is Cyberpunk Anime. Genre is Electronic.
Try this in Atlabs Music Video
PATH A: A duo, one with short natural hair in a vintage denim jacket and one with long braids in a cream coat, perform back to back on a sunlit rooftop at golden hour. The skyline glows behind them. Mood is Nostalgic and Uplifting. Visual style is Semi-Realism. Genre is Pop.
Try this in Atlabs Music Video
PATH A: A singer with soft features and close-cropped hair sits alone in a warmly lit room at night, a single lamp casting long shadows across the wall behind them. The camera stays close, cutting between their hands and their face. Mood is Melancholic and Reflective Calm. Visual style is Oil Painting. Genre is Folk.
Try this in Atlabs Music Video
PATH B (Motion Control): The character stands inside a vast empty warehouse with industrial pendant lights overhead and a wet concrete floor reflecting the light. Smoke fills the lower half of the frame. The camera faces the character straight on. The setting is dark, industrial, and late-night. Use this as the scene prompt while the movement is transferred from the reference clip.
Try this in Atlabs Motion Control
PATH B (Motion Control): The character performs on a desert highway at golden hour, flat scrubland stretching to the horizon on both sides. The sky is burnt orange fading to deep blue above. The camera is placed low, shooting slightly upward. Dusty and wide open. Use this as the scene prompt while the movement comes from the reference video.
Try this in Atlabs Motion Control
PATH B (Modify Video): Apply a high-contrast black and white treatment to @Video1. Push the shadows to deep black and let the highlights go bright. Add a light film scratch texture across the frame. The look should feel like a 1990s music video shot on 16mm. Keep Original Audio ON.
Try this in Atlabs Modify Video
Pro Tips for Both Paths
For Path A, the single highest-leverage action is writing a detailed character description in the Finalise Cast step. A two-sentence description produces inconsistent character appearance across scenes. A description with seven or more specific details, covering hair, skin tone, face shape, build, clothing style, and any distinctive features, gives Atlabs a stable reference point for the entire generation. Specificity at the cast stage pays off in every scene.
For Path B, choose your reference clip based on camera stability rather than the fame of the moment. A segment where the camera holds steady and the performer moves deliberately gives Motion Control cleaner motion data than a heavily edited segment with fast cuts and camera movement. The most iconic moments in a famous video are not always the most technically useful ones for motion transfer. Find the segment where the performance is continuous and the framing is consistent.
Both paths benefit from a Lip Sync pass when the track has a vocal performance. For Path A, take a character-facing frame from your Music Video output and run it through Lip Sync with the audio file. For Path B, take the Motion Control output directly into Lip Sync. In both cases, the addition of synchronised lip movements transforms the character from a figure who moves alongside the song into a performer who delivers it.
Frequently Asked Questions
Which path should I choose if I have my own original track?
Path A is the natural choice. The Music Video workflow is built around audio-first generation, and the Creative Direction and Finalise Cast steps give you full control over the visual world and the character who inhabits it. You own the output entirely and it is built specifically around your track's tempo, mood, and genre.
Can I use both paths together in the same project?
Yes. A common approach is to use Path A for the main narrative sections of a video and Path B for a specific sequence where you want to reference the energy or movement vocabulary of an existing performance. The outputs from both paths can be assembled in any standard video editor. Both can be run through Lip Sync at app.atlabs.ai/lip-sync using the same audio track.
How long can the reference clip be in Motion Control?
Motion Control accepts reference clips between 3 and 30 seconds. For best results, use a single continuous movement segment rather than a multi-cut sequence. If the moment you want to recreate runs longer than 30 seconds, break it into shorter segments and run each one through Motion Control separately.
What visual styles produce the most realistic character appearance in Path A?
Realistic and Semi-Realism are the Visual Style options that produce the most accurate representation of a described character's physical features. Cinematic adds a filmic production quality while keeping features recognisable. For stylised outputs that are clearly AI-generated, Anime, Cyberpunk Anime, and Vintage Cinema all work well depending on the genre of the track.
Final Verdict
Casting yourself in a music video no longer requires a production budget or a camera crew. Atlabs provides two distinct paths that cover the full range of what creators, musicians, and marketers need when they want to place themselves inside a visual music story.
Path A builds the video from your audio up, with you as the defined character from the start. The Music Video workflow's four steps take you from audio upload to a fully animated original video in a single session. Path B starts from an existing performance and transfers its movement onto your character, using Motion Control and Lip Sync to produce a result grounded in a real human performance.
Both paths end at the same place: a video where you are the one in the frame. Start at the workflow that fits what you are making today, and use the other one when the brief calls for it.
Try both paths free at https://www.atlabs.ai/