If your content looks like everyone else's, it disappears. The creators breaking through right now are not the ones with the biggest budgets. They are the ones with the strangest, most unexpected visuals.
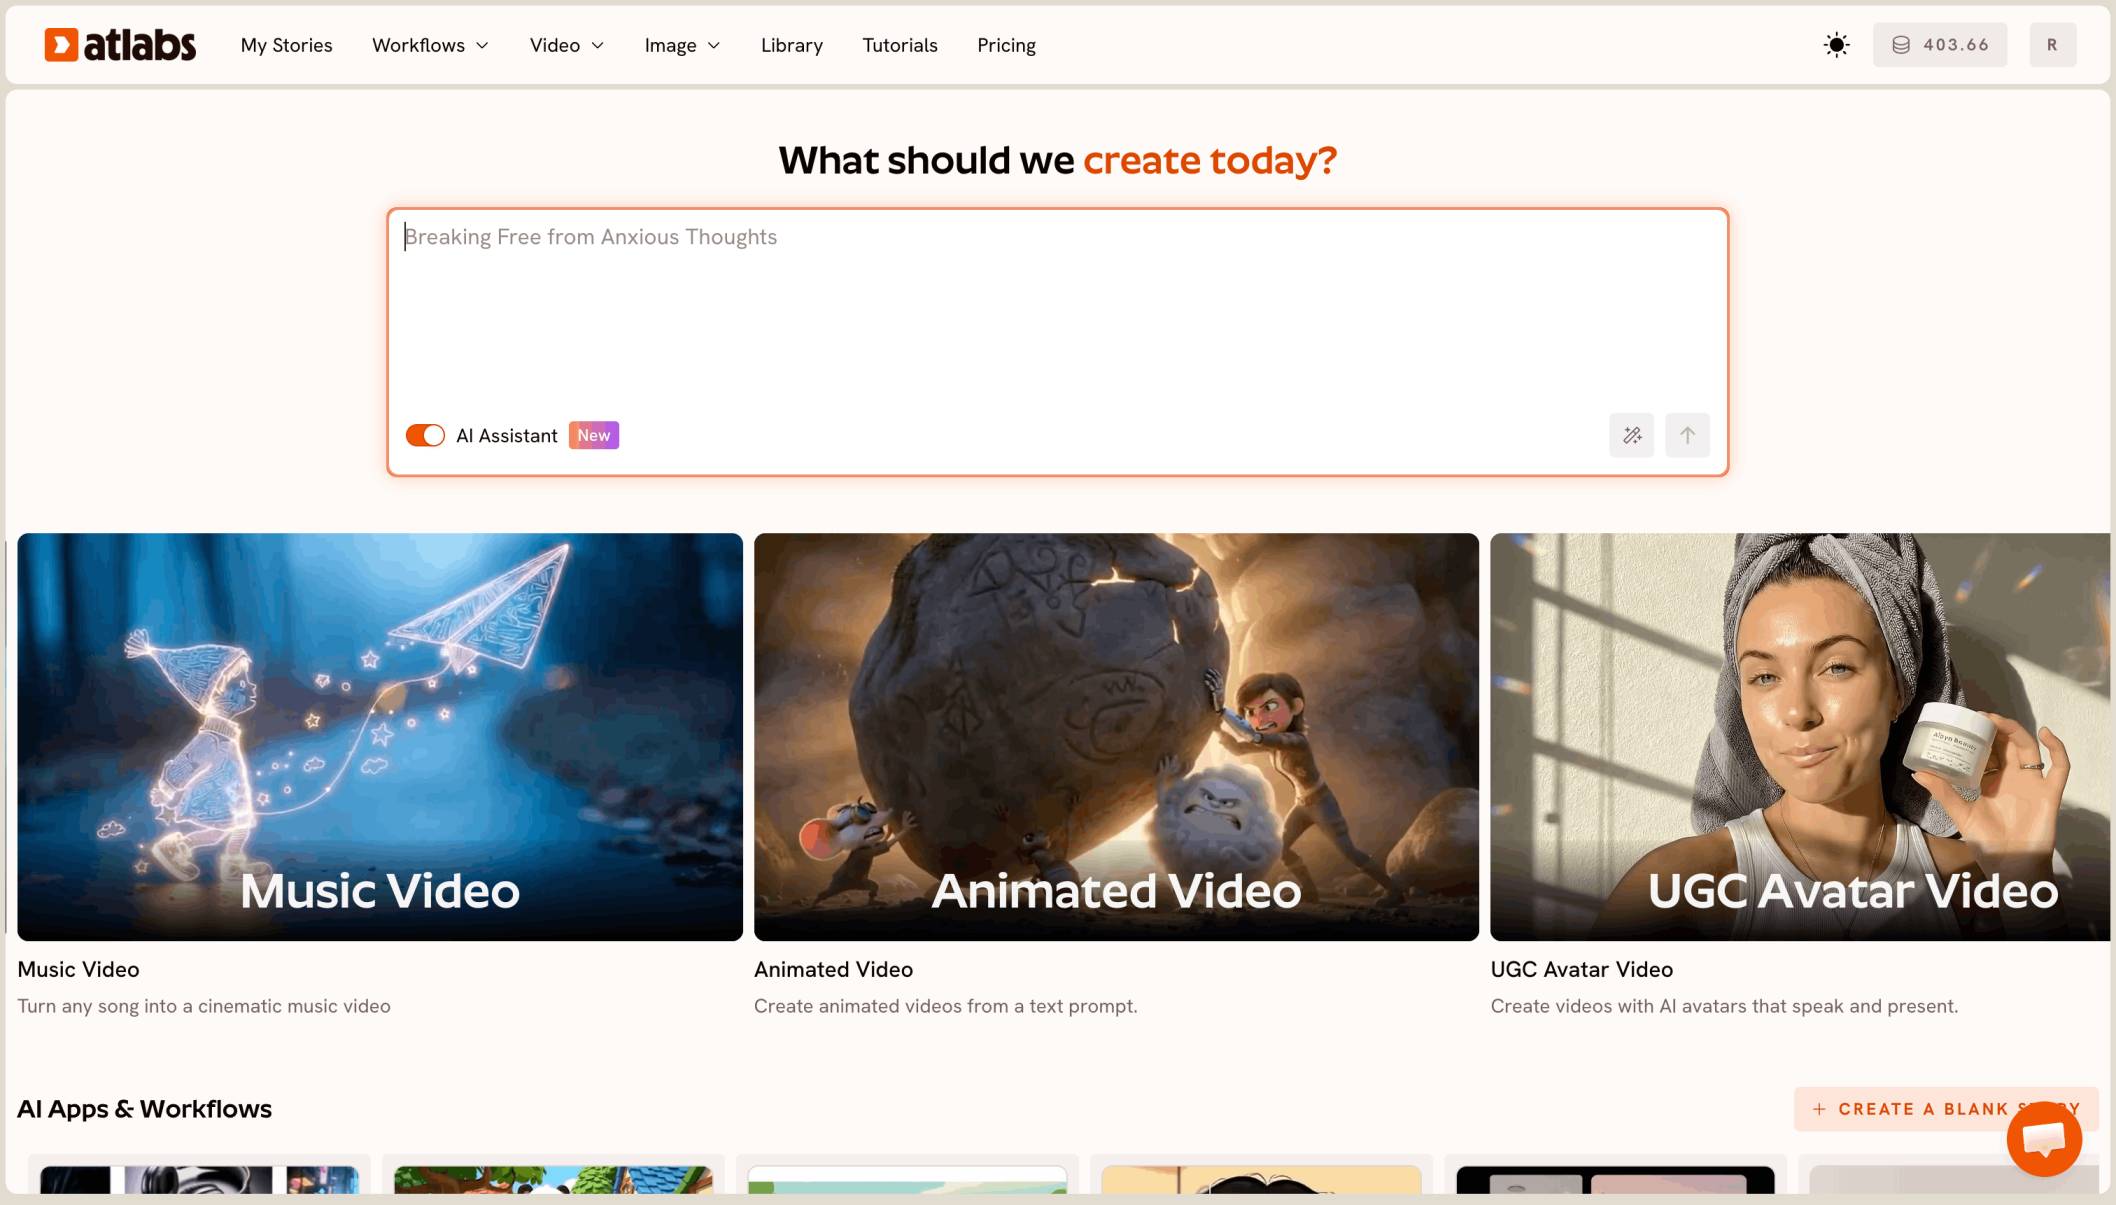
This guide walks through exactly how influencer characters were built inside Atlabs, from the first image prompt to the finished video sequence, with every prompt, every setting, and every decision explained. Whether you are a content creator, a brand, or just someone curious about how far AI visuals have come, you can use this workflow to build your own.
Why Weird Works: The Case for Surreal AI Characters
Before getting into the how, it is worth understanding why this kind of content performs so well.
Social feeds are optimized for attention. Platforms surface content that gets paused, rewatched, shared, and saved. The single most powerful driver of all those behaviors is surprise. When a viewer sees something they cannot immediately categorize, their brain pauses. That pause is the opening every creator wants.
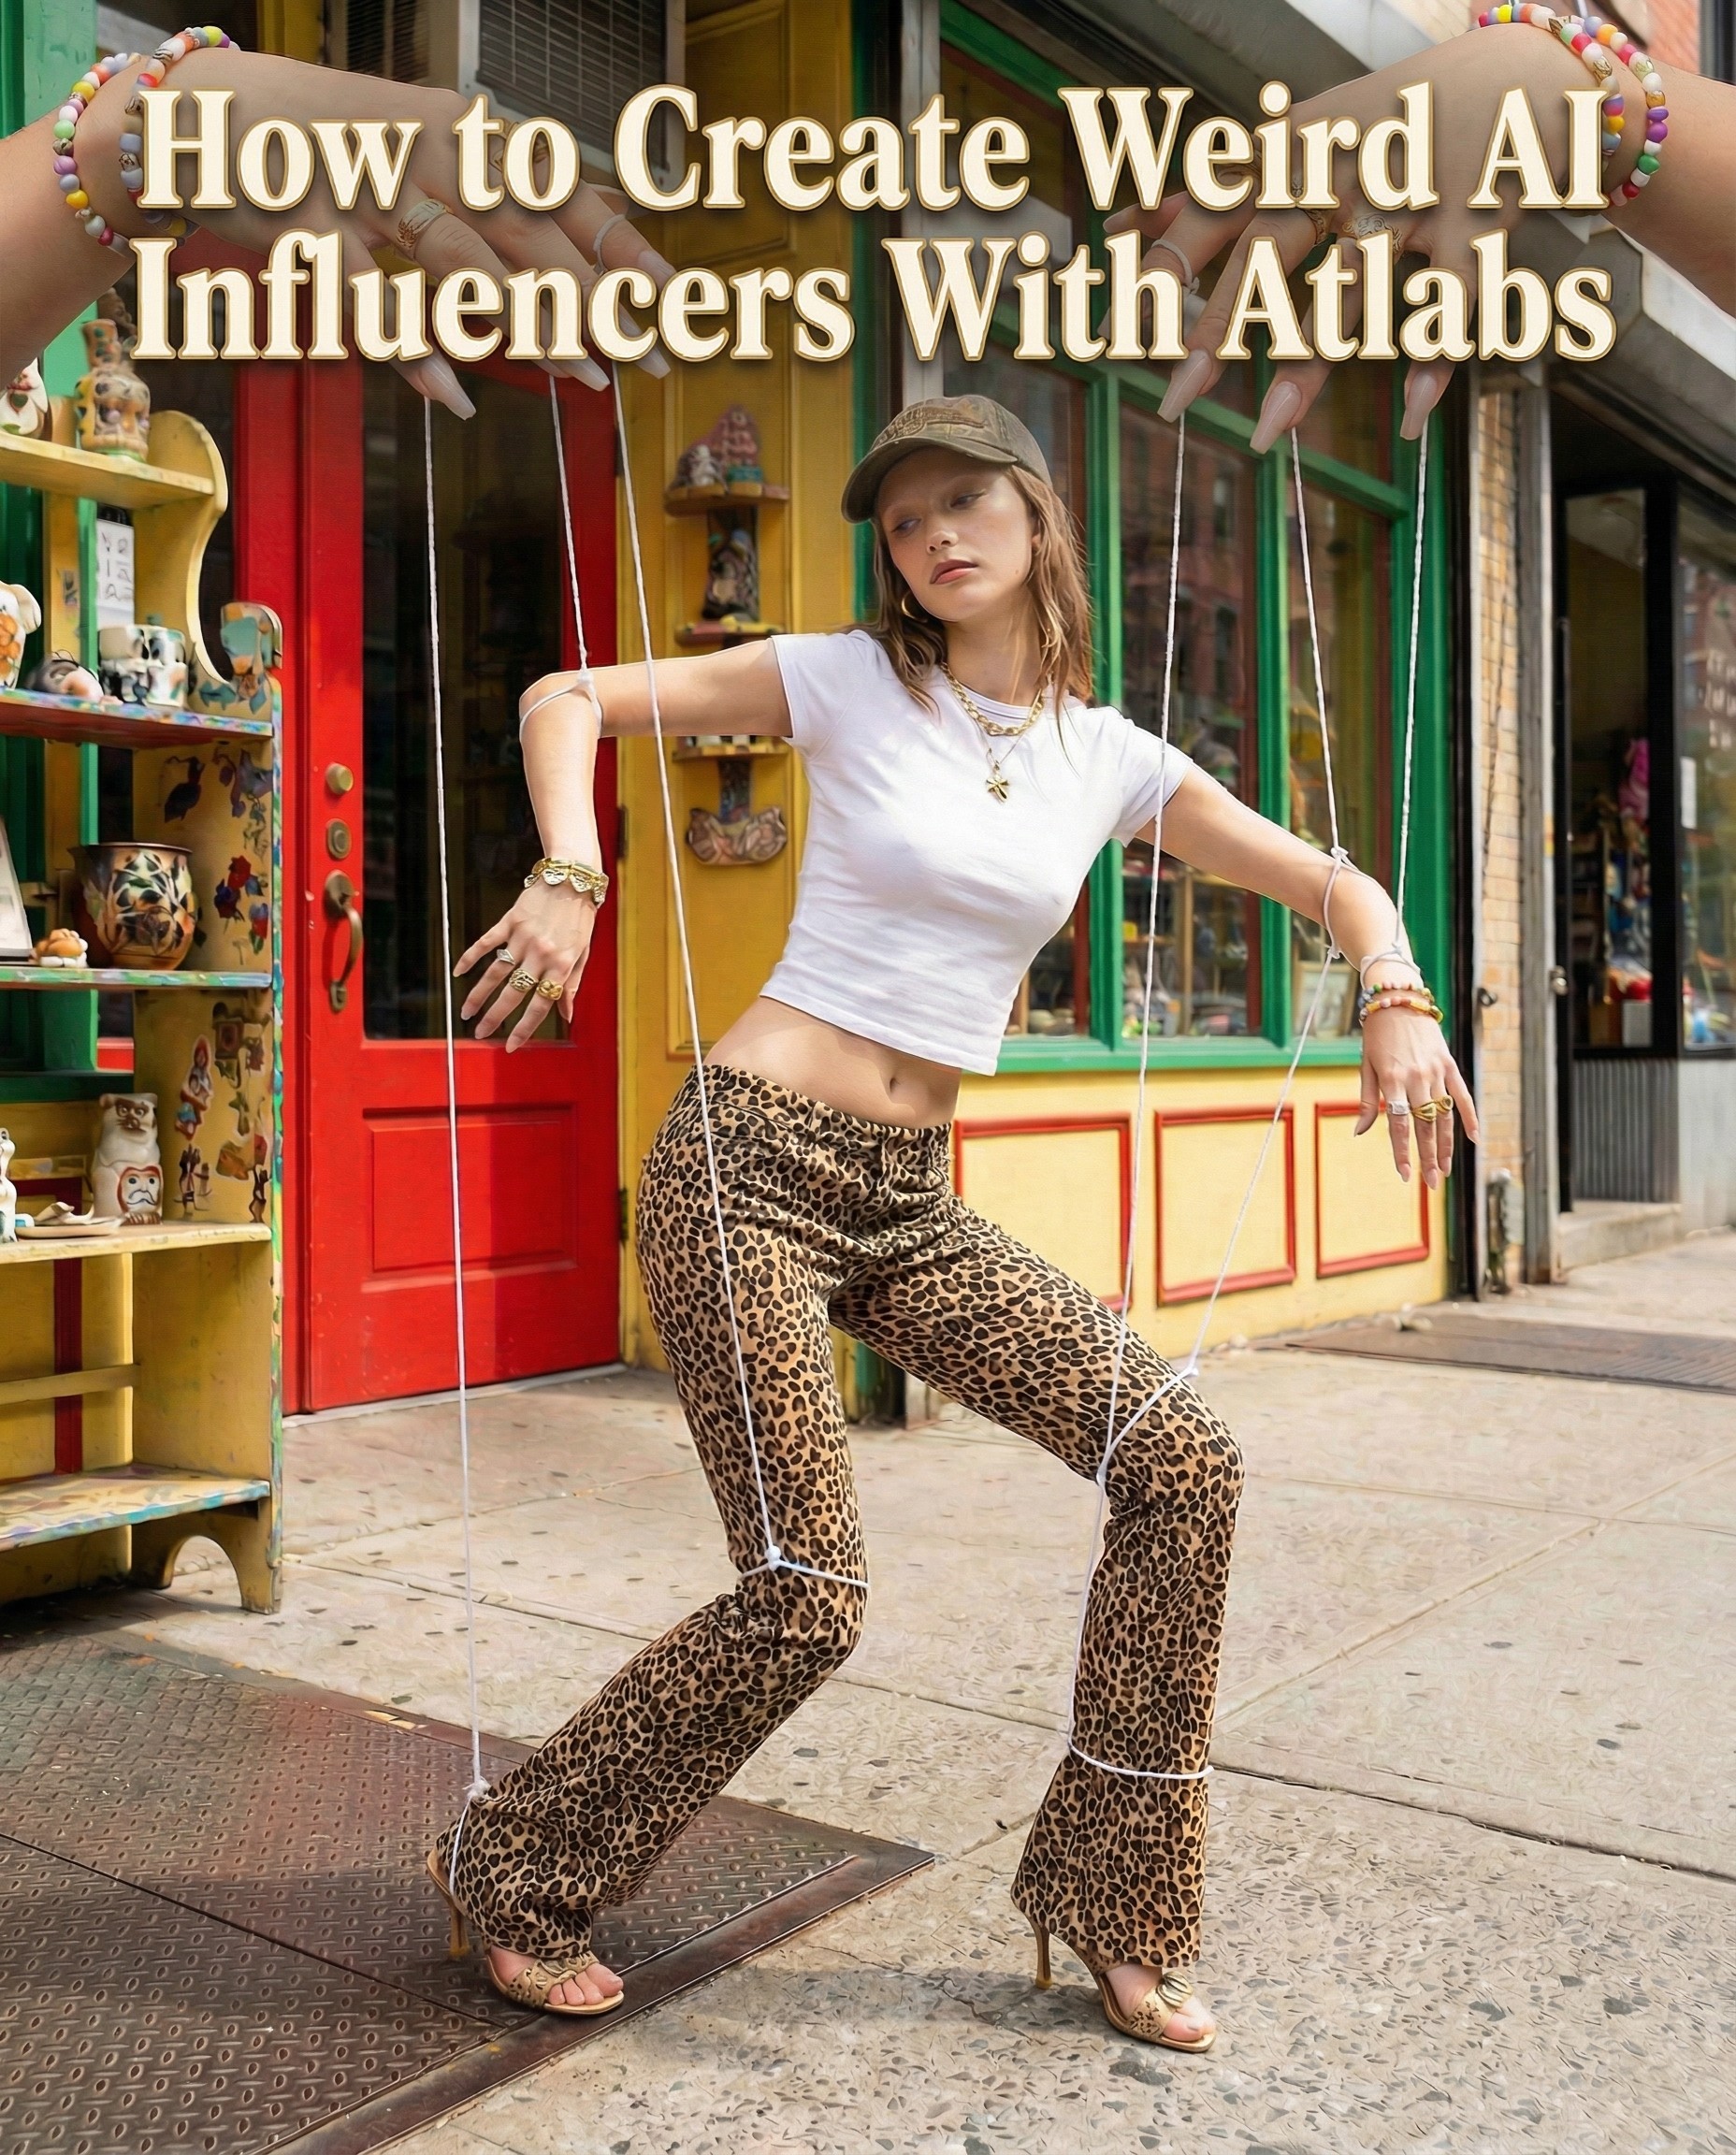
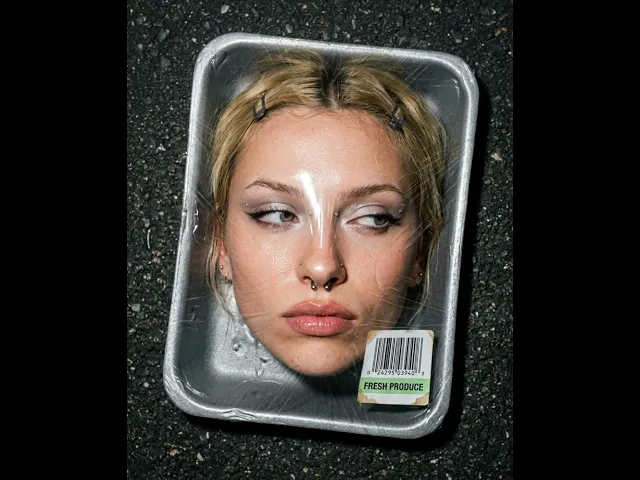
Surreal, conceptually strange visuals create that pause reliably. An image of a woman in a meat tray with a barcode label does not fit any existing mental template. A puppet model being controlled by giant ringed hands does not resolve instantly. The viewer lingers. They look closer. They share it because nothing in their feed looks like it.
The second reason this style works is that it reads as intentional. There is a difference between content that looks strange because it went wrong and content that looks strange because someone designed it that way. Editorial surrealism signals creative control. It tells the viewer that someone with strong aesthetic instincts made this deliberately, which builds a very specific kind of credibility.
AI makes this style available to anyone. What used to require a creative director, a set designer, a photographer, and a post-production team can now be achieved with a well-written prompt and a tool like Atlabs. The barrier to entry for high-concept visual content has collapsed completely.
Traditional Editorial Shoot | AI Influencer with Atlabs |
Photographer: $500 to $2,000 per day | Included in subscription |
Studio rental: $300 to $800 per day | No location needed |
Talent / model fees: $200 to $1,500 | No talent required |
Set design and props: $100 to $500 | Described in a prompt |
Post-production and retouching: $200 to $600 | Instant, unlimited iterations |
Total per shoot: $1,300 to $5,400 | One flat monthly cost |
Turnaround: 1 to 2 weeks | Same session, same day |
The Four Characters in This Walkthrough
The screenshots in this guide show five distinct influencer characters built across a single Atlabs session. Here is a quick overview of each concept before the step-by-step breakdown:
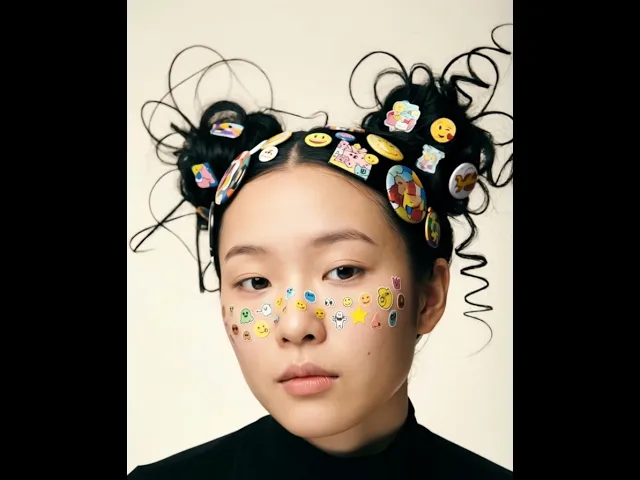
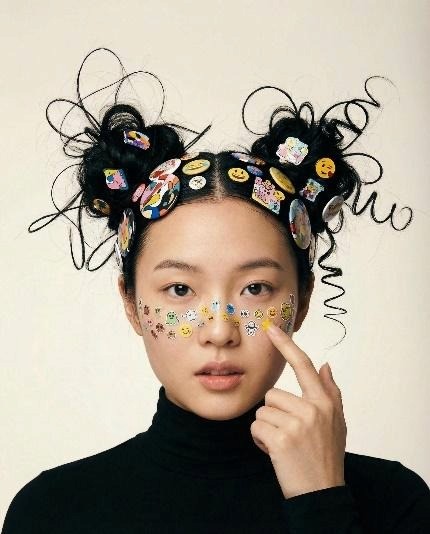
The Sticker Girl: A young East Asian woman with two chaotic high buns loaded with emoji pins and cartoon badge accessories, face covered in tiny stickers across the cheeks and nose bridge. Black turtleneck, warm off-white background. Editorial portrait with a playful surreal identity.
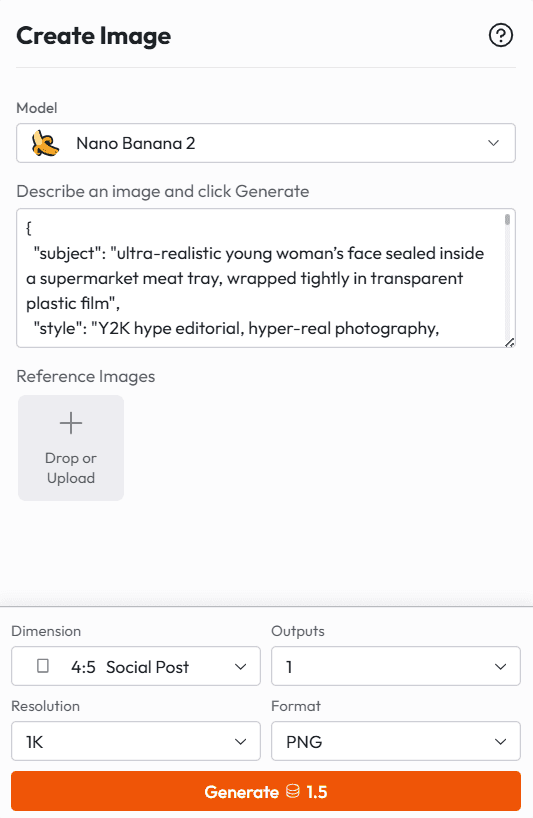
The Meat Tray: A hyper-realistic Y2K editorial concept. A woman's face pressed inside a supermarket styrofoam tray, sealed under tight cling film with a Fresh Produce barcode label, placed on dark asphalt. Shot from above with direct flash. Extremely high realism, no over-smoothing.
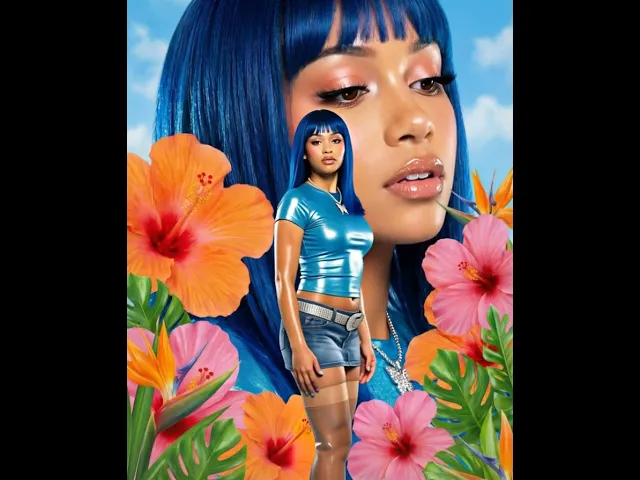
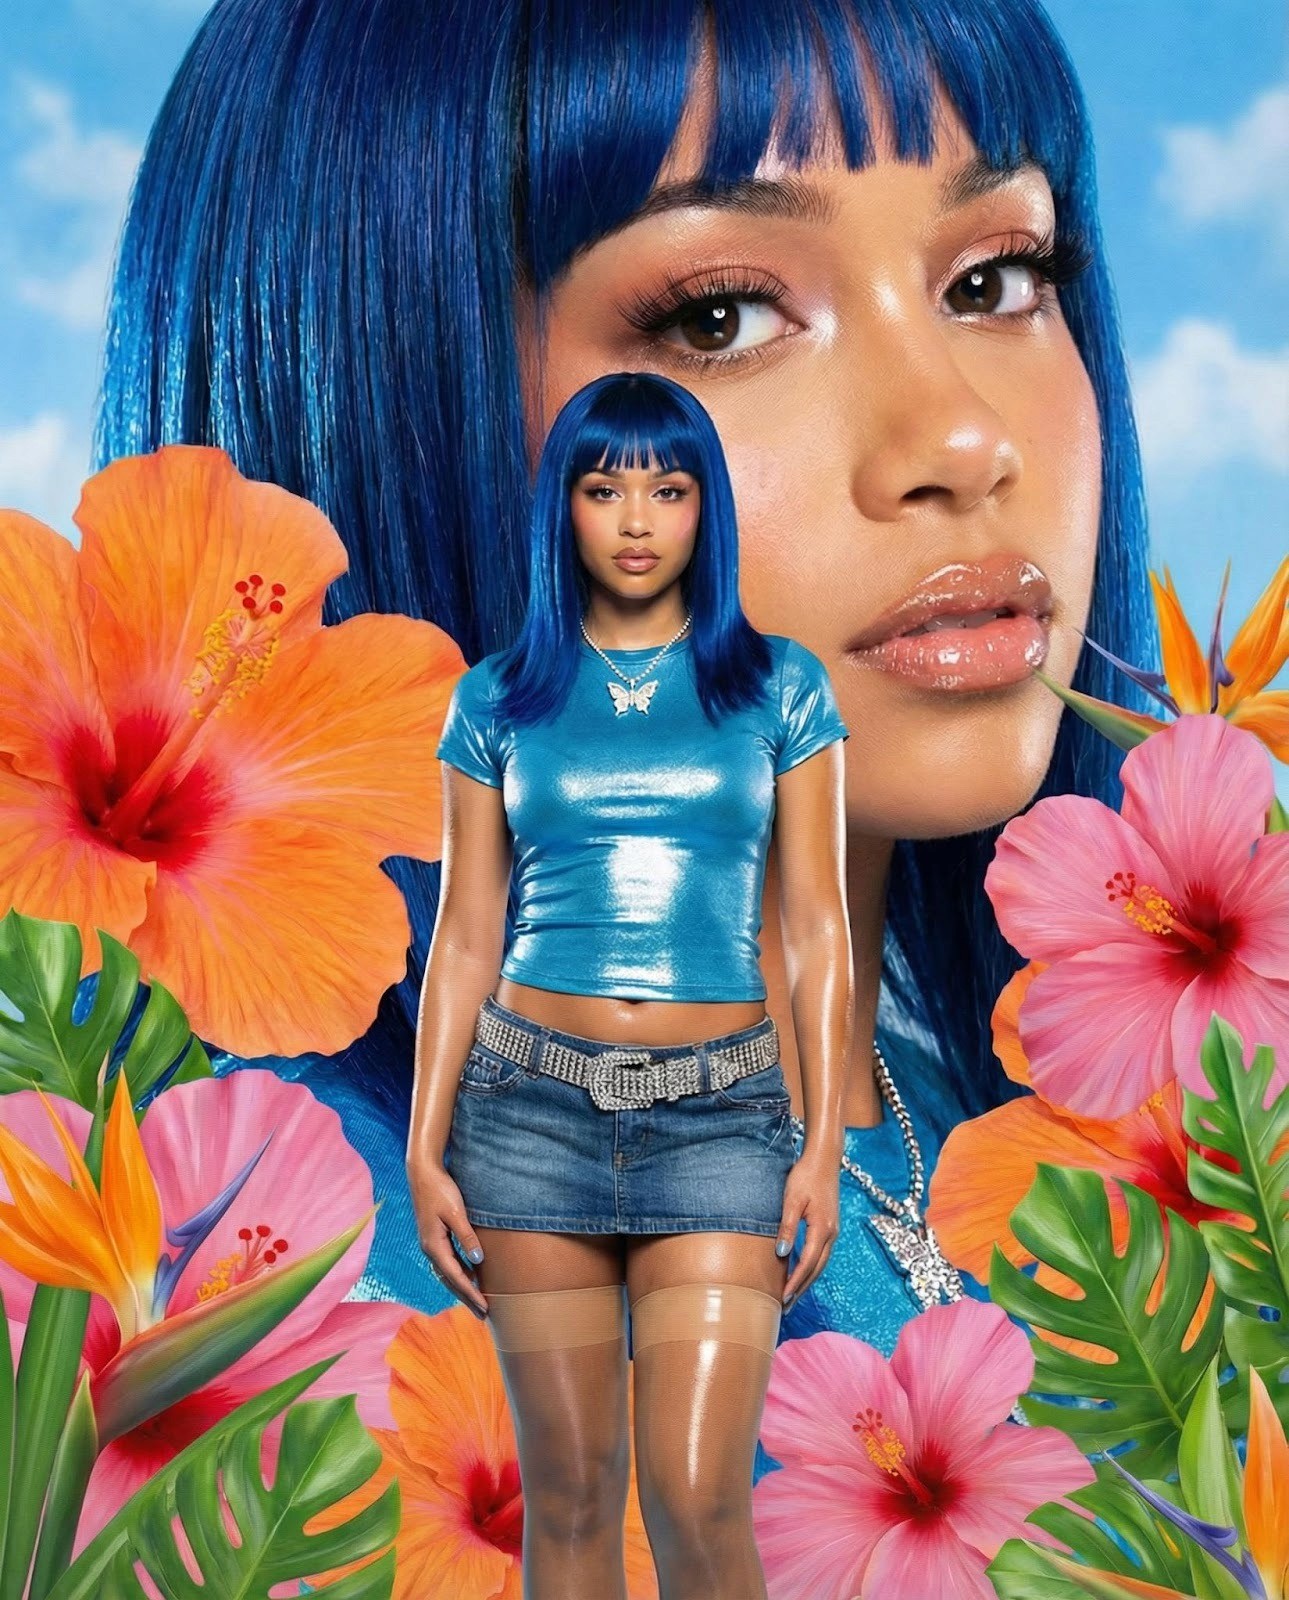
The Y2K Flower Editorial: A fashion model with electric blue sleek hair and blunt bangs wearing a metallic baby tee and low-rise denim, standing in front of a giant close-up of her own face surrounded by oversized tropical flowers. Glossy Y2K magazine aesthetic with direct flash lighting.
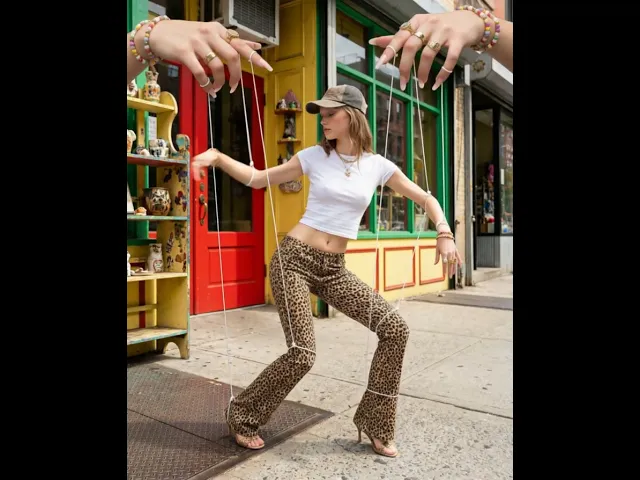
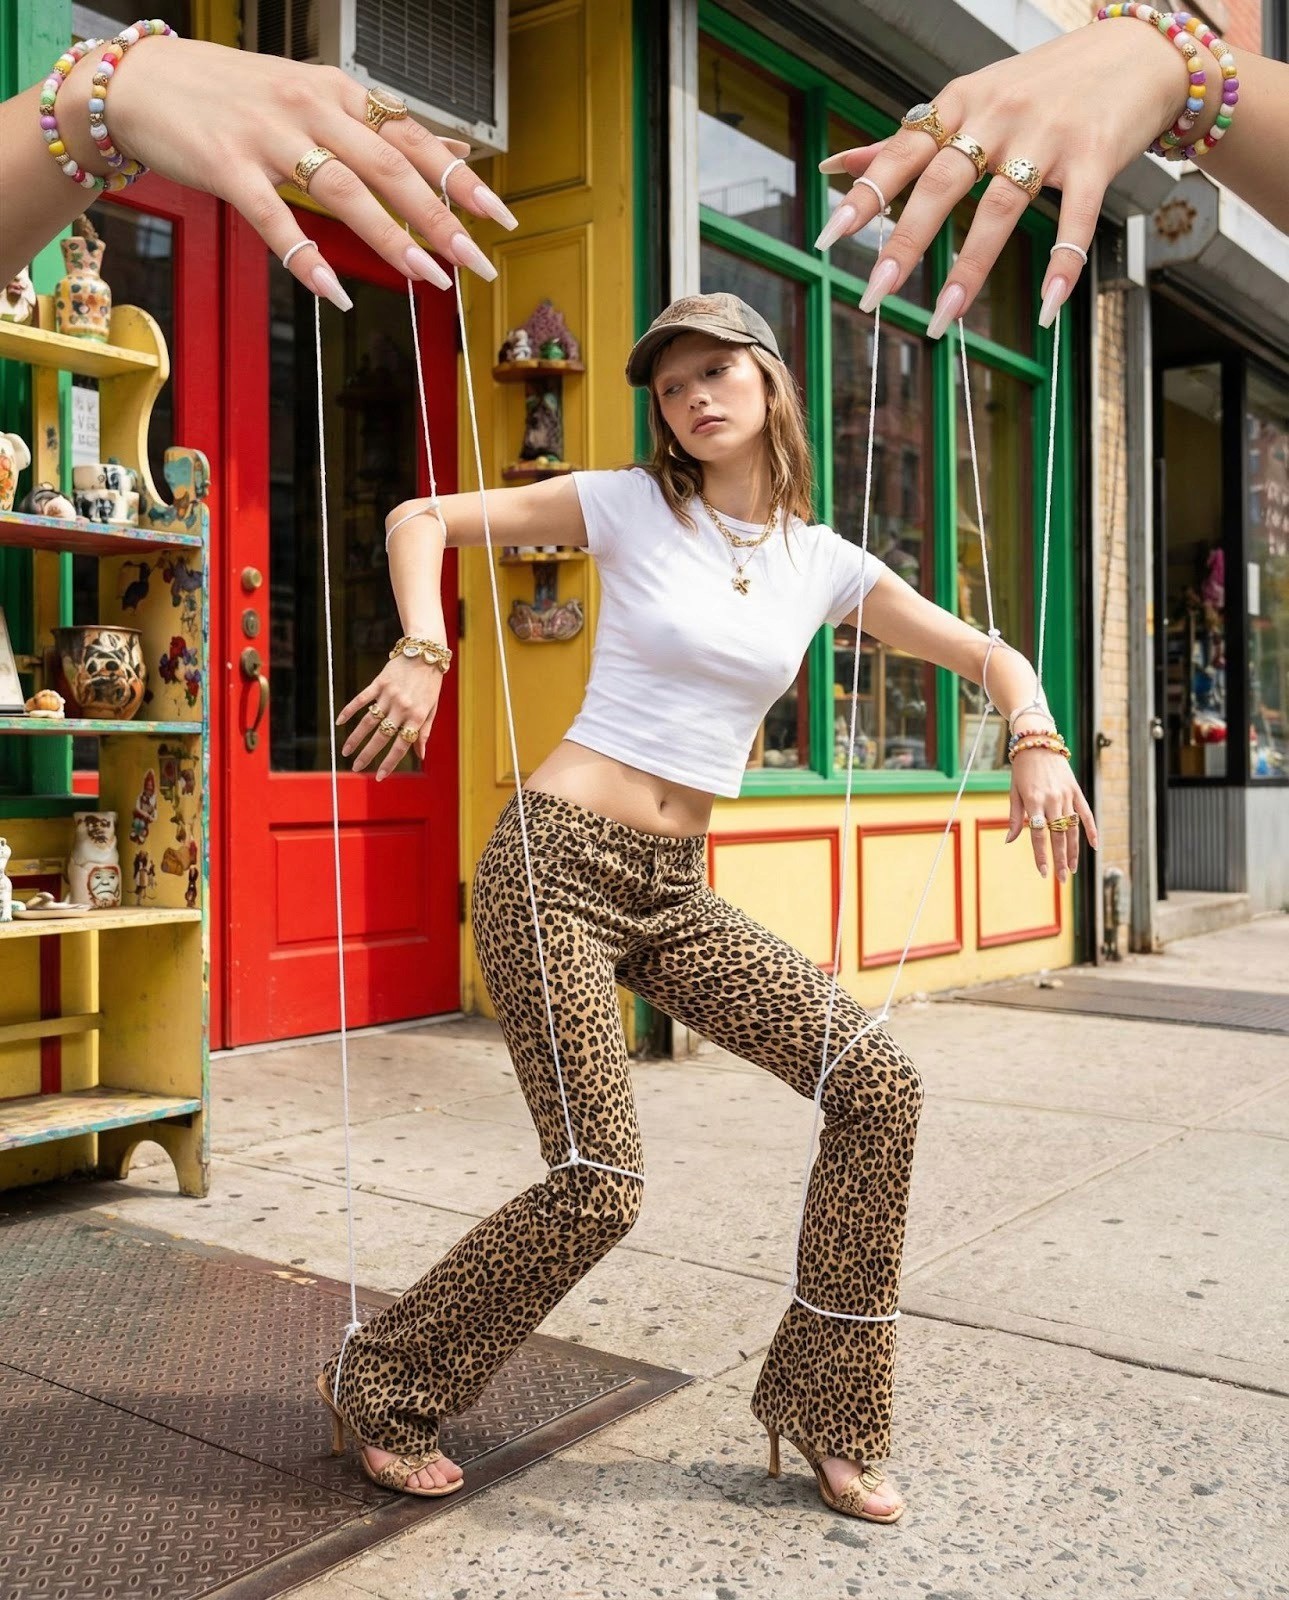
The Puppet Model: A full-body fashion editorial shot. A tall model in a Y2K marionette pose with visible white strings attached to her limbs, controlled by two oversized hands entering from above, adorned with bold jewelry. Colorful storefront exterior with natural daylight.
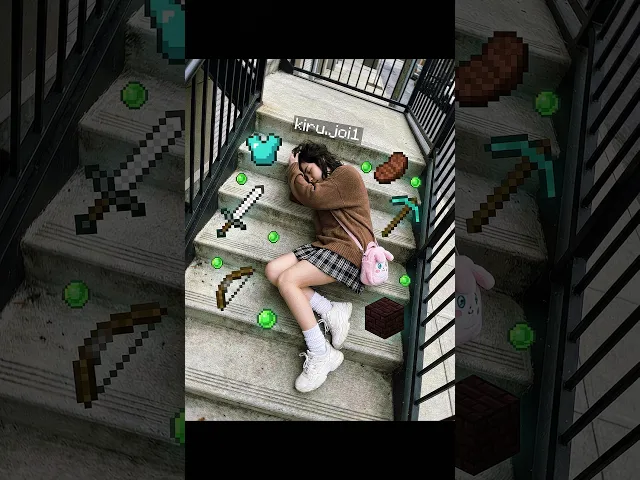
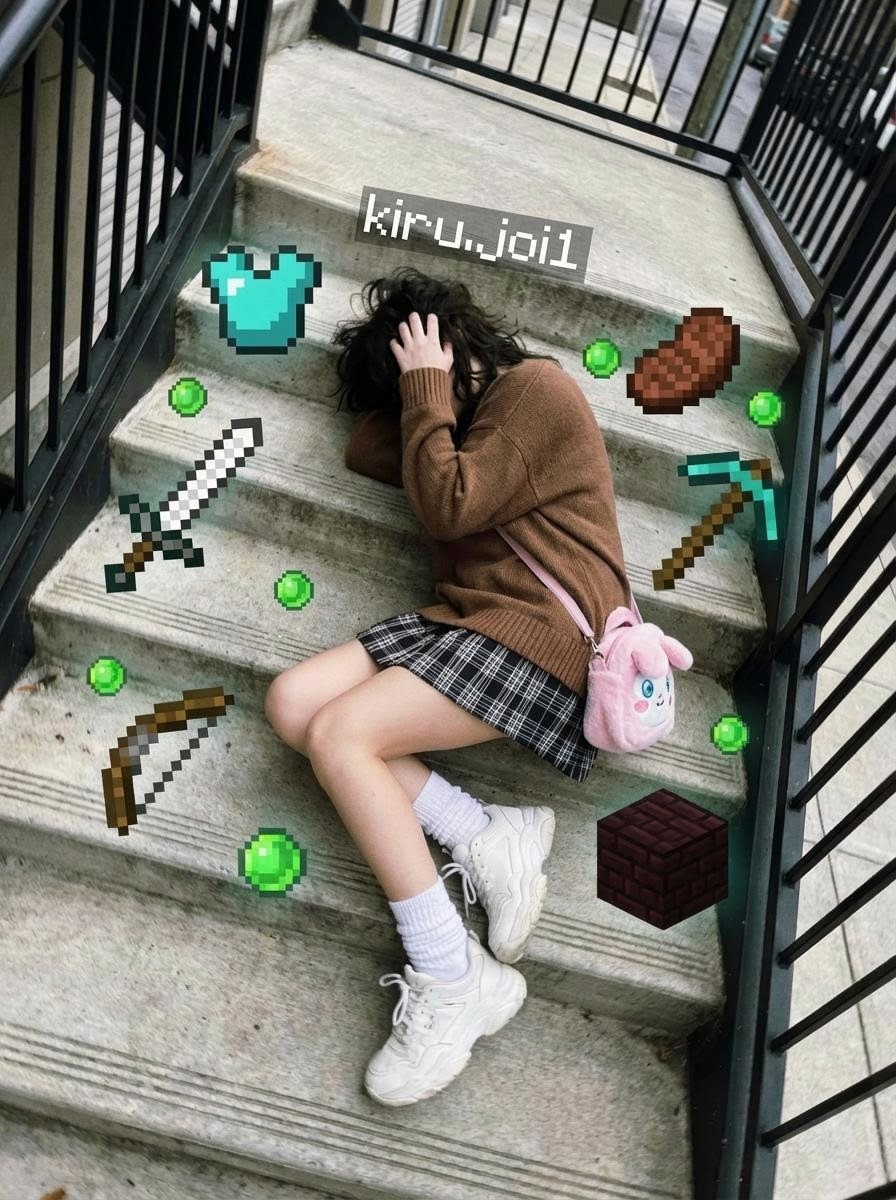
5. Minecraft fall: A Young woman with minecraft tools spread all around the ground
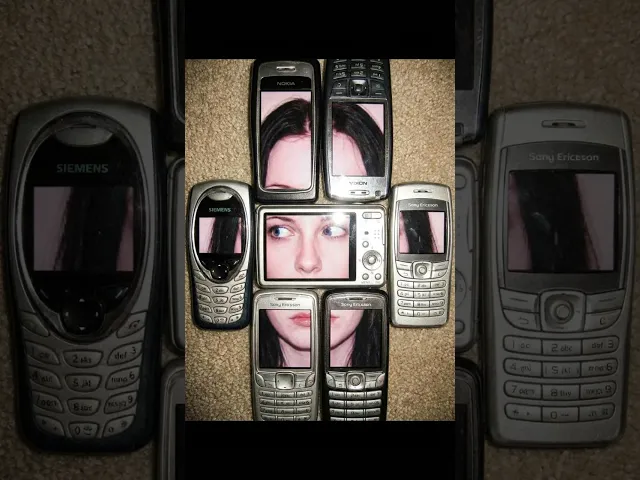
6. Nokia Model: A young women face separated through out nokia’s and old phones
Each of these characters was built using the same four-step workflow inside Atlabs. The steps are the same every time. What changes is the creative direction inside each step.
Step 1: Generate the Character Image
Everything begins with an image prompt. This is the single most important creative decision in the whole process. A weak prompt produces a generic result that you will regenerate five times. A strong prompt produces something usable on the first or second try.
Atlabs uses your prompt to generate a high-resolution editorial image that becomes the visual identity of your influencer. The image is what gives the character her look, her world, and her energy. Get this right and everything downstream becomes easier.
What a Strong Character Prompt Actually Contains
Looking across the five characters built for this walkthrough, every high-performing prompt shares the same structural logic. Here is how to think about each layer:
Layer 1: Physical Anchoring
Before any concept or prop, lock the character's physical reality. This includes ethnicity and facial structure, expression, pose, and skin finish. The more precise this layer, the less the model has to guess, and guessing is where the drift happens.
For the Sticker Girl, the physical layer read: East Asian facial structure with soft features, small nose, straight brows, and almond eyes. Expression: neutral, slightly curious, lips slightly parted, soft but direct gaze into camera. Pose: front-facing, centered, head straight, shoulders relaxed. Skin: smooth but natural, subtle pores visible, no heavy retouching, soft matte with slight natural glow.
Every word there is doing work. Soft matte with slight natural glow is not the same as smooth glowing skin. Lips slightly parted is not the same as open mouth. That specificity is what separates a character that reads as considered from one that reads as generic.
Layer 2: The Surreal Element
This is where the creative concept lives. Define the strange element with the same precision as the physical anchor. Do not say fun accessories. Say large circular pins with abstract art prints, medium enamel pins with cartoon illustrations, small round emoji pins with yellow faces, and colorful badge-style discs with playful graphics. Then describe the behavior of those elements: glossy finish with light reflections, slight imperfections, not perfectly aligned, slightly tilted placements.
For the Puppet Model, the surreal element was described as: two oversized feminine hands entering from the top of frame holding strings, hands adorned with bold rings, charms, and bracelets with detailed nail art, and white visible strings attached to the wrists, arms, waist, and legs of the model. That level of detail is what makes the image look designed rather than accidental.
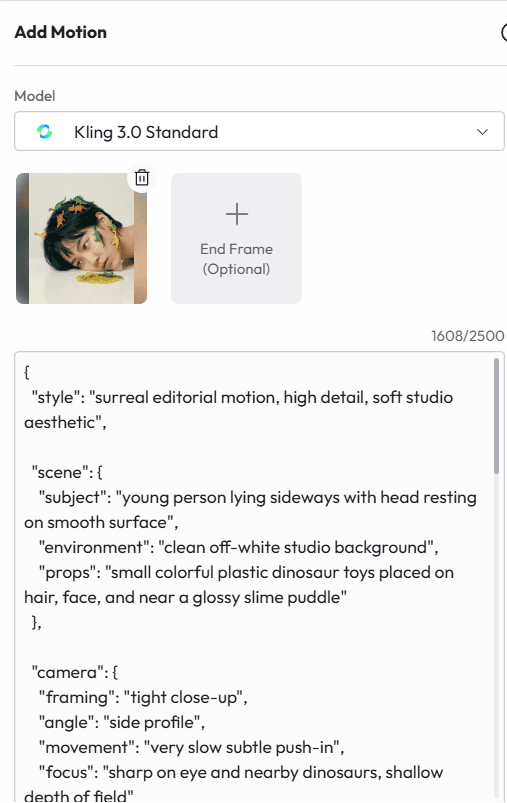
For the Dinosaur Kid, the prompt specified small colorful plastic dinosaur toys standing on top of the head, others around the face near the surface, and a small puddle of slime-like liquid near the face with toy dinosaurs interacting around it. Interacting is a key word. It tells the model to position the elements in a way that has visual logic between them, not just scattered randomly.
Layer 3: Environment and Lighting
The background and lighting setup define the visual world the character inhabits. Keep this consistent with the concept. Editorial surrealism reads best against clean, uncluttered backgrounds, or against very deliberate environmental choices.
The Sticker Girl was placed against a plain warm off-white and beige backdrop with soft studio frontal diffused lighting, even illumination on the face, and very soft shadows. This gives the wild hair and stickers maximum visual contrast with nothing competing in the background.
The Meat Tray went the opposite direction. Dark asphalt ground, gritty urban texture, direct flash photography with realistic harsh flash and natural skin shine. That gritty outdoor realism makes the concept feel more disturbing and more compelling than a clean studio shot would.
The Puppet Model used a colorful storefront exterior with a bright red door, yellow walls, green window frames, and decorative shelves. Natural daylight, bright and even with soft shadows. The high-saturation environment amplifies the Y2K street energy.
Layer 4: Explicit Constraints
This is the layer most people skip, and it is often the difference between a first-generation result and a fifth-generation result. Add a constraints section at the bottom of your prompt that tells the model what not to do.
For the Sticker Girl, the constraints were: do not simplify hair structure, do not reduce number of stickers, avoid perfect symmetry, avoid over-smoothing skin, maintain chaotic hair loops, keep stickers visually distinct and detailed. Every one of those constraints addresses a real failure mode that AI image models default to when they simplify complex prompts.
The Full Prompt Examples
PROMPT: The Sticker Girl
|
PROMPT: The Meat Tray
|

Generate three to five variations of each prompt. The model will interpret even identical prompts slightly differently across generations, and small differences in expression, hair chaos, or prop placement can dramatically affect which image works best for animation. Pick the frame with the expression and composition you want to animate before moving to the next step.
PROMPT: The Y2K Flower Editorial
|
PROMPT: The Puppet Model
|
PROMPT : Minecraft fall
|
PROMPT: Nokia Model
|
Step 2: Set Your Start Frame and End Frame
Once you have your hero image, open it inside Atlabs and navigate to the Motion panel. This is where the static image begins its transformation into video. The two most important inputs at this stage are the start frame and the optional end frame. Together they define the visual bookends of your clip.
Start Frame
Your generated image becomes the start frame. Upload it into the motion panel under the first frame slot. This is the visual state the clip will begin from. The lighting, the pose, the expression, and the atmosphere in this image set the tone for everything that follows.
One important note: the start frame should be the strongest, most intentional version of your character. If you generated five variations, pick the one where the expression lands perfectly, where the hair chaos reads clearly, where the sticker placement feels organic rather than scattered. That frame is doing the creative heavy lifting.
End Frame (Optional but Powerful)
The end frame controls where the clip lands visually. You have two options:
Leave it empty and let the motion prompt drive the action. The AI will generate movement and resolve within the visual world of the start frame. This works well for portrait close-ups where you want natural, organic movement.
Set a second image as the end frame to create a directed visual transition. Generate a second version of your character in a different state, a turned pose, a different expression, a shifted composition, and set that as the end frame. The AI will interpolate the motion between the two states.
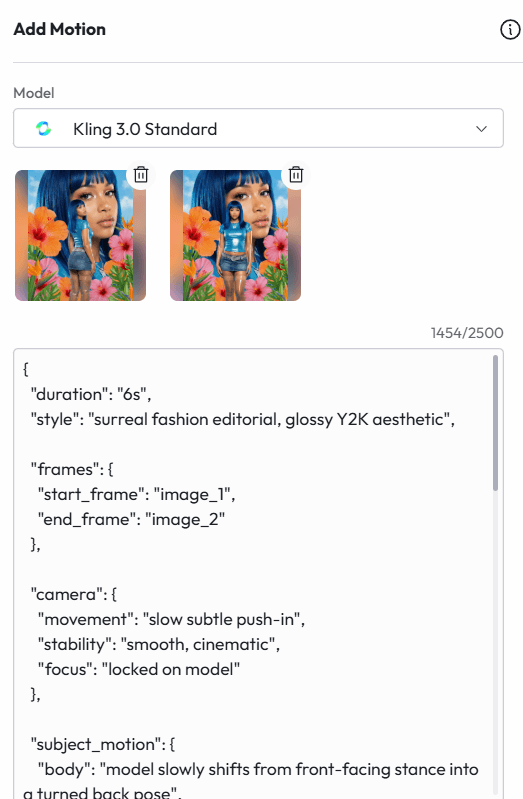
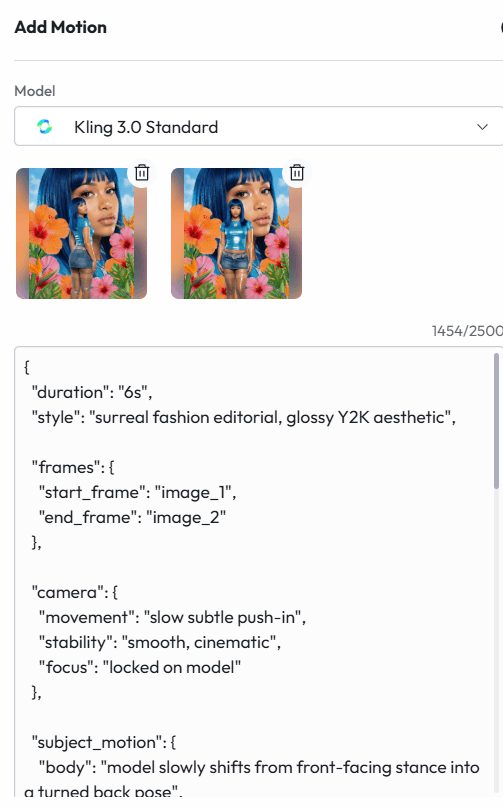
For the Y2K flower editorial, the start frame showed the model in her forward-facing pose with the giant face visible behind her, and the end frame showed the same character from a slightly more turned angle. The result was a slow, cinematic lateral shift that felt like a magazine spread coming to life.
For the puppet model, only a start frame was used. The motion prompt had full directional control, which gave more freedom to describe the puppet movement behavior in detail without constraining it to a predetermined end state.
Model Selection
Atlabs offers different generation models in the dropdown. The choice here affects the quality and fidelity of the output:
Model | Best For |
Kling 3.0 Pro | Close-up portrait work, high skin texture fidelity, detailed accessory and facial expression preservation |
Kling 3.0 Standard | Full-body motion, scene transitions, dynamic action, reliable for complex movement prompts |
The Sticker Girl and Meat Tray used Pro for the tight portrait fidelity. The Puppet Model and Dinosaur Kid used Standard to give the motion model more flexibility with full-body and side-profile sequences.
Duration Settings
Set your clip duration in the dropdown before generating. Here is a practical guide:
3 seconds: tight portrait clips, close-up reactions, simple movements. Ideal for loopable social content.
4 seconds: standard motion clip. Enough time for a clear action to unfold without overstaying.
6 seconds: complex sequences with multiple movements or a full scene transition between start and end frames.
You can always trim down after generation. It is harder to add time, so when in doubt, go slightly longer.
Step 3: Write and Run Your Motion Prompt
This is where your character comes alive. The motion prompt is the text instruction that tells Atlabs how the character moves, how the camera behaves, what physical actions occur, and what the emotional atmosphere of the clip should be. It is the most creatively expressive part of the whole workflow.
The screenshots in this guide show two distinct approaches to motion prompting. Both work. Which you use depends on what you need from the clip.
Approach 1: Plain Language Direction
Write the motion prompt the way you would direct a real person on set. Describe the action in sequence, give the model physical and emotional cues, and be specific about scale and intensity of movement.
This approach works best for natural, performer-driven clips where you want the character to feel present and reactive rather than cinematic.
MOTION PROMPT: Sticker Girl
|
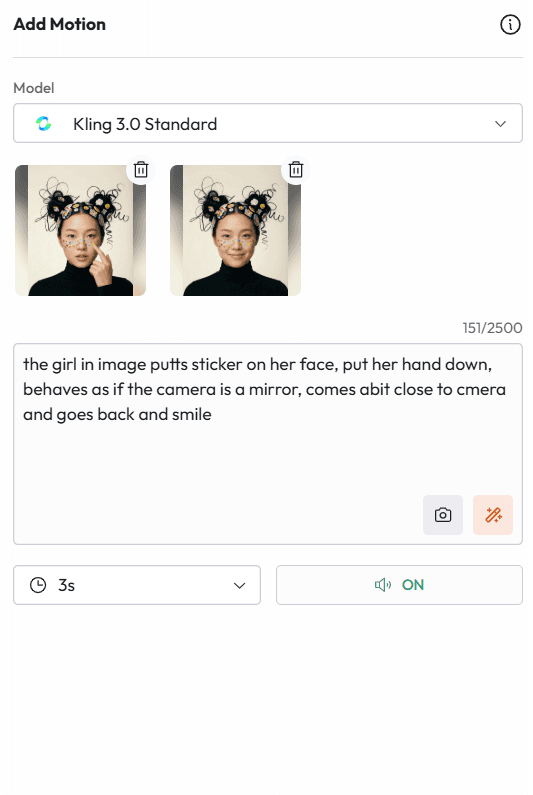
That prompt has four distinct action beats: placing the sticker, lowering the hand, treating the camera as a mirror, and the final smile. Each beat gives the model a clear physical action to generate. The result is a clip that feels natural and self-aware, like watching someone get ready in front of a mirror.
MOTION PROMPT: Puppet Model
|

Notice the constraint at the end: the movement should not be too much, very natural. This is one of the most important practices in motion prompting. Unconstrained motion prompts often produce exaggerated, unnatural results. Telling the model to keep movement subtle and grounded almost always improves the output.
Approach 2: Structured JSON Direction
For more complex editorial clips where you want precise control over camera movement, subject behavior, and overall atmosphere, a JSON-style structured prompt gives you layer-by-layer direction. This is the approach used for the Y2K flower editorial and the Dinosaur Kid.
MOTION PROMPT: Y2K Flower Editorial (JSON structure)
|
MOTION PROMPT: Dinosaur Kid (JSON structure)
|
The JSON structure is not a requirement. The Atlabs motion engine reads and interprets natural language equally well. The structured format is useful when you want to think clearly about each layer of the clip and avoid blurring camera instructions, subject motion, and atmosphere into one hard-to-parse block.
Universal Motion Prompting Principles
Across all five clips, a few practices consistently improved results:
Name the props and their behavior. The puppet prompt called out the hands and strings specifically. The dinosaur prompt called out the slime puddle. Unnamed elements tend to get ignored or simplified by the motion model.
Constrain movement scale explicitly. Words like subtle, gentle, very slow, and slight consistently produced more naturalistic results than leaving scale undefined.
Separate camera direction from subject direction. Even in plain-language prompts, try to make it clear which movements are camera movements and which are character movements. Mixing them creates confusion in the output.
Generate multiple versions. The same motion prompt produces meaningfully different results across generations. The sticker girl clip was generated four times before settling on the one with the most natural hand movement and smile timing. Always have options.
Use the sound toggle strategically. The motion panel has a sound ON/OFF toggle. Turning sound ON allows the AI to generate ambient audio that matches the scene. For the Sticker Girl clip, sound was enabled for a natural studio atmosphere. For the puppet and meat tray clips, sound was left off to give full control to music added in post.
Step 4: Edit, Assemble, and Finish Your Video
With your motion clips generated, the final step is assembling them into a finished video inside the Atlabs timeline. This is where the clips become a sequence, where pacing gets shaped, and where the production value of the final output gets established.
Timeline Assembly
The left panel inside Atlabs shows all your generated clips in order with their timestamps. You can see this clearly in the screenshots: the five influencer clips are stacked as scenes 1 through 5 with durations ranging from 3 to 6 seconds each. Drag to reorder them. The sequence order shapes how the viewer experiences the overall piece.
For a short editorial reel featuring multiple characters, ordering by visual contrast works well. A tight portrait close-up followed by a full-body shot followed by a surreal concept shot creates visual rhythm. Putting two close-up portraits back to back risks monotony regardless of how strong each individual clip is.
Trim and Reverse
Trim is one of the most useful tools in the Atlabs edit panel. Generated clips often have the best action in the middle or toward the end, with a slightly static first frame. Trimming in from the start point removes that static opening and makes the clip feel more energetic from the first frame.
Reverse runs a clip backwards. This sounds like a small feature but it is practically very useful. A camera pull-back reversed becomes a push-in. A hand moving down reversed becomes a hand rising. A character leaning away reversed becomes a character leaning in. Reversing a clip gives you a different read on the same generated moment without spending credits on a new generation.
Voiceover and Lip Sync
If your influencer character is meant to speak, the Voiceover and Lip Sync panels handle this inside the same interface. Navigate to Voiceover to apply an AI voice to a script, then use Lip Sync to match the mouth movement of the character to the audio. This is particularly useful for brand content where the character needs to address the viewer directly.
Voice selection matters here. A voice that does not match the visual energy of the character creates an immediate disconnect. The Y2K blue-hair editorial character would feel wrong with a corporate narration voice. Match the voice register to the visual personality.
Captions
Use the Captions panel to add auto-generated captions to your clips before export. Atlabs generates sentence-level captions that time to the audio. For social media content, this is not optional. The majority of video on Instagram, TikTok, and LinkedIn is watched without sound at least some of the time. Captions keep the message intact regardless of whether audio is playing.
Sentence-level captions also function as attention direction. Each caption that appears on screen briefly reanchors the viewer's focus, which reduces drop-off in the middle of a clip.
B-Roll
The B-Roll panel in Atlabs lets you insert atmospheric cutaway clips between your main character scenes. For an influencer reel, this could mean texture shots, close-up product details, or abstract visual passages that give the main character scenes more breathing room. B-roll pacing is what separates a compilation from an edit.
Export Settings by Platform
Platform | Recommended Settings |
Instagram Feed / TikTok / Reels | 9:16 vertical, captions baked in, 15 to 60 seconds |
Instagram Square Feed Post | 1:1 square, captions baked in |
YouTube Shorts | 9:16 vertical, captions optional, up to 60 seconds |
LinkedIn Feed | 1:1 square or 16:9, captions baked in, under 3 minutes |
Website / Portfolio Reel | 16:9 widescreen, no baked captions, MP4 |
Brand Pitch Deck Embed | 16:9, compressed MP4, loop-friendly |
Atlabs exports directly in the format you select. For influencer content that needs to live across multiple platforms, export the same sequence in multiple aspect ratios in a single session rather than re-editing separately for each.
More Surreal Character Concepts to Try
Once the four-step workflow is internalized, the range of characters you can create expands quickly. Here are five more directions worth building toward, with enough creative direction to get started:
The Glitch Portrait
A hyperrealistic close-up portrait where the face appears to be experiencing a digital glitch. Sections of the face appear slightly offset, pixelated, or doubled. Clean white background. Cold blue and white color palette with flashes of hot pink. Expression: completely neutral and unbothered by the glitch. Motion prompt: very slow camera push-in while the glitch effect pulses subtly at the edges of the face.
The Flower Burial
A fashion model lying in a shallow bath of milk, completely submerged up to the chin. Oversized fresh florals in deep burgundy and cream floating around her face. Eyes closed. Expression: serene, removed from the world. Soft diffused backlight creating a glow through the milk surface. Motion prompt: slow breathing movement, one petal drifts gently across the surface, camera stays completely still.
The Living Mannequin
A figure styled exactly like a department store mannequin, frozen mid-pose, in a high-end retail window display. Surrounded by actual mannequins that are slightly less realistic than the real subject. Confusion between subject and props is the concept. Motion prompt: subject blinks slowly, shifts weight almost imperceptibly, one finger moves slightly as if waking up.
The Cloud Head
An editorial portrait where the subject's hair has been replaced entirely by a soft sculptural cloud formation. Warm golden studio light. Everything below the neck is completely normal and grounded: a neutral shirt, natural skin. The cloud sits exactly where the hair should be, impossibly light and real. Motion prompt: cloud shifts very slowly like time-lapse cloud movement while the subject's expression remains still.
The Oversized Toy World
A full-body shot where a human figure is standing in a scene that appears to be built entirely from oversized toy blocks, plastic figurines, and inflatable props, but photographed with total realism. The subject is dressed in normal contemporary clothing, completely unaware of the absurdity of the environment. Motion prompt: subtle idle animation on subject while toy props remain still, slow camera push-in.
Why Atlabs Is the Right Tool for This Kind of Work
There are other AI image and video tools. Most of them do one part of this workflow. Atlabs does all of it in the same session, which matters more than it sounds.
The typical alternative workflow involves generating images in one tool, animating them in a second, editing in a third, adding audio in a fourth, and captioning in a fifth. Each handoff between tools introduces friction, format conversion time, and quality loss. More importantly, each separate tool has its own prompt logic, its own output quirks, and its own learning curve.
Atlabs keeps image generation, motion prompting, timeline editing, voiceover, lip sync, captions, and export inside one interface. The result is that creative momentum does not get interrupted by tool-switching. When a motion clip comes back and does not quite land, you can adjust the prompt and regenerate immediately in the same workspace. That immediacy is what makes rapid creative iteration possible.
The platform also supports the kind of volume that influencer content creation demands. A single character concept built in one session can produce five to ten usable clip variations across different motion prompts. Those clips become a content library. Post one today. Schedule three for the week. Test two against each other as paid ads. The production capacity changes the creative ambition.
The Bottom Line
Weird works. Surreal, conceptually strange, visually unexpected content consistently outperforms safe and polished content in organic reach, engagement, and memorability. The only thing that has historically limited how many creators could execute at that level was production cost and access to equipment and talent.
AI removes that constraint entirely. The workflow described in this guide, four steps inside Atlabs, produces editorial-quality influencer content that would have cost thousands of dollars and days of production time to create through traditional means. It now takes an afternoon.
The characters in these screenshots are not the ceiling. They are the starting point. Build something stranger.
Start creating at atlabs.ai. Free to start, no credit card required.