TL;DR
Stop AI character morphing with the 2x2 Grid Method. Generate 4 connected scenes simultaneously to maintain perfect consistency across lighting, scale, and character details. This complete tutorial shows you how to create a cinematic Samurai vs. Nine-Tailed Fox battle sequence entirely in Atlabs AI, from character sheets to final edit.
The #1 Problem Every AI Filmmaker Faces
Does your AI character change their face every time you generate a new shot?
If you're new to AI filmmaking, you've probably hit the "consistency wall." You generate a cool Samurai in one shot, but in the next frame:
His armor changes color
The lighting shifts completely
The monster he's fighting shrinks to the size of a dog
His face looks like a different person
Consistency is the enemy of AI filmmaking.
Traditional solutions require juggling 5+ different tools: one for images, another for upscaling, a third for video generation, a fourth for editing, and a fifth for sound design. That's expensive, time-consuming, and frankly... exhausting.
There's a better way.
What You'll Learn
✓ The 2x2 Grid Method for perfect character consistency
✓ How to create character reference sheets that "lock in" your actors
✓ Exact prompts for a Samurai vs. Nine-Tailed Fox battle sequence
✓ Image-to-video animation techniques for cinematic motion
✓ How to edit everything in one platform (Atlabs AI)
✓ Why this method works (the science behind AI consistency)
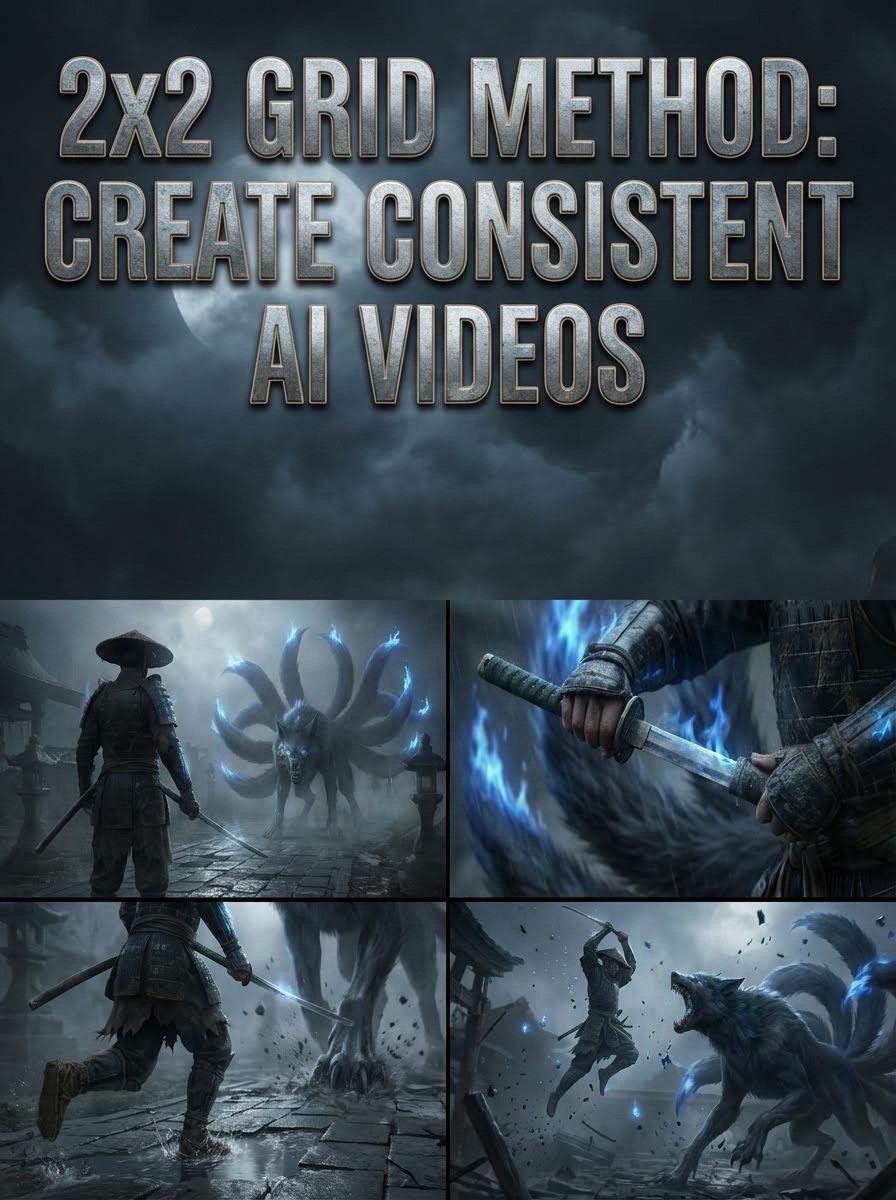
What Is the 2x2 Grid Method?
Instead of asking the AI for one image at a time, you ask it to create a grid of four images (2 images wide, 2 images tall) that tell a story in sequence, all generated simultaneously.
Why Does This Work?
Think of the AI like a painter with a short attention span.
Traditional Method (Inconsistent):
If you ask for four separate paintings one after another, the painter might forget what the character looked like in the first one. Each painting becomes a new interpretation.
2x2 Grid Method (Consistent):
But if you ask the painter to create four panels on one single canvas at the same time, they remember the lighting, colors, and character details perfectly across all four panels, because they're painting everything simultaneously while the reference is fresh in their mind.
What This Ensures
Consistency Factor | How Grid Method Solves It |
|---|---|
Scale Continuity | Fox remains massive compared to Samurai across all frames |
Lighting Match | Eerie blue moonlight hits armor identically in every shot |
Character Identity | Samurai's katana and armor design don't morph between frames |
Color Palette | Blue spirit fire maintains exact same hue and intensity |
Environmental Details | Shrine ruins, fog, and debris stay consistent |
The Complete Workflow: 5 Essential Steps
Step 1: Establish Your "Actors" (Character Reference Sheets)
Step 2: Generate the 2x2 Grid (4 Connected Scenes)
Step 3: Crop and Upscale Individual Frames
Step 4: Animate with Image-to-Video
Step 5: Edit for Cinematic Rhythm
Let's dive deep into each step.
Step 1: Create Character Reference Sheets
Before you film a single frame of action, you need to tell Atlabs exactly what your hero and monster look like. If you skip this step, your Samurai might change armor every time he swings his sword.
Think of these as the "DNA" for your video.
Why Character Sheets Matter
Character sheets serve three critical functions:
Visual Anchor: Gives AI a consistent reference point
Detail Lock: Prevents random variations in costume/features
Scale Establishment: Shows relative sizes before action begins
A. The Samurai (The Hero)
Copy-Paste This Prompt:
Full body character sheet of a gritty, dark fantasy Ronin Samurai. He wears battered, black lacquered armor with subtle glowing blue runic engravings. He carries a katana with a distinct jade-green hilt. Show him from three angles: Front view, Side view, and Back view. Neutral grey background, flat lighting, hyper-detailed, 8k resolution. No text.
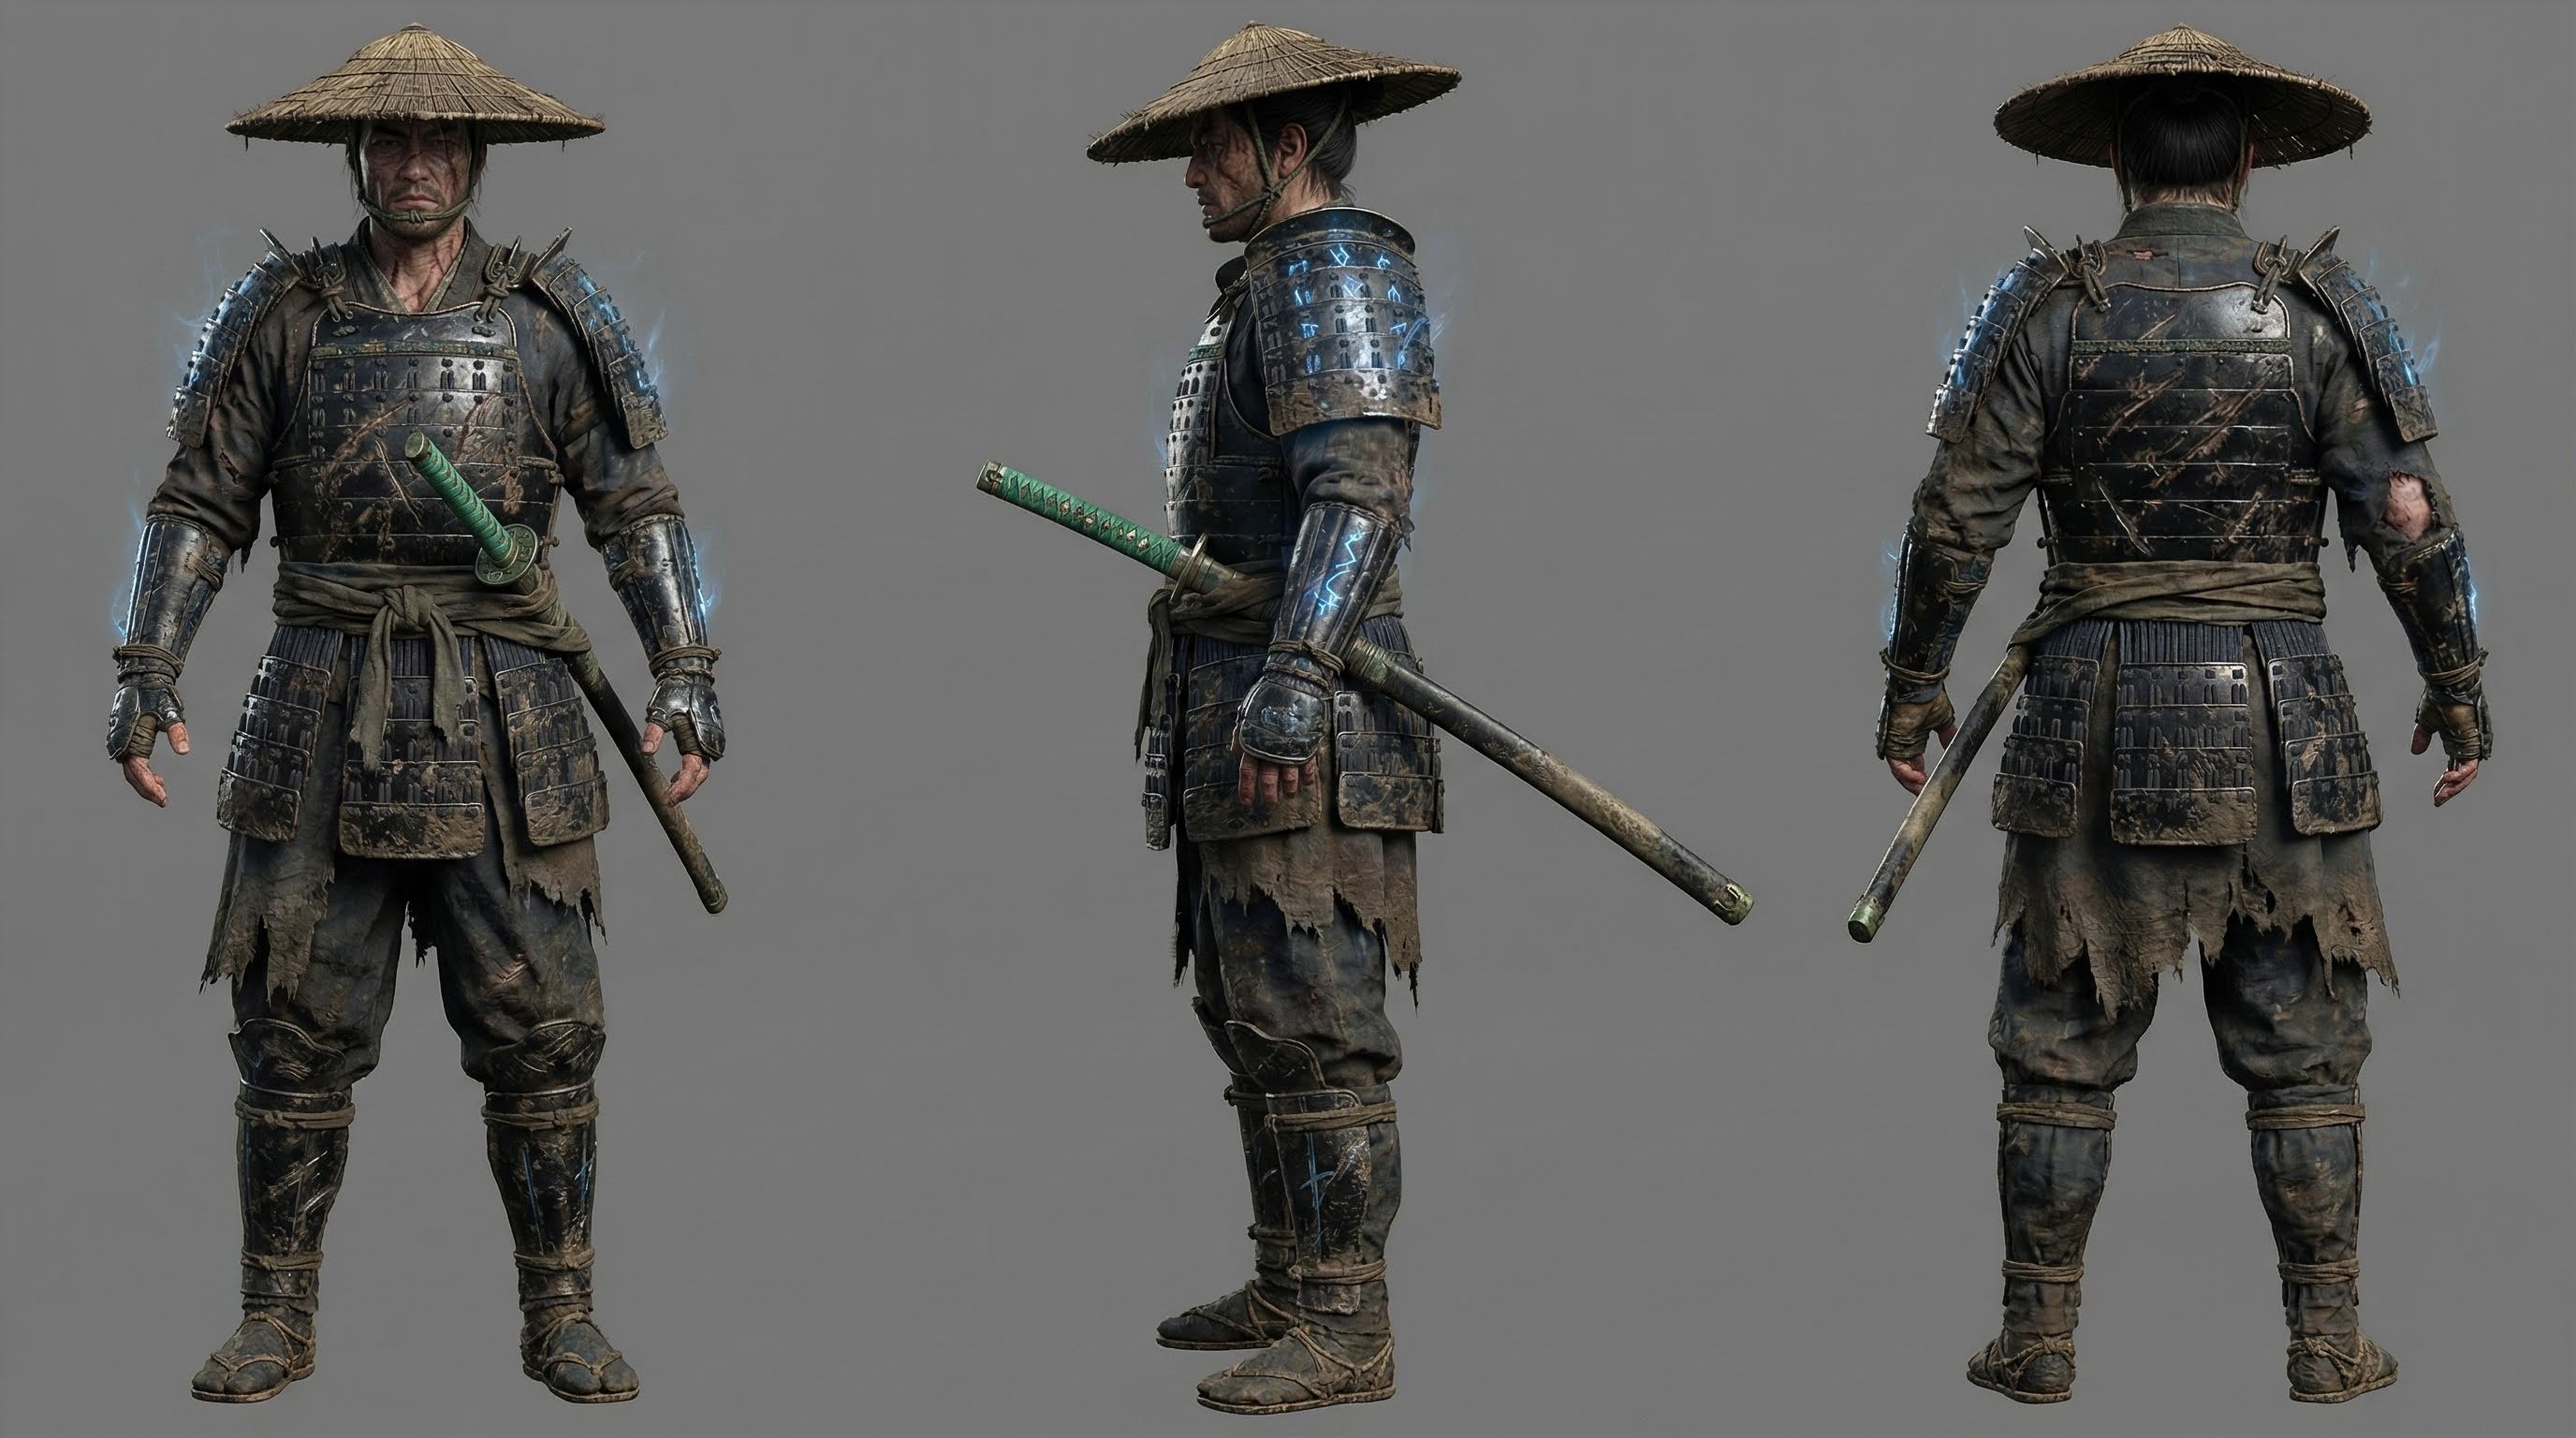
Key Elements:
"Full body" ensures complete visual reference
"Three angles" provides 360° understanding
"Jade-green hilt" creates a distinctive identifier
"No text" prevents AI from adding unwanted labels
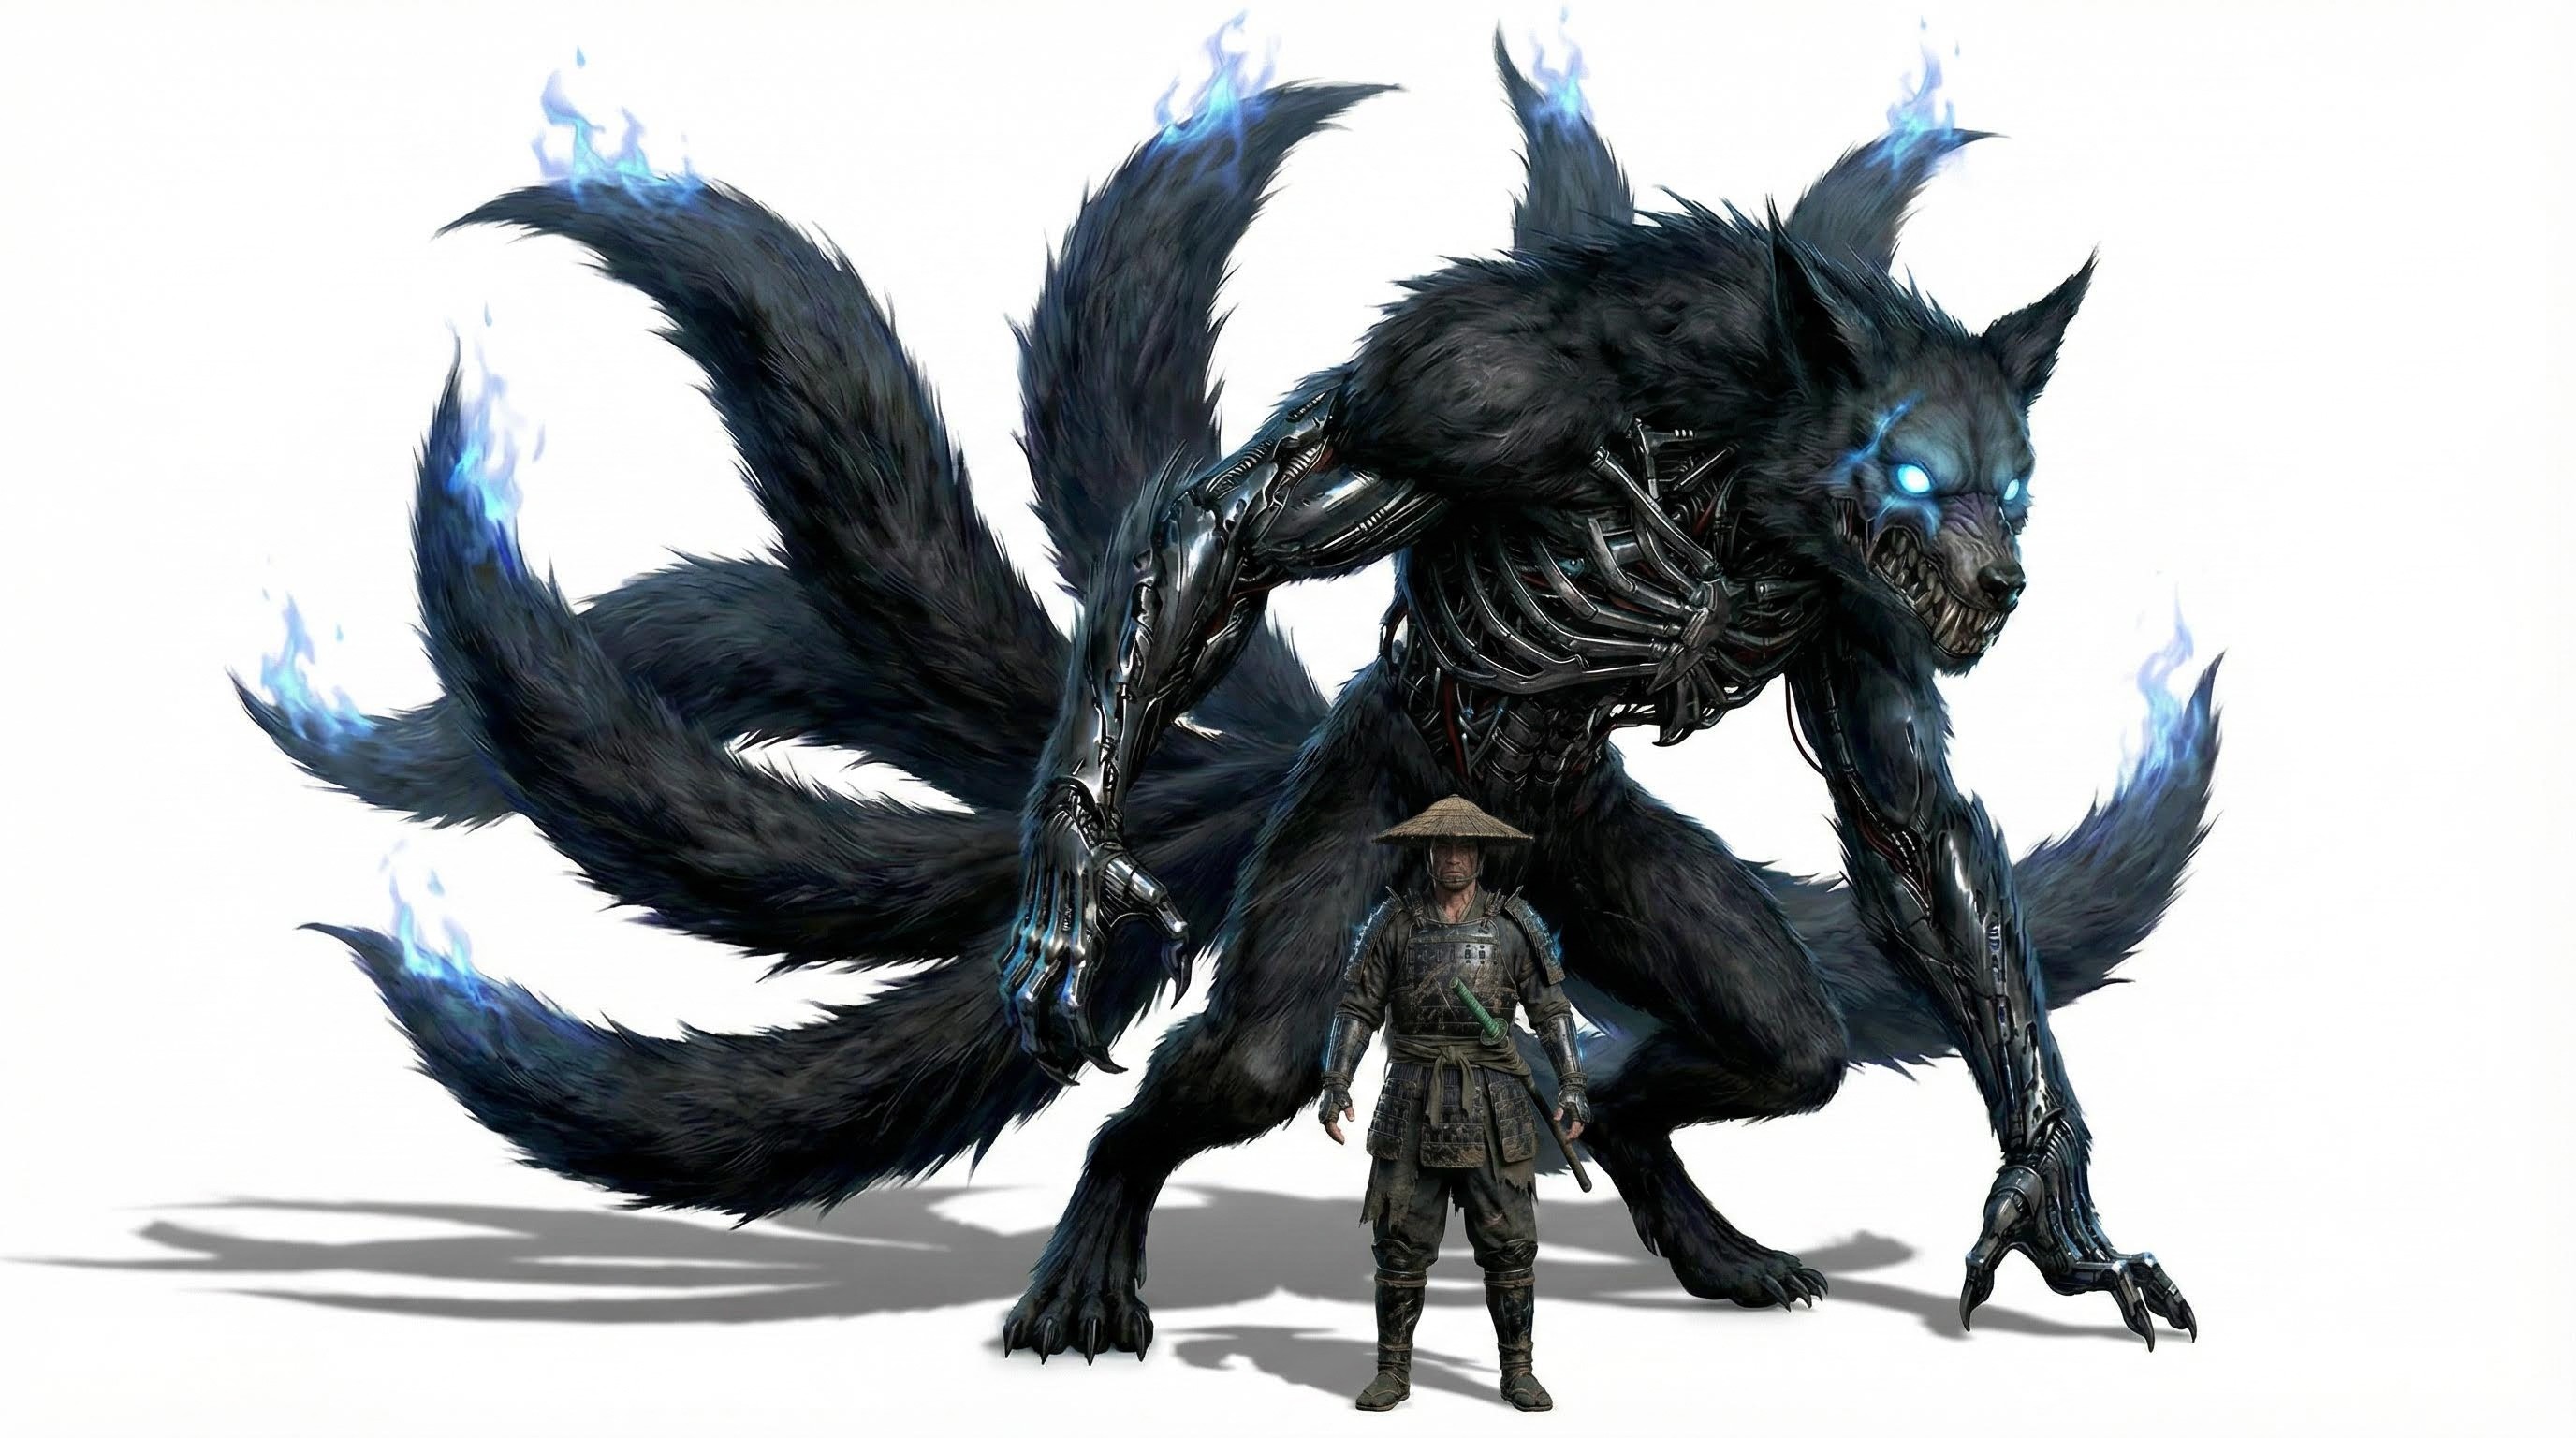
B. The Nine-Tailed Fox (The Monster)
Copy-Paste This Prompt:
Full body character sheet of a colossal, demonic Nine-Tailed Fox (Kitsune). It has matted dark fur, exposed cybernetic/mechanical ribs, and nine massive tails tipped with blue spirit fire. Its eyes are glowing hollow sockets. Show full body, menacing posture. Neutral grey background, photo realistic style. No text.
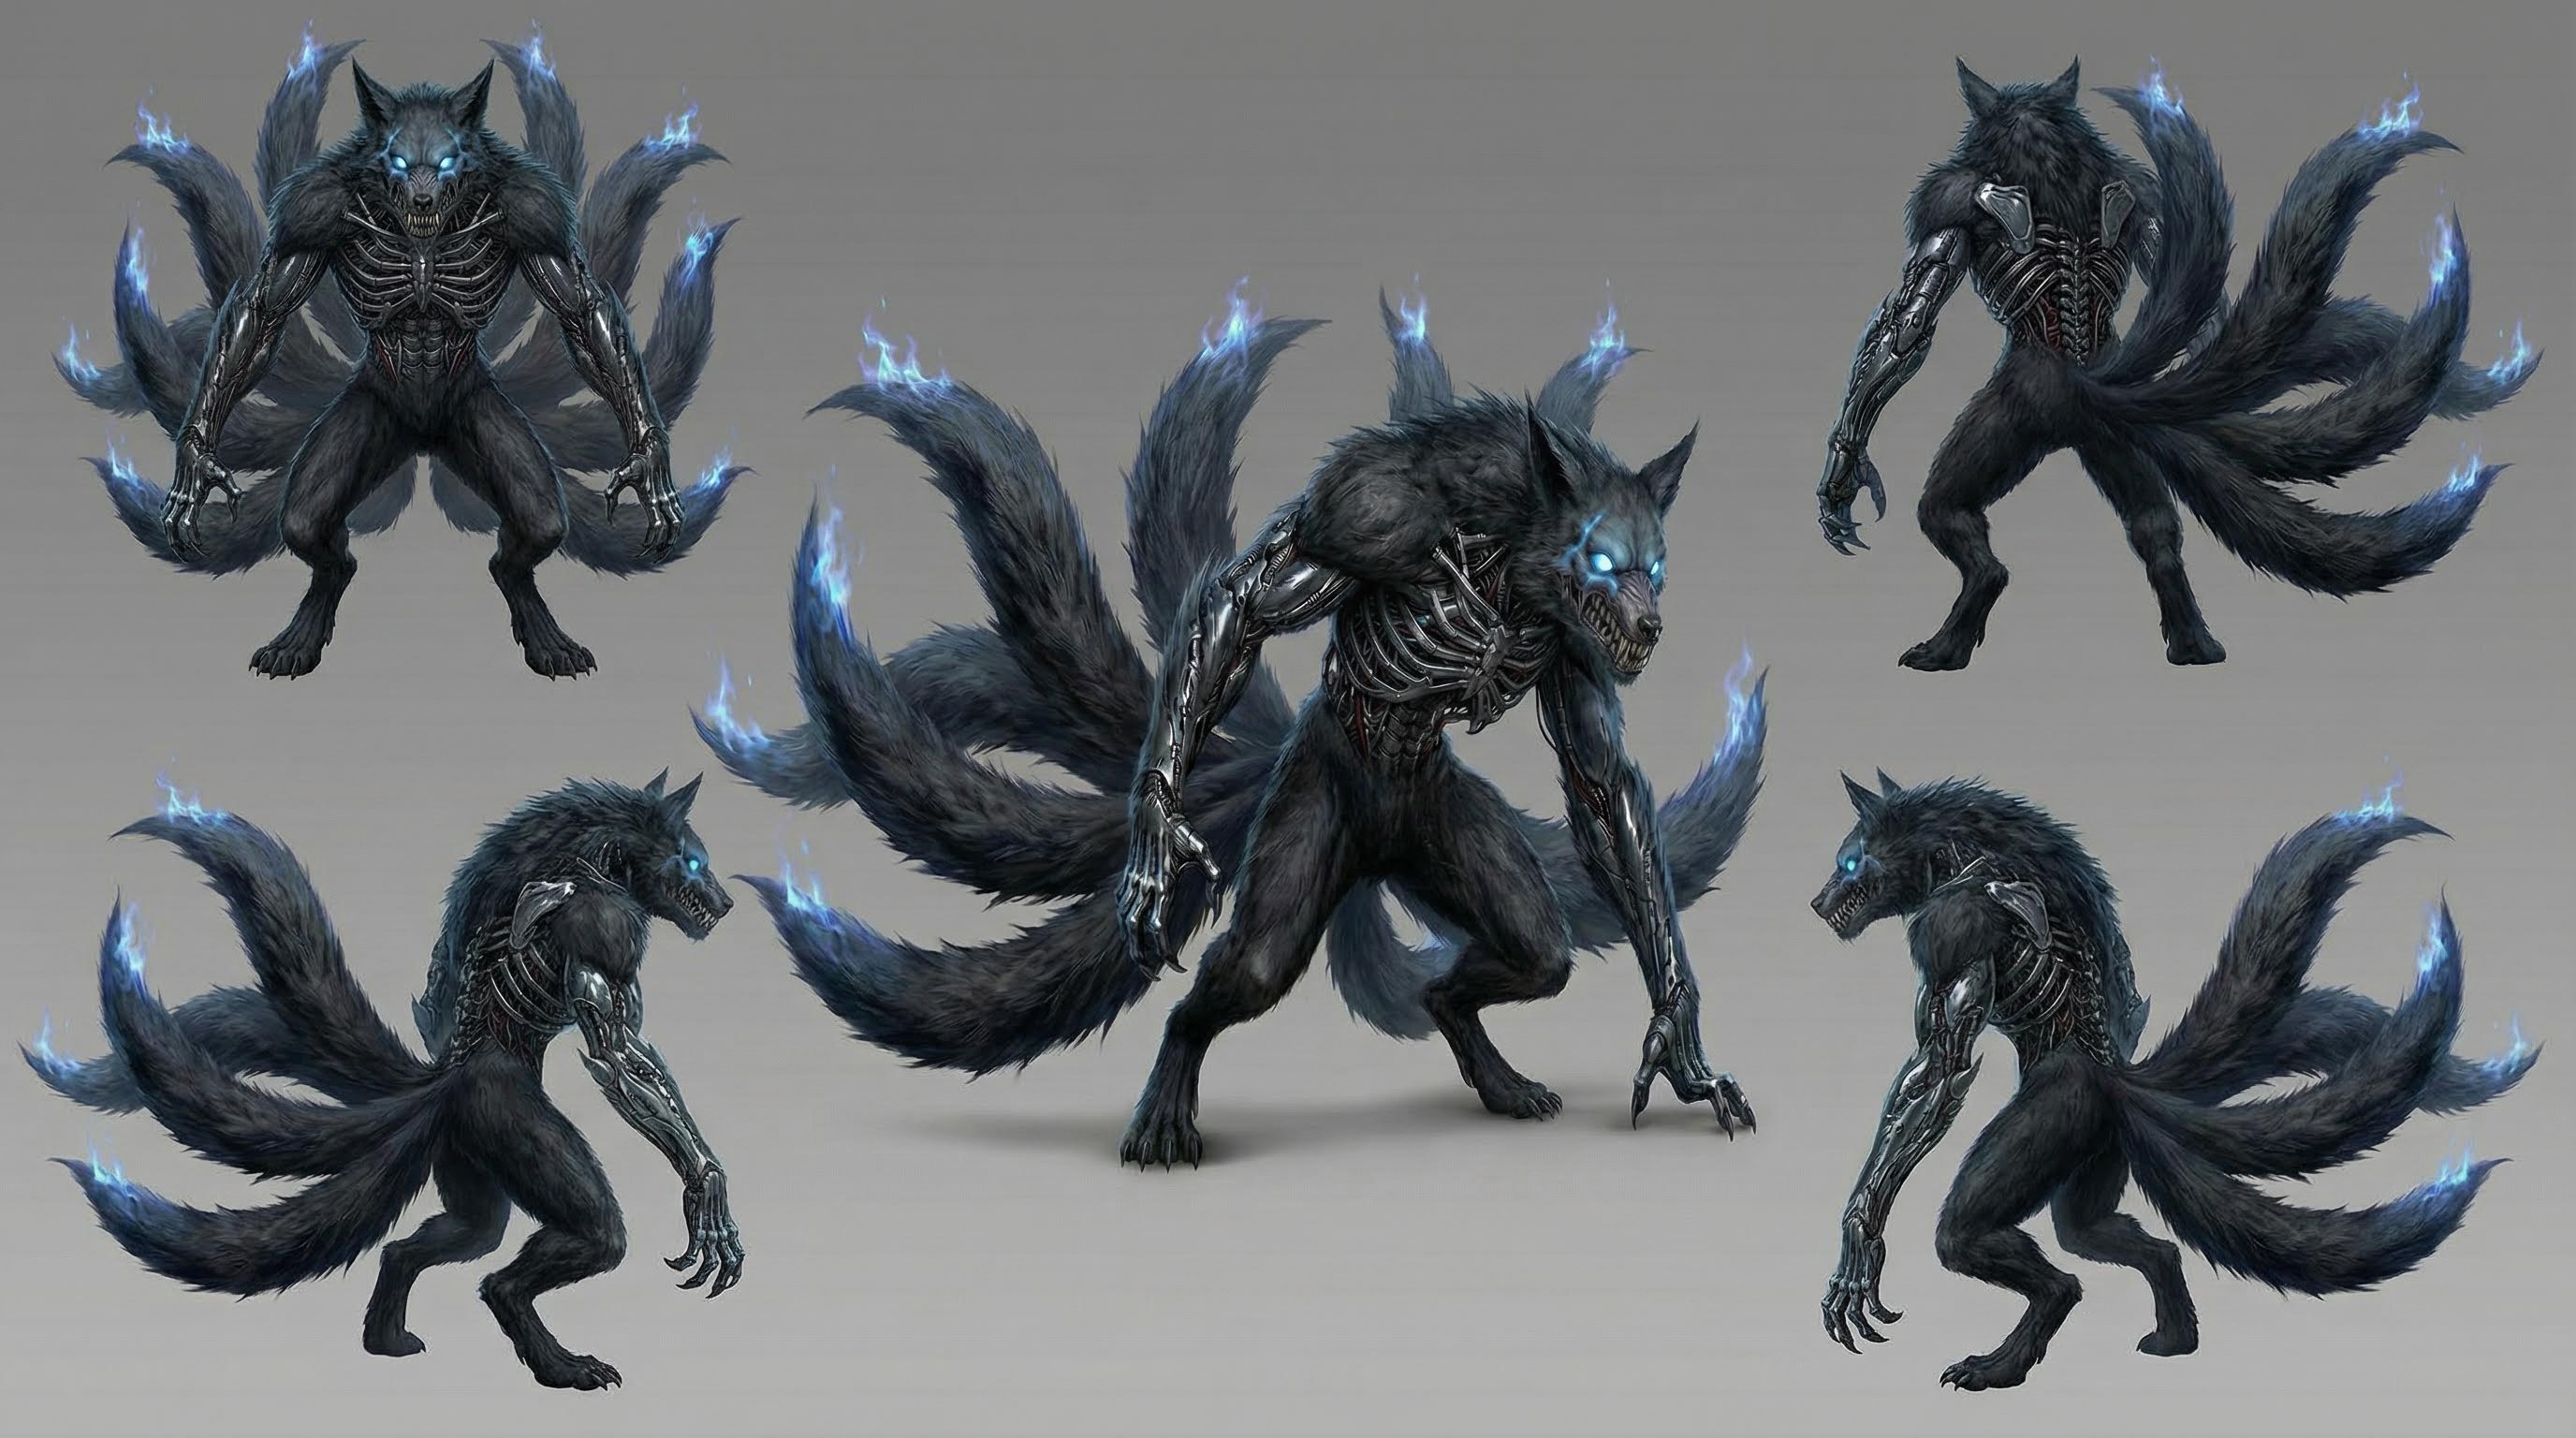
Key Elements:
"Nine massive tails" explicitly specifies count
"Blue spirit fire" creates visual continuity element
"Cybernetic/mechanical ribs" adds unique identifier
"Glowing hollow sockets" provides distinctive face feature
C. The Scale Reference (Most Important!)
Why scale matters: The biggest consistency failure in AI video is size relationships. Without a scale reference, your "massive" monster might shrink to puppy size between shots.
Copy-Paste This Prompt:
Scale reference sheet. Show the Samurai and the Nine-Tailed Fox standing side-by-side against a white background. The Samurai is standing tall but only reaches the height of the Fox's ankle. The Fox looms over him, massive and terrifying. This image demonstrates the extreme size difference between the two characters.
Pro Tip: Save this scale image. Upload it into Atlabs as an image reference when generating your 2x2 grid to reinforce size consistency.
Step 2: The Magic Prompt (The 2x2 Grid)
Now we create our action sequence. We're going to ask Atlabs to generate four specific camera angles of the fight scene in one simultaneous generation.
This prompt looks long, but it's actually just a list of instructions for four different connected pictures.
Understanding the Grid Structure
Each frame serves a specific narrative purpose and uses a different cinematic technique.
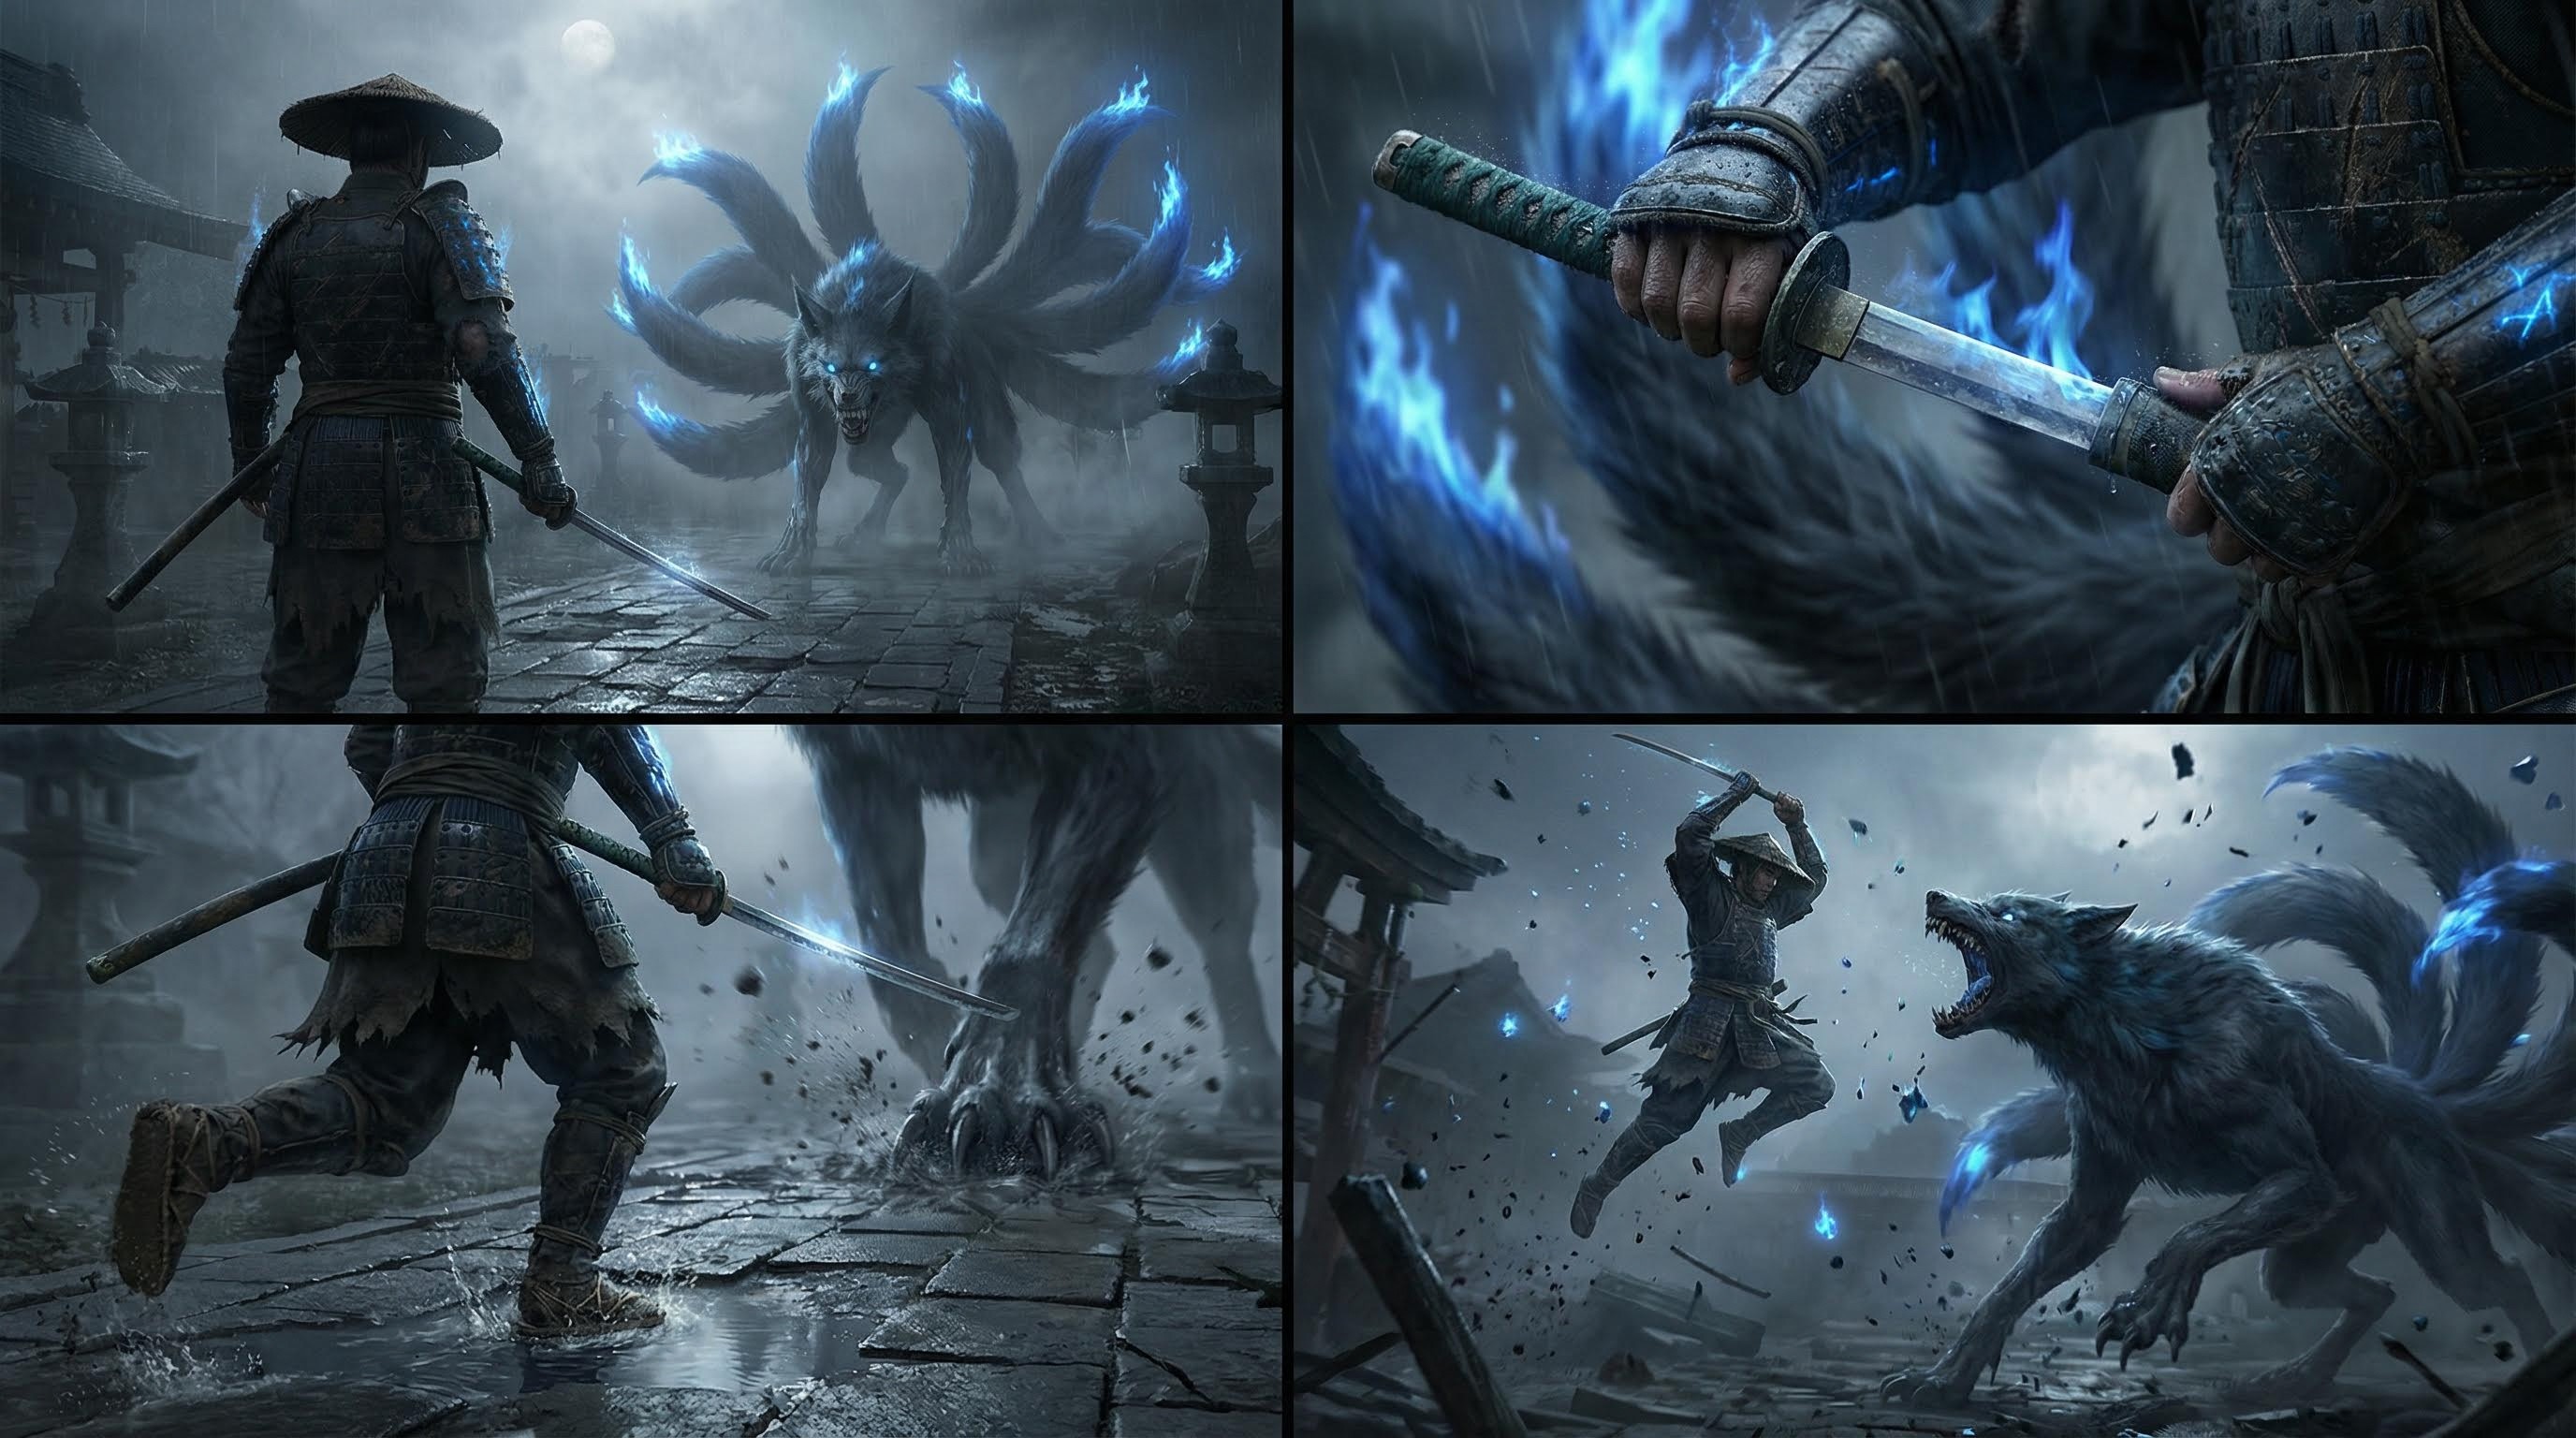
The Complete 2x2 Grid Prompt
Copy-Paste This Entire Prompt:
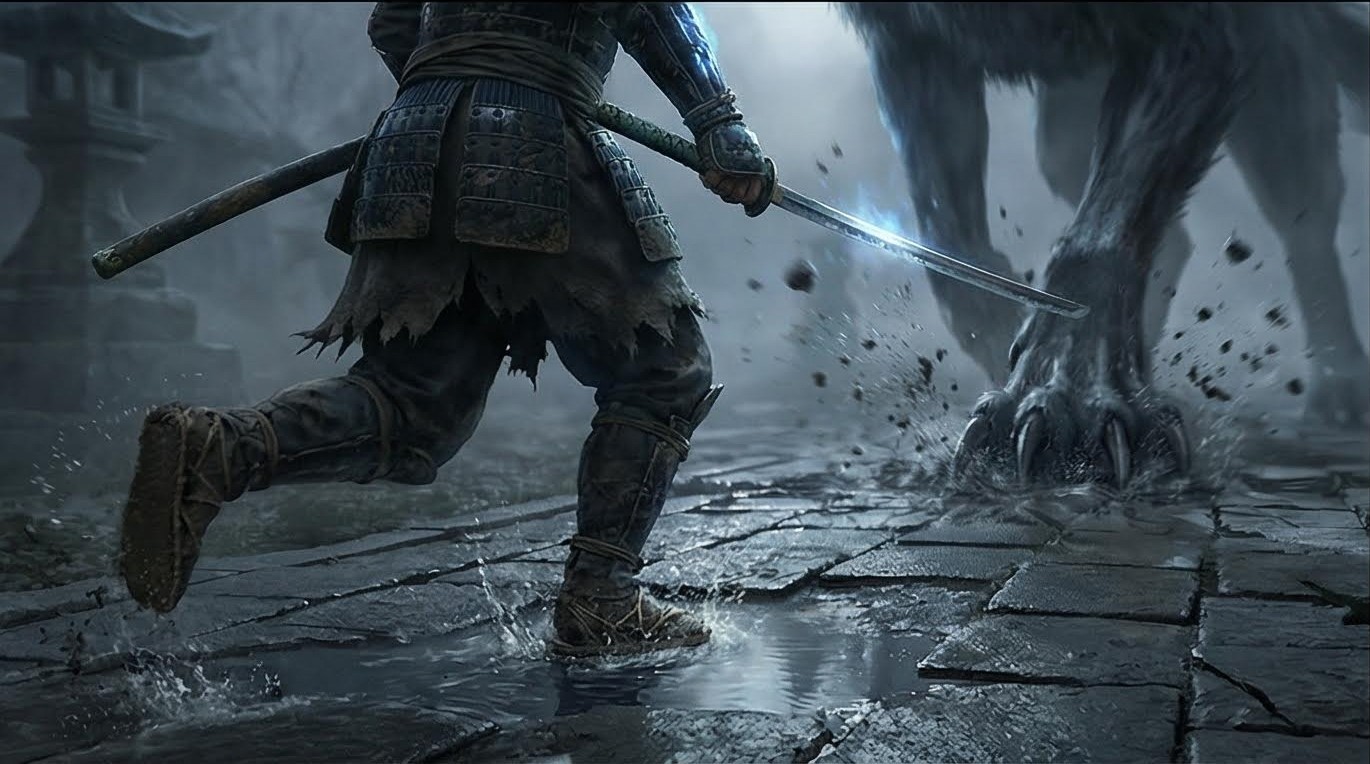
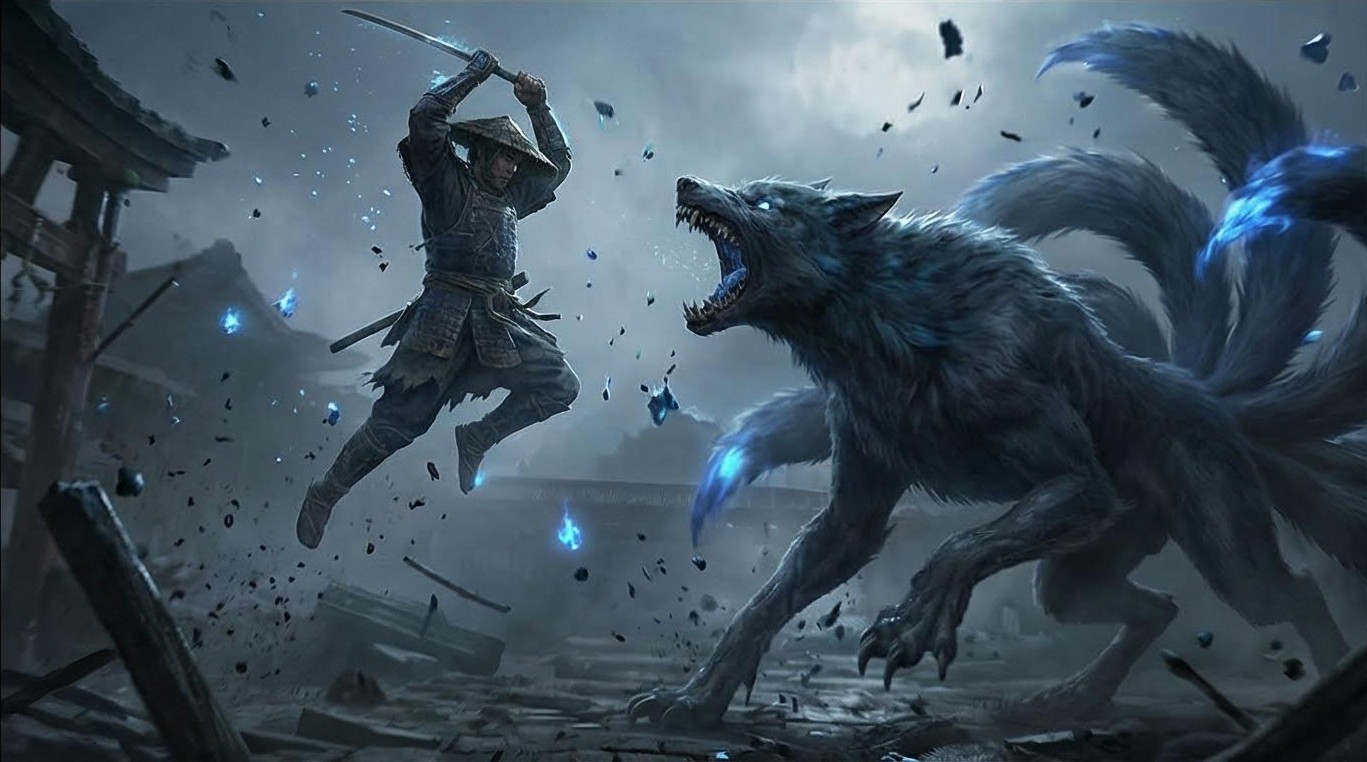
Generate a photorealistic, cinematic 2x2 grid of still frames from a dark fantasy live-action film. A lone Samurai is battling a massive, demon-possessed Nine-Tailed Fox at a ruined Shinto shrine. The imagery must feel grounded but mystical. Moonlight cuts through fog. The Fox's tails glow with ghostly blue fire. The Samurai is gritty and worn. Real weight, real danger. Frame 1 (The Standoff):Wide, over-the-shoulder shot from behind the Samurai. He stands in the foreground, katana drawn, silhouette framed by moonlight. The Nine-Tailed Fox (20ft tall) fills the background, its nine tails fanned out like a peacock of blue fire, snarling down at him. Frame 2 (The Tension):Extreme close-up on the Samurai's hands gripping the katana hilt. Rain mixes with sweat on his gauntlets. The steel blade reflects the blue ghostly fire of the Fox. The background is blurred, showing only the massive texture of the Fox's fur rushing towards him. Frame 3 (The Charge):Low angle, ground-level action shot. Focus on the Samurai's feet splashing through a puddle on the shrine stones. He is mid-sprint, launching himself forward. In the background, out of focus, a massive paw from the Fox is smashing into the ground where he just stood. Frame 4 (The Strike):Wide shot, mid-air freeze frame. The Samurai has leapt high into the air, katana raised above his head, ready to slash. The Fox is rearing back, jaws snapping, bracing for the impact. Debris and spirit energy particles float in the air.
Breaking Down Each Frame
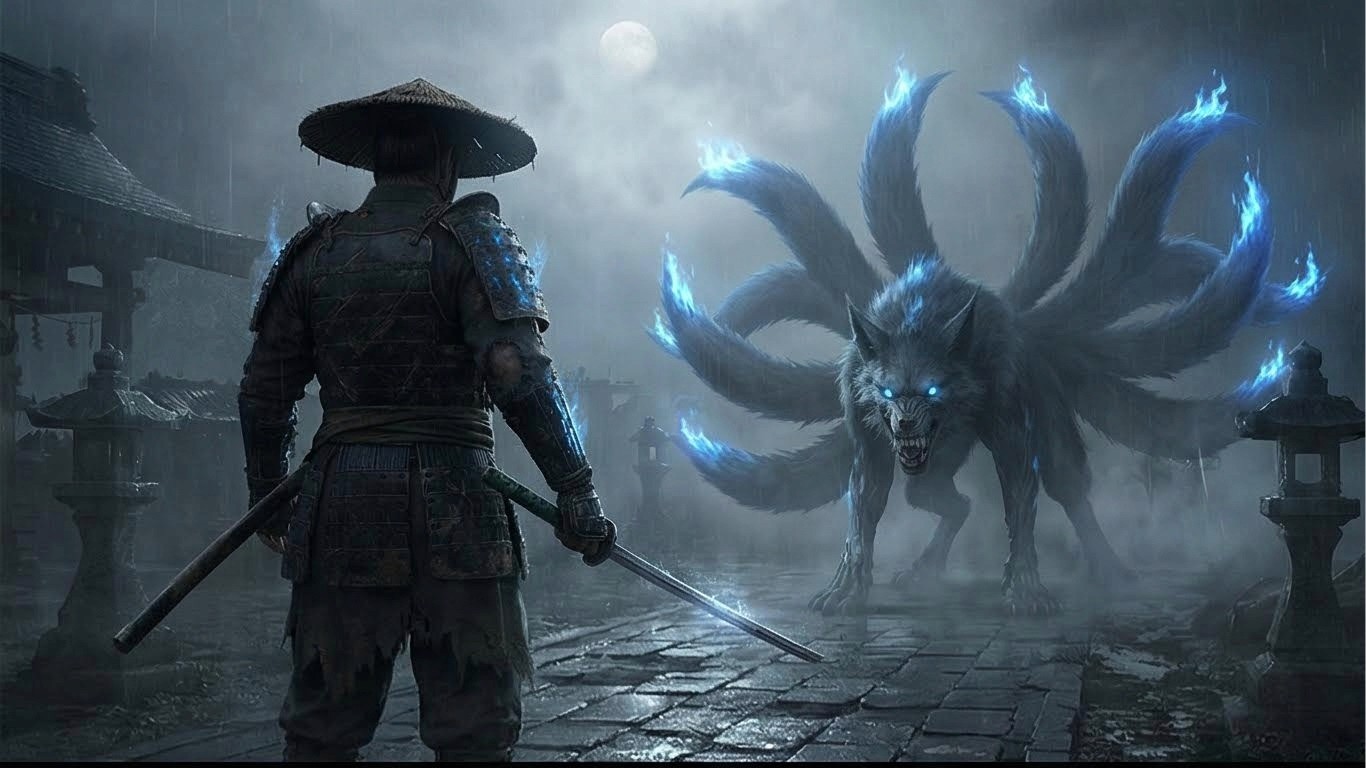
Frame 1: The Standoff (Establishing Shot)
Cinematic Technique: Over-the-shoulder wide shot
Purpose: Establishes scale, environment, and dramatic tension
Key Elements:
Silhouette framing creates dramatic contrast
"20ft tall" specification maintains scale
"Nine tails fanned out" reinforces detail consistency
Why this works: Starting wide gives context before cutting to details.
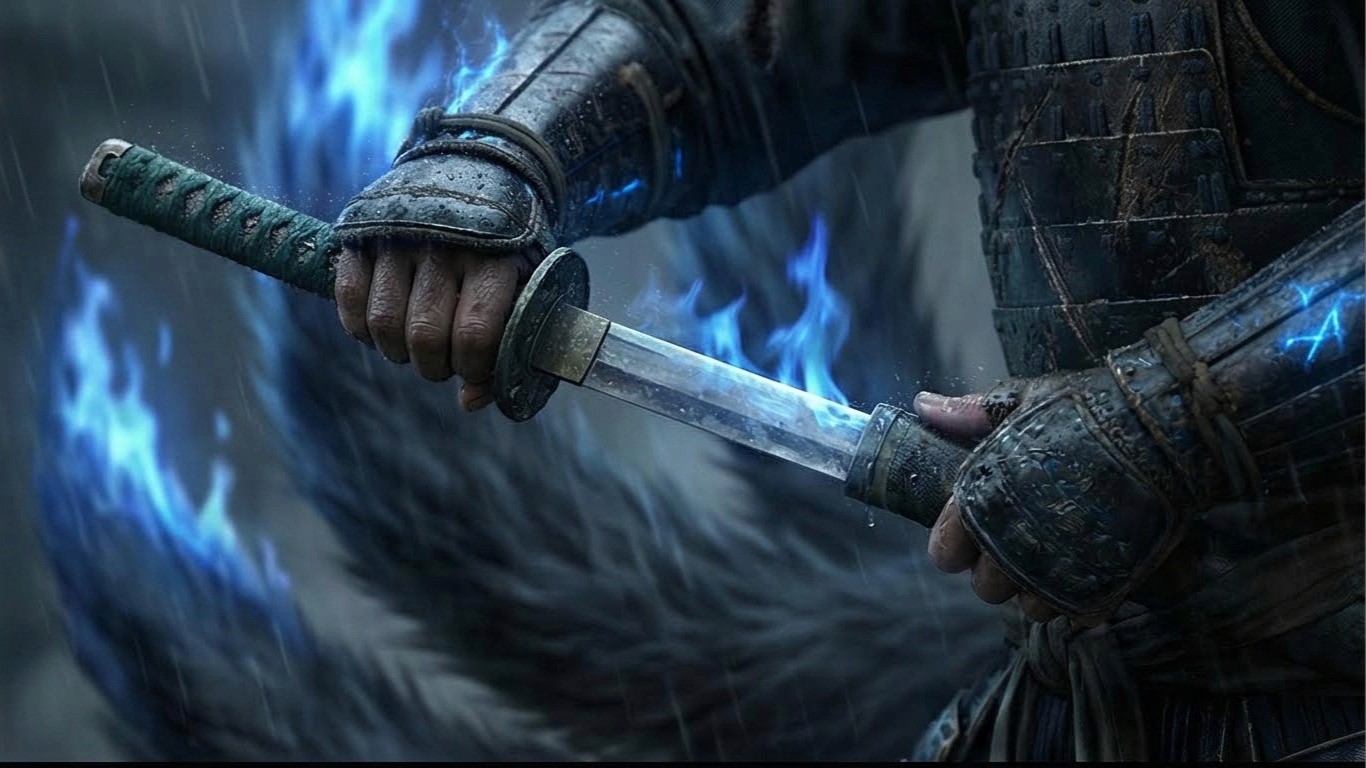
Frame 2: The Tension (Detail Shot)
Cinematic Technique: Extreme close-up
Purpose: Creates intimacy and shows emotional stakes
Key Elements:
Focus on hands (not face) maintains mystery
"Reflects blue fire" creates visual connection to Fox
Blurred background maintains scale without showing full beast
Why this works: Close-ups create emotional investment before action explodes.
Frame 3: The Charge (Dynamic Action)
Cinematic Technique: Low angle ground-level shot
Purpose: Conveys speed, momentum, and danger
Key Elements:
"Splashing through puddle" adds kinetic energy
"Massive paw smashing" reinforces scale and threat
Out-of-focus background suggests motion blur
Why this works: Low angle makes action feel visceral and immediate.
Frame 4: The Strike (Climactic Moment)
Cinematic Technique: Mid-air freeze frame
Purpose: Captures peak action in iconic pose
Key Elements:
"Mid-air freeze frame" creates suspended-time effect
"Debris and spirit energy" adds environmental storytelling
"Jaws snapping" shows monster's counter-reaction
Why this works: Frozen peak action creates poster-worthy moment.
Step 3: Crop and Upscale
Once Atlabs generates your 2x2 grid, you'll see four connected scenes that maintain perfect consistency. But they're all in one image.
The Process
1. Save the Grid Image
Download the full 2x2 grid from Atlabs.
2. Crop Into Individual Frames
Use any image editor (even basic phone apps work) to crop the grid into four separate images:
Top-left = Frame 1 (Standoff)
Top-right = Frame 2 (Tension)
Bottom-left = Frame 3 (Charge)
Bottom-right = Frame 4 (Strike)
3. Upscale in Atlabs
Because you cropped the image, the quality might look soft. Import the four images back into Atlabs and use the Upscale feature.
Why Upscaling Matters
Before Upscale | After Upscale |
|---|---|
Soft details | Crisp textures |
~512x512 px per frame | 2K-4K resolution |
Visible compression | Film-quality detail |
Flat lighting | Enhanced depth |
Copy and Paste Prompt:Upscale and enhance [image1] with extreme photorealism and cinematic fidelity. Preserve the exact composition, framing, camera angle, color grade and subject placement — do not alter or add new elements except adding a bit to the sides so that we go from a 16:9 aspect ratio to a 21:9 aspect ratio Increase resolution to true high-end cinematic clarity, with natural film-grade sharpness (no Al oversharpening).
Pro Tip: Upscaling adds back texture details like rain on armor, individual fur strands, and stone weathering that make the difference between "AI-generated" and "cinematic."
Step 4: Turn Images into Video (Animation)
Now comes the magic. We're going to transform those four still images into four video clips using Atlabs' Image-to-Video tool.
Critical Beginner Tip
DON'T describe the character in your motion prompts.
❌ Wrong: "The Samurai in black armor with blue engravings moves forward..."
✅ Right: "Camera tracks forward as the character breathes heavily..."
Why? The AI can already see the character in the image you uploaded. Describing them again can actually confuse the model and break consistency. Instead, describe only the movement and camera motion.
Motion Prompts for Each Frame
Frame 1 (The Standoff) - Motion Prompt
Slow camera push in. The Fox's tails sway hypnotically with blue fire. Rain falls gently. The Samurai breathes heavily, shoulders rising and falling.
Effect: Creates tension through subtle movement
Duration: 3-4 seconds
Key Motion: Breathing, fire swaying, rain
Frame 2 (The Grip) - Motion Prompt
Subtle camera shake. Rain runs down the blade. The reflection on the steel shifts as the hands tighten their grip.
Effect: Builds anticipation through micro-movements
Duration: 2-3 seconds
Key Motion: Hand tensing, rain droplets, reflection shift
Frame 3 (The Charge) - Motion Prompt
Fast, low-tracking camera following the feet. Water splashes violently. Heavy motion blur on the background debris.
Effect: Explosive energy release
Duration: 2-3 seconds
Key Motion: Running, splashing, camera tracking
Frame 4 (The Strike - The Climax) - Motion Prompt
Fast handheld wide shot, heavy motion blur. The Samurai descends and slices downward. The Fox recoils, snapping its jaws. Sparks and blue spirit energy explode from the impact point. Debris flies everywhere.
Effect: Maximum kinetic impact
Duration: 3-4 seconds
Key Motion: Sword slash, monster recoil, explosion
Step 5: Edit for Cinematic Rhythm
You now have four video clips. To make them feel like a professional movie, you need to edit them together inside Atlabs.
The Editing Sequence
1. Arrange the Clips
Import all four clips into Atlabs' video editor in this order:
Standoff → Hands → Feet → Air Strike
2. Timing and Pacing
Clip | Duration | Pacing | Purpose |
|---|---|---|---|
Standoff | 3-4 sec | Slow | Build tension |
Hands | 2-3 sec | Medium | Increase urgency |
Feet | 2 sec | Fast | Release energy |
Strike | 3-4 sec | Explosive | Climactic payoff |
Total Runtime: 10-13 seconds of pure cinematic action
Advanced Technique: Speed Ramping
AI video can sometimes feel "floaty." To add impact, use speed ramping on Frame 4 (The Strike).
How to Speed Ramp:
Take the video from Frame 4
At the moment the sword makes contact with the Fox
Increase playback speed to 150% for 0.5 seconds
Return to normal speed
Effect: This creates a visceral "hit" sensation with real weight.
Sound Design (The Secret Weapon)
Add sound effects directly in Atlabs to sell the illusion. Sound accounts for 50% of cinematic impact.
Frame 1 (Standoff):
Low, guttural growl (distant)
Wind howling through ruins
Distant thunder
Frame 2 (Hands):
Leather creaking
Rain pattering on metal
Heavy breathing
Frame 3 (Feet):
Splashing water
Heavy footsteps on stone
Rushing wind
Frame 4 (Strike):
Loud metallic "SCHWING" (sword slash)
Ethereal explosion sound
Monster roar
Debris crashing
Pro Tip: Layer 2-3 sounds per frame for richness, but keep the mix clean—don't overwhelm.
Why Use Atlabs for This Entire Workflow?
In traditional AI filmmaking tutorials, creators juggle 5+ different expensive tools:
Task | Traditional Tool | Cost |
|---|---|---|
Character Generation | Midjourney | $10-60/mo |
Image Upscaling | Topaz Gigapixel | $99 one-time |
Video Generation | Runway ML | $12-76/mo |
Video Editing | Premiere Pro | $22.99/mo |
Sound Design | Epidemic Sound | $15/mo |
Total | 5 platforms | $158-272/mo |
The Atlabs Advantage
Atlabs puts all of this in one browser tab:
✓ Generate the 2x2 grid
✓ Upscale the individual shots
✓ Animate images to video
✓ Edit the final movie
✓ Add sound design
✓ Export finished product
All without leaving the site. No context switching. No file management hell.
Common Mistakes to Avoid
Mistake #1: Skipping Character Reference Sheets
❌ Wrong: Jump straight to the 2x2 grid without character sheets
✅ Right: Create detailed character sheets first, use them as reference
Why it matters: Without a visual anchor, consistency breaks down across the grid.
Mistake #2: Describing Characters in Motion Prompts
❌ Wrong: "The Samurai in black armor runs forward..."
✅ Right: "Camera tracks forward. Feet splash through puddles."
Why it matters: Describing characters in motion prompts can override the visual reference and break consistency.
Mistake #3: Generating Frames Individually
❌ Wrong: Generate Frame 1, then Frame 2, then Frame 3...
✅ Right: Generate all 4 frames simultaneously in one 2x2 grid
Why it matters: Individual generation loses the consistency advantage—you're back to the "short attention span painter" problem.
Mistake #4: Ignoring Scale in Every Frame
❌ Wrong: Only mention Fox size in Frame 1
✅ Right: Reinforce scale in every frame description ("massive paw," "20ft tall," "looms over")
Why it matters: AI needs constant reminders to maintain relative proportions.
Mistake #5: Static Motion Prompts
❌ Wrong: "The Samurai stands still, wind blows"
✅ Right: "Slow camera push in. Breathing shoulders. Swaying tails. Falling rain."
Why it matters: Multiple micro-movements create cinematic life. Static = boring.
Frequently Asked Questions
Why do my AI characters look different in every shot?
AI generates images based on "random noise", essentially rolling the dice on visual details each time. If you generate shots one by one, the "noise" changes every generation, creating inconsistency.
The 2x2 Grid Method solves this by forcing the AI to use the same visual seed data for four images simultaneously, keeping the character consistent across all frames.
How do I ensure the Fox always has 9 tails?
Three-part solution:
Character Sheet: Explicitly show nine tails in reference
Grid Prompt: Mention "nine tails" in every frame description
Repetition: Use phrases like "tails fanned out" or "tails glowing" in each frame
The 2x2 grid helps the AI "lock in" the tail count better than individual generations because it sees all four frames as a connected whole.
Can I do this on my phone?
No! Because Atlabs is browser-based, you can generate and animate these cinematic sequences from any computer. No powerful GPU required.
How long does this entire process take?
Time breakdown:
Character sheets: 5-10 minutes
2x2 Grid generation: 2-5 minutes
Cropping: 2 minutes
Upscaling: 5-10 minutes
Video generation: 10-15 minutes
Editing: 10-15 minutes
Total: 35-60 minutes from concept to finished cinematic sequence.
Can I use this method for other genres?
Absolutely! The 2x2 Grid Method works for any cinematic sequence:
Sci-fi: Space marine vs. alien
Fantasy: Wizard casting spell
Horror: Detective investigating haunted mansion
Action: Car chase sequence
Drama: Emotional confrontation
The technique is universal, just adapt the prompts to your genre.
What if I want more than 4 shots?
Create multiple 2x2 grids with overlapping elements:
Grid 1: Shots 1-4 (Opening confrontation)
Grid 2: Shots 5-8 (Mid-battle escalation)
Grid 3: Shots 9-12 (Final resolution)
Use the last frame of each grid as a visual reference for the first frame of the next grid to maintain consistency.
The Science Behind Why This Works
Understanding AI Image Generation
AI models like those in Atlabs generate images through a process called diffusion:
Start with random noise
Gradually "denoise" based on your text prompt
Each denoising step makes decisions about colors, shapes, details
The problem: Each generation starts with different random noise, leading to different results.
The 2x2 Grid solution: By generating four images simultaneously in one canvas:
They share the same initial noise pattern
The AI maintains visual coherence across all four panels
Character features, lighting, and scale stay locked
Think of it like baking four cookies on one tray versus four separate batches—same oven, same temperature, same timing, consistent results.
Advanced Techniques (For Experienced Users)
Technique 1: Color Grading Consistency
Add this to your 2x2 grid prompt:
Color grading: Teal shadows, orange highlights, desaturated midtones, high contrast. Cinematic LUT applied.
Technique 2: Camera Metadata
Include technical details for more precise results:
Shot on Arri Alexa, 35mm lens, f/2.8, shallow depth of field, anamorphic bokeh.
Technique 3: Reference Image Upload
After generating your character sheets, upload the scale reference image when creating the 2x2 grid. This doubles down on consistency.
Quick Reference: Complete Prompt Cheat Sheet
Character Sheet Prompts
Samurai:
Full body character sheet of a gritty, dark fantasy Ronin Samurai. He wears battered, black lacquered armor with subtle glowing blue runic engravings. He carries a katana with a distinct jade-green hilt. Show him from three angles: Front view, Side view, and Back view. Neutral grey background, flat lighting, hyper-detailed, 8k resolution. No text.
Nine-Tailed Fox:
Full body character sheet of a colossal, demonic Nine-Tailed Fox (Kitsune). It has matted dark fur, exposed cybernetic/mechanical ribs, and nine massive tails tipped with blue spirit fire. Its eyes are glowing hollow sockets. Show full body, menacing posture. Neutral grey background, concept art style. No text.
Scale Reference:
Scale reference sheet. Show the Samurai and the Nine-Tailed Fox standing side-by-side against a white background. The Samurai is standing tall but only reaches the height of the Fox's ankle. The Fox looms over him, massive and terrifying. This image demonstrates the extreme size difference between the two characters.
Motion Prompts
Frame 1: Slow camera push in. The Fox's tails sway hypnotically with blue fire. Rain falls gently. The Samurai breathes heavily, shoulders rising and falling.
Frame 2: Subtle camera shake. Rain runs down the blade. The reflection on the steel shifts as the hands tighten their grip.
Frame 3: Fast, low-tracking camera following the feet. Water splashes violently. Heavy motion blur on the background debris.
Frame 4: Fast handheld wide shot, heavy motion blur. The Samurai descends and slices downward. The Fox recoils, snapping its jaws. Sparks and blue spirit energy explode from the impact point. Debris flies everywhere.
Ready to Direct Your First Cinematic Scene?
You now have everything you need to create consistent, professional-quality AI video sequences. No expensive software. No technical degree. Just Atlabs and these proven techniques.
What You Get with Atlabs AI:
✓ All-in-one platform for the entire workflow
✓ 50+ AI models for maximum creative control
✓ Image-to-video with professional motion options
✓ Built-in video editor with sound design
✓ 4K upscaling for theatrical quality
✓ No downloads or installations required
✓ Works on any device including phones
Start creating your cinematic masterpiece today.
Try the 2x2 Grid Method on Atlabs Now – Free Trial Available
Related Tutorials
Tags: 2x2 grid method, AI video consistency, consistent AI characters, Atlabs AI tutorial, cinematic AI video, AI filmmaking, character consistency, image to video, AI video generation, Samurai vs Fox
Author: Atlabs Team | Category: AI Video Tutorials
Pro Tips Summary
💡 Always create character sheets first before generating action
💡 Generate all 4 frames simultaneously for perfect consistency
💡 Don't describe characters in motion prompts—only describe movement
💡 Reinforce scale in every frame of your grid prompt
💡 Add multiple micro-movements to avoid static, boring clips
💡 Sound design is 50% of impact—don't skip it
💡 Speed ramp the climax for satisfying kinetic weight
Master the 2x2 Grid Method. Create cinematic AI videos. Tell stories that matter.
Credits to : PJAce