TL;DR
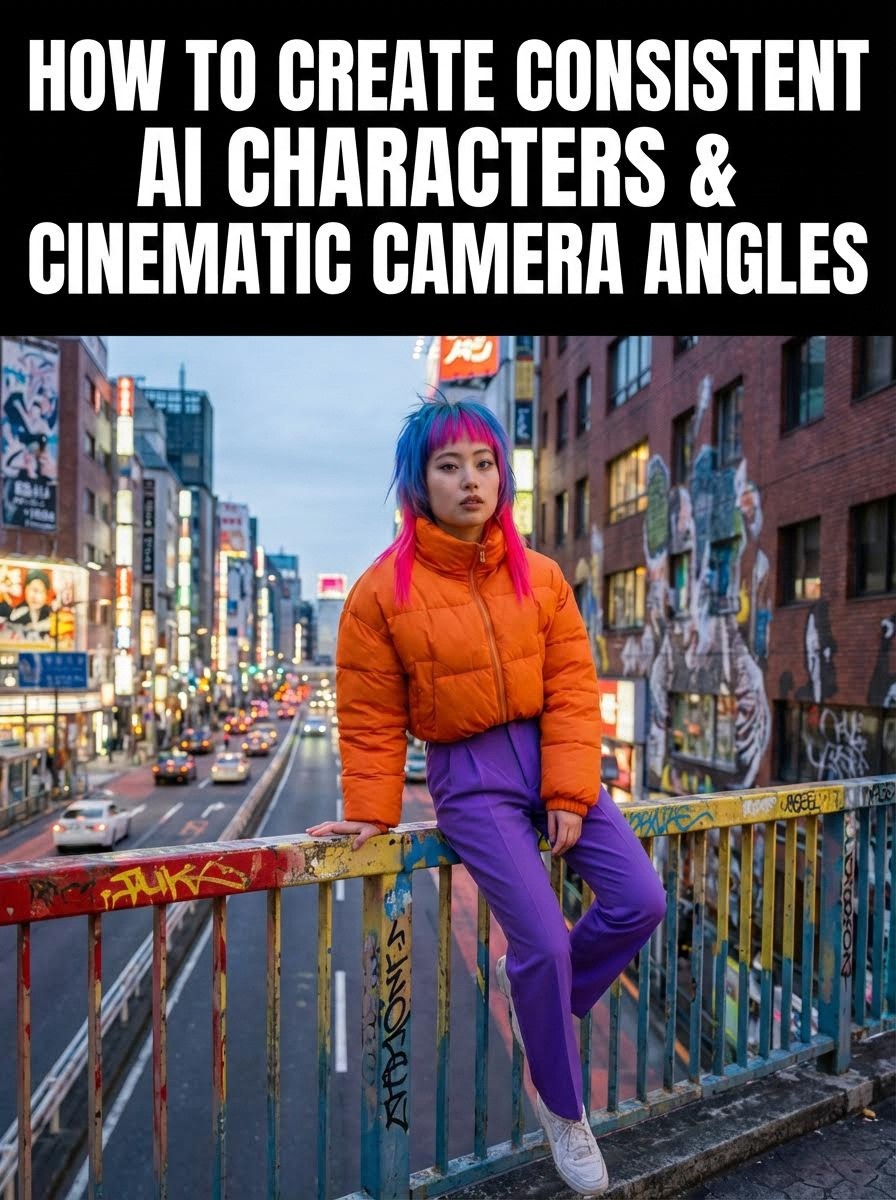
Learn the exact 3-step workflow to create consistent AI characters and place them in 15+ professional camera angles using Atlabs AI's Nano Banana Pro. Includes copy-paste prompts for low angles, drone shots, Dutch tilts, and dynamic action scenes, no film crew required.
Why Character Consistency Is the #1 Challenge in AI Video Creation
Creating consistent AI characters across multiple scenes is the biggest hurdle in AI video production. When you try to place the same character in different environments or camera angles, they often morph, change outfits, or lose facial features entirely.
The problem? Most creators skip the critical foundation step.
The solution? The Base Image Method.
In this guide, you'll learn the exact Nano Banana Pro workflow used by AI filmmakers to maintain perfect character consistency across 15+ cinematic camera angles complete with copy-paste prompts for each shot.
What You'll Learn
✓ How to create a base character image that maintains consistency
✓ 15 professional camera angle prompts (low angle, drone, Dutch tilt, etc.)
✓ The exact keywords that prevent character morphing
✓ How to animate your scenes in Atlabs AI
✓ Common mistakes that break character consistency
The Nano Banana Pro Method: Your Complete 3-Step Workflow
Step 1: Creating Your Base Character Image
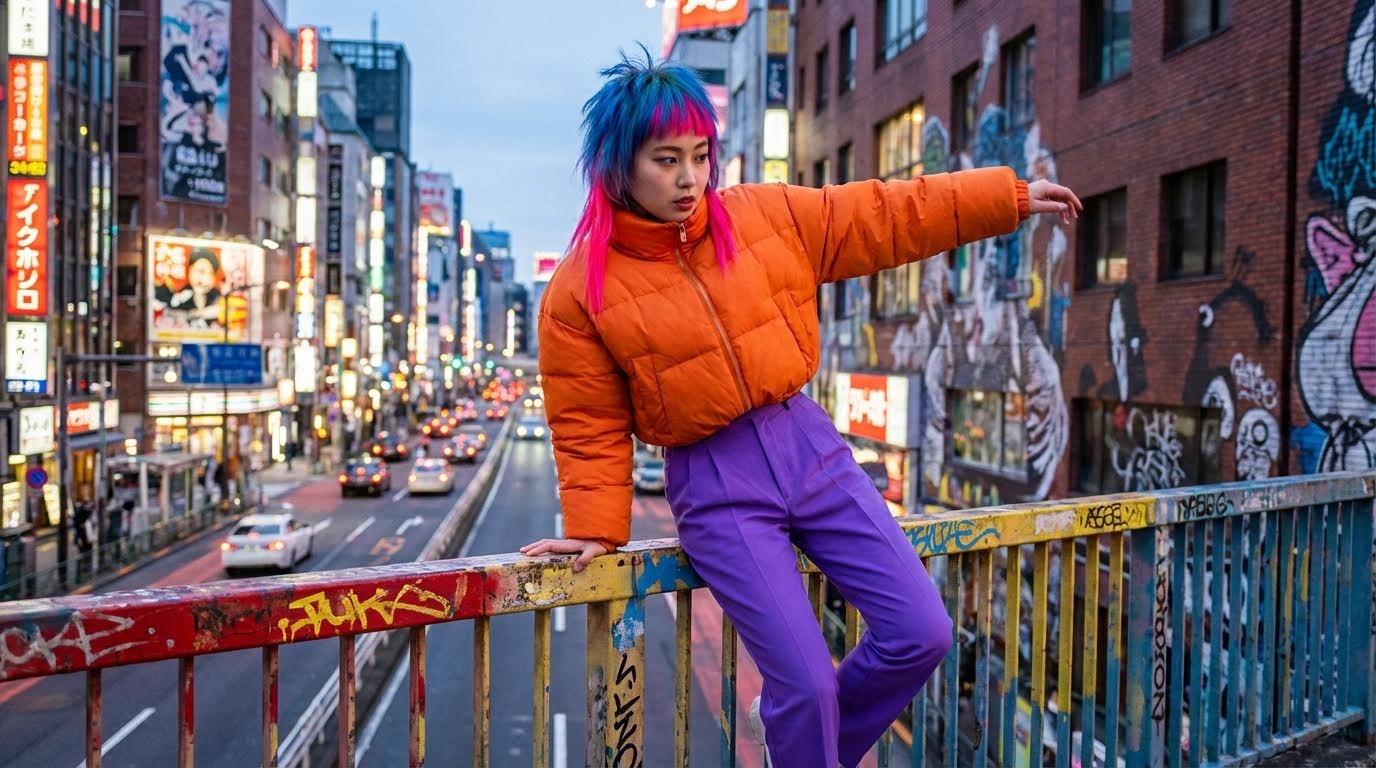
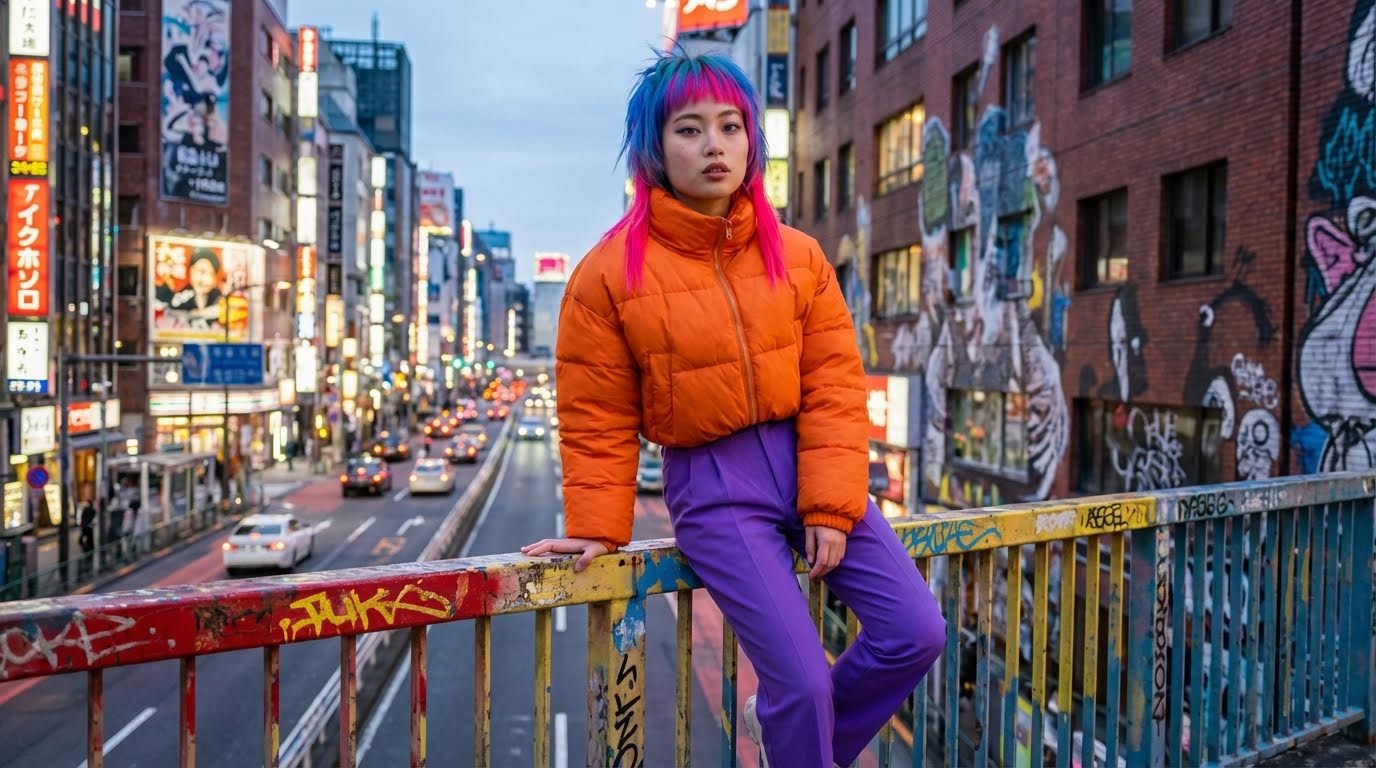
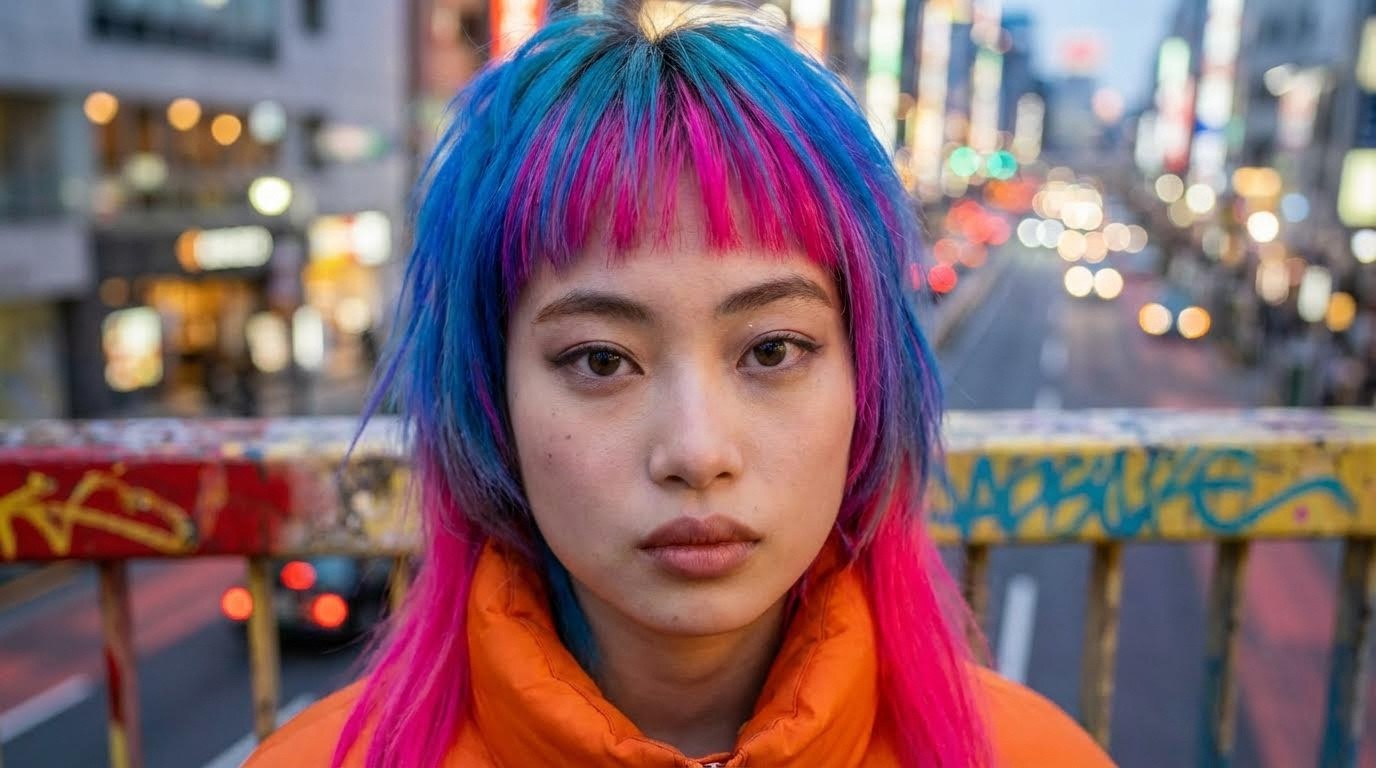
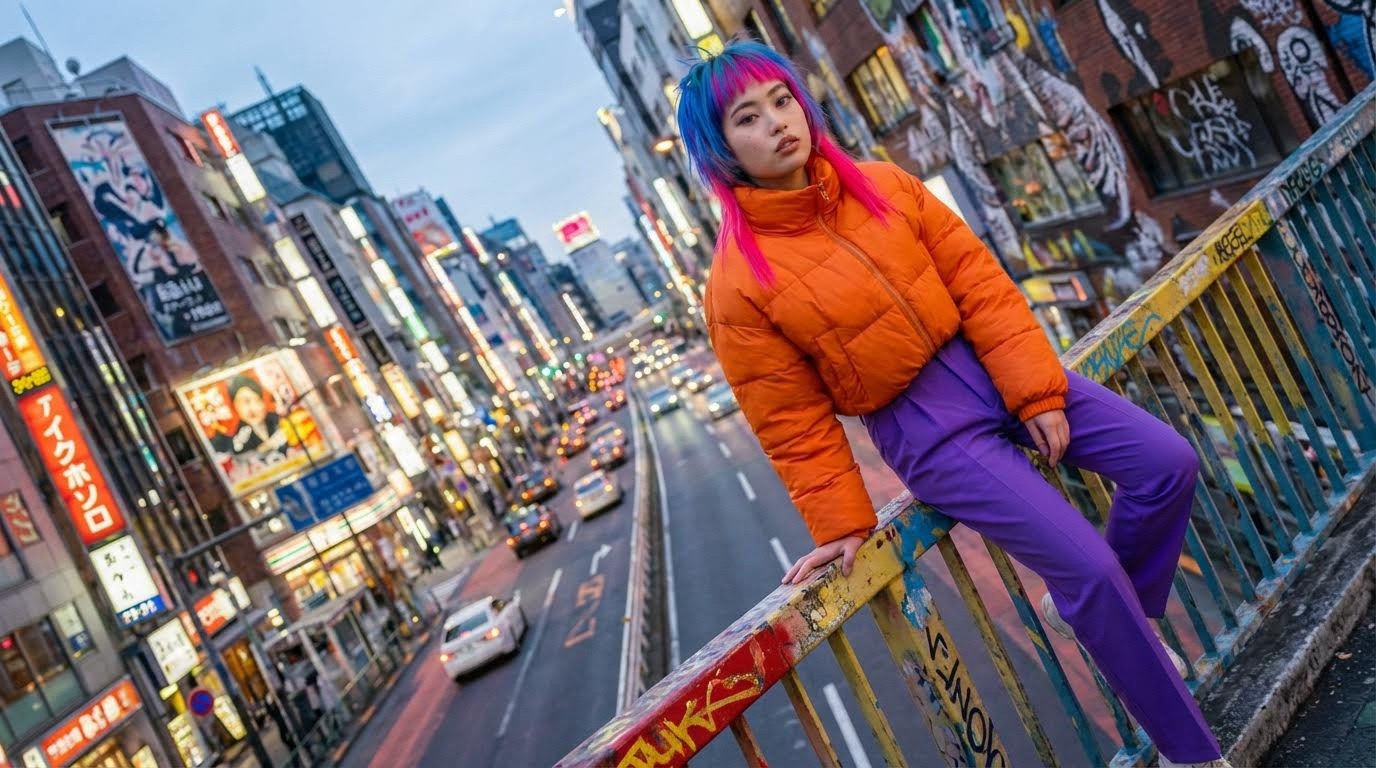
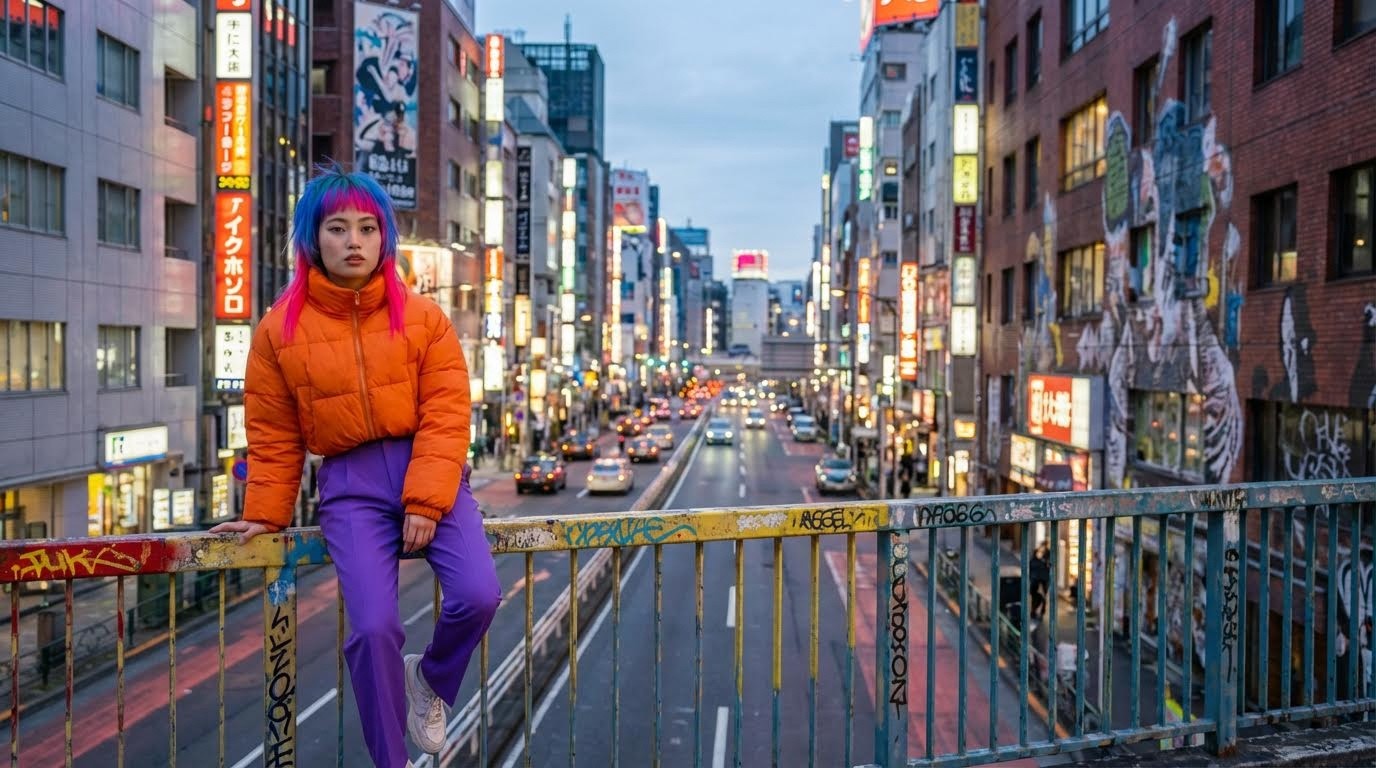
The secret to consistency isn't just a good prompt, it's the Base Image. To ensure your character looks the same in a close-up as they do in a wide shot, you must start with a full body shot containing all outfit details.
Why Full Body Matters
When you only generate a headshot or partial view, the AI has to "guess" what the rest looks like in different angles. This guessing causes inconsistency. A full-body base image gives the AI complete reference data.
The Base Character Prompt
Pro Tip: Save this image as your reference file. You'll use it as an Image Reference in Atlabs AI to generate all the specific angles below.
The "Full Body" Hack
Most users start with a medium shot (waist up). While this keeps the face consistent, you often lose the details of the trousers and shoes in later shots.
Best Practice: Start by generating a Full Body Shot first.
The Workflow: Use your full-body image as a reference in Atlabs AI (using the Image-to-Image feature) to generate your subsequent close-ups.
The Golden Prompt Strategy:
Generate Full Body: Create your character showing shoes, pants, and jacket.
Generate Medium Shot: Use the full-body image as a reference with the prompt: "Change the camera angle to a medium half body eye level shot..."
Generate Close-Up: Use the medium shot as a reference for the face details.
By cascading your images this way, you ensure that the neon jacket, the purple trousers, and the facial structure remain identical across every scene.
Step 2: 15 Professional Camera Angle Prompts
Here are the exact prompts and keywords to generate cinematic camera angles. Each prompt uses your base character as a reference to maintain consistency.
Quick Reference: When to Use Each Camera Angle
Camera Angle | Best For | Emotional Effect | Prompt Keyword |
|---|---|---|---|
Low Angle | Action, power scenes | Dominance, strength | "low-angle front view" |
High Angle | Vulnerability, isolation | Weakness, exposure | "looking down from above" |
Extreme High Angle | Drama, comic-book style | Helplessness | "extreme high angle shot" |
Drone Shot | Scale, environment reveal | Isolation, grandeur | "drone shot from above" |
Over-Shoulder | Dialogue, confrontation | Tension, intimacy | "over-the-shoulder perspective" |
Dutch Tilt | Unease, chaos | Disorientation | "off-kilter cinematic angle" |
Side Profile | Contemplation | Thoughtfulness | "side profile shot" |
Tracking Shot | Chase scenes, movement | Momentum | "from behind" |
1. Low Angle Action Shot
What camera angle should I use for action scenes?
The low angle makes your character look powerful and dominant. It places the viewer beneath the subject, emphasizing strength and agility.
The Prompt:
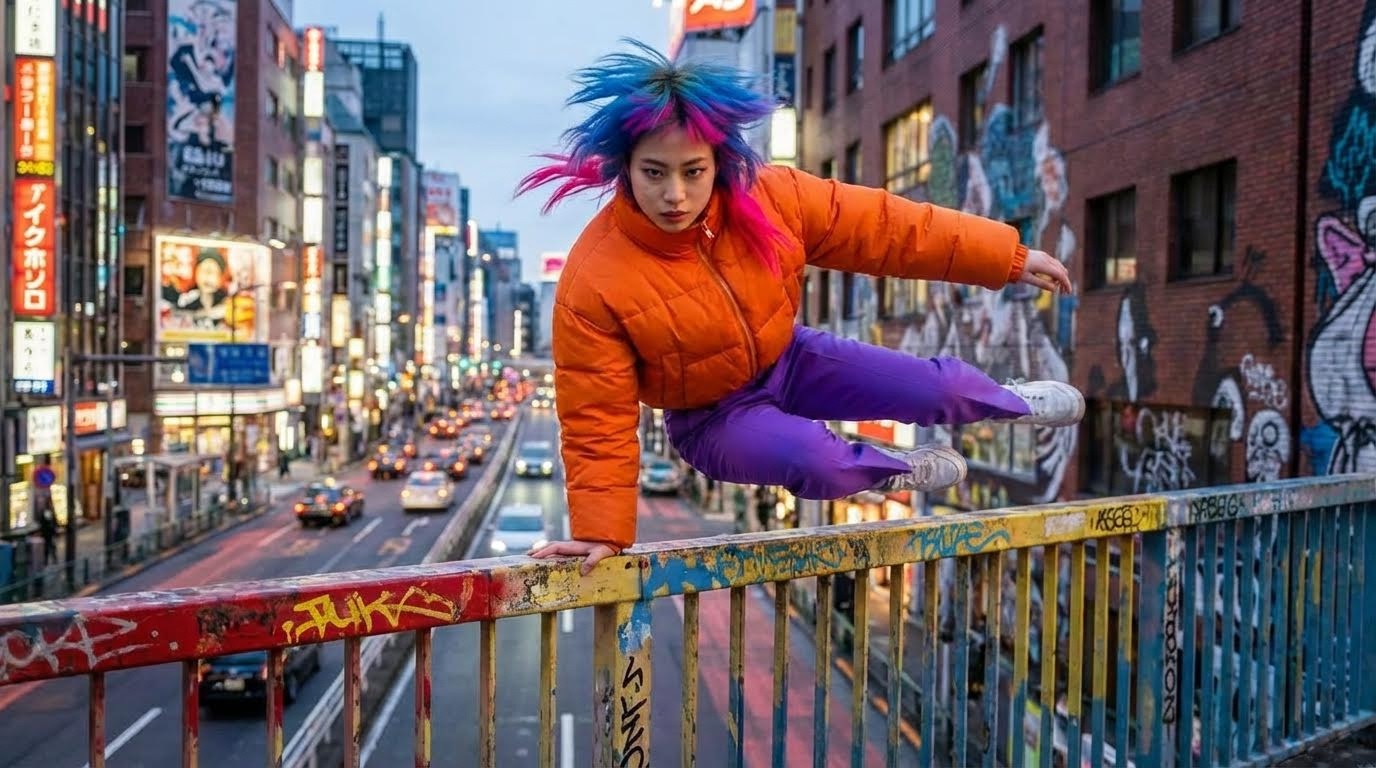
Best For: Superhero landings, parkour, martial arts, powerful moments
2. High Angle (God's Eye View)
How do I make my AI character look vulnerable?
This does the opposite of the low angle. It creates distance, giving the audience a "god-like" view, often making the character look vulnerable or isolated.
The Prompt:
Best For: Establishing shots, showing scale, vulnerability, defeat
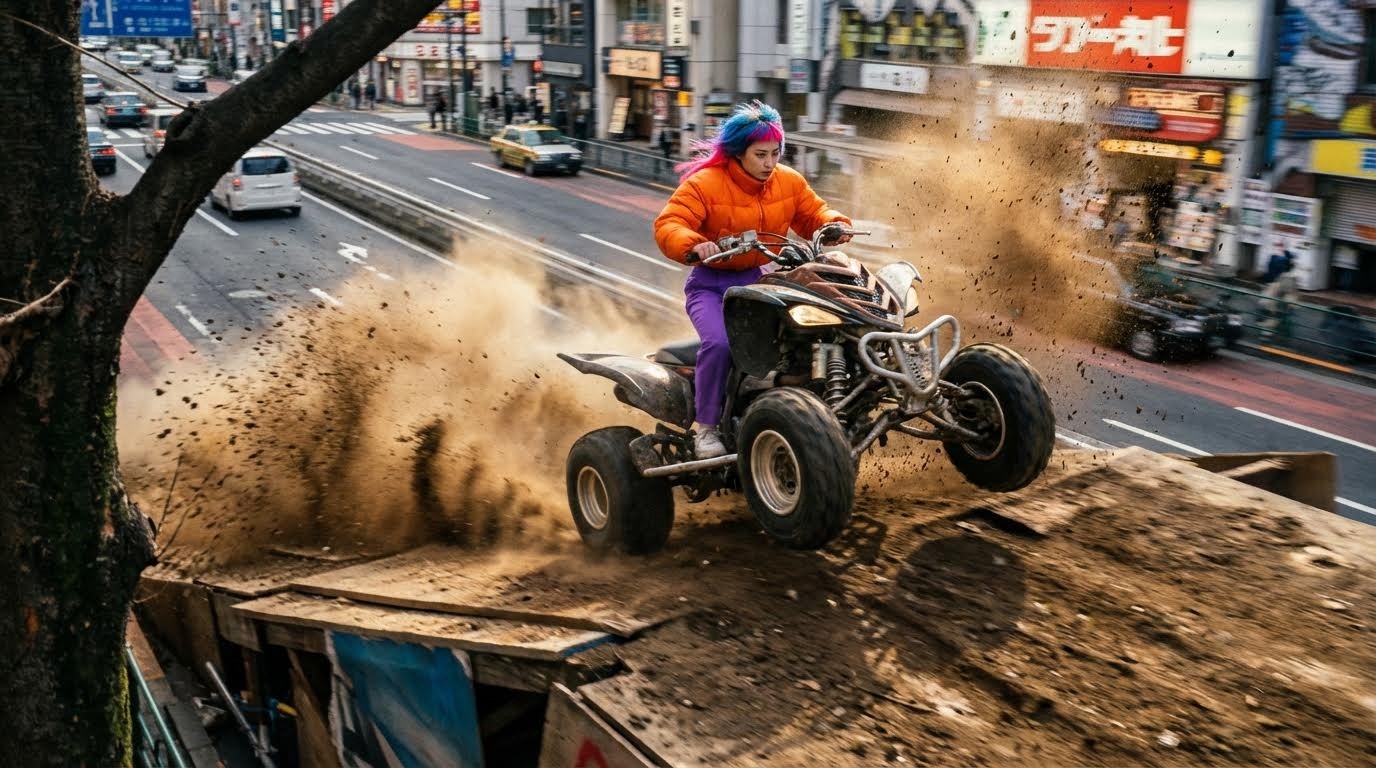
3. The "From Behind" Tracking Shot
This is the holy grail for video games and chase scenes. It allows you to create camera movement that follows the character forward.
The Prompt:
Please rotate the camera to show the other side of the quad and the girl.
Alternative:
Show the other side of the image.

⚠️ Important Tip: Do not pluralize "girl" to "girls," or the AI might mistakenly add a second person to the vehicle.
Best For: Chase sequences, character-following shots, revealing what's ahead
4. Over-The-Shoulder (Dialogue & Tension)
Perfect for interactions between your protagonist and an antagonist. It implies confrontation, secrecy, or intimacy.
The Prompt:
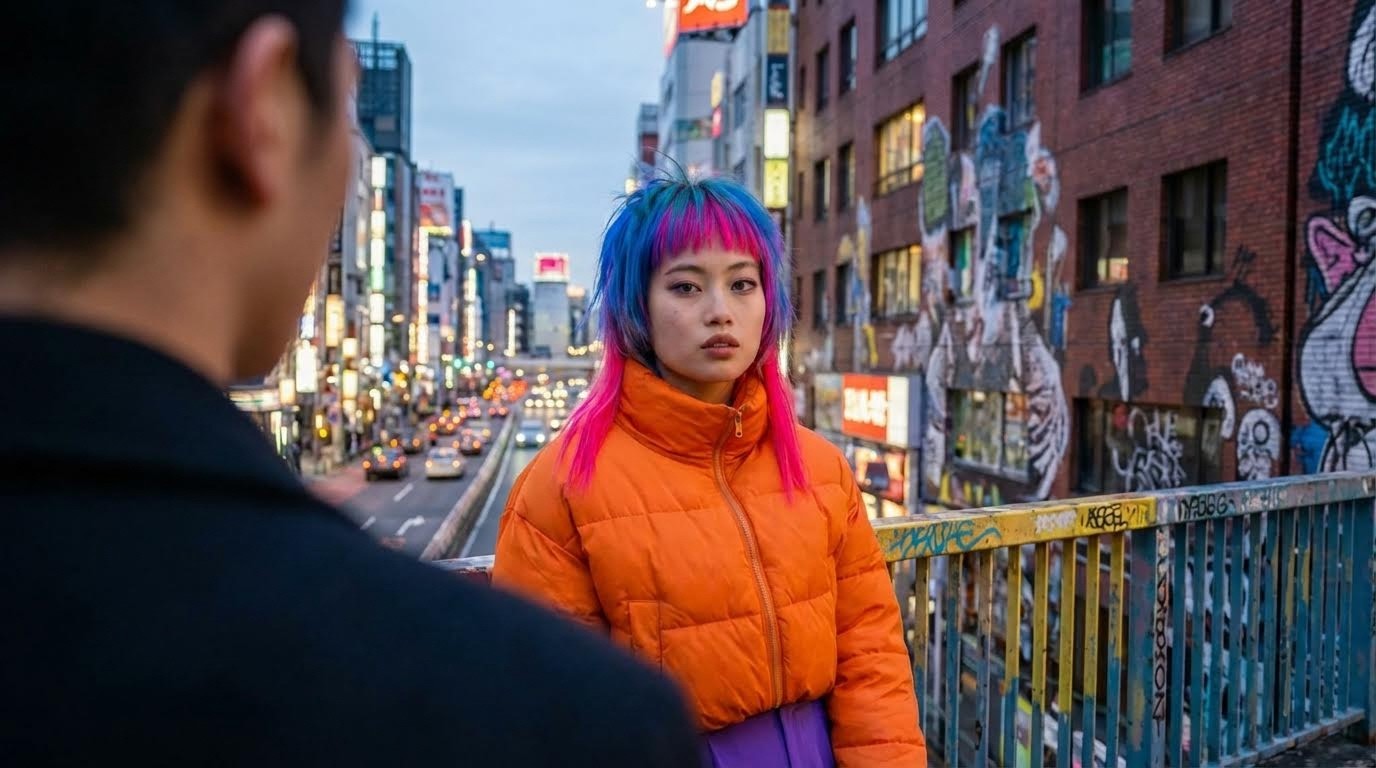
Best For: Conversations, confrontations, reaction shots, POV moments
5. The Dutch Angle / Off-Kilter Shot
How do I create unease or tension in AI video?
AI models often struggle with "off-center" requests. To create unease or tension, you need to be descriptive about the imbalance.
The Prompt:
Change the angle to off-kilter cinematic angle of the woman.
Alternative for precise framing:
Place the woman on the right side of the frame, tilted camera angle.
Best For: Horror scenes, psychological thrillers, disorientation, chaos
6. Extreme High Angle (Desert Scene)
This creates a dramatic, comic-book-style perspective that emphasizes vulnerability and isolation.
The Prompt:

Best For: Dramatic reveals, moments of realization, superhero scenes
7. Extreme Low Angle (Enraged)
How do I make my AI character look powerful?
The extreme low angle maximizes dominance and aggression.
The Prompt:
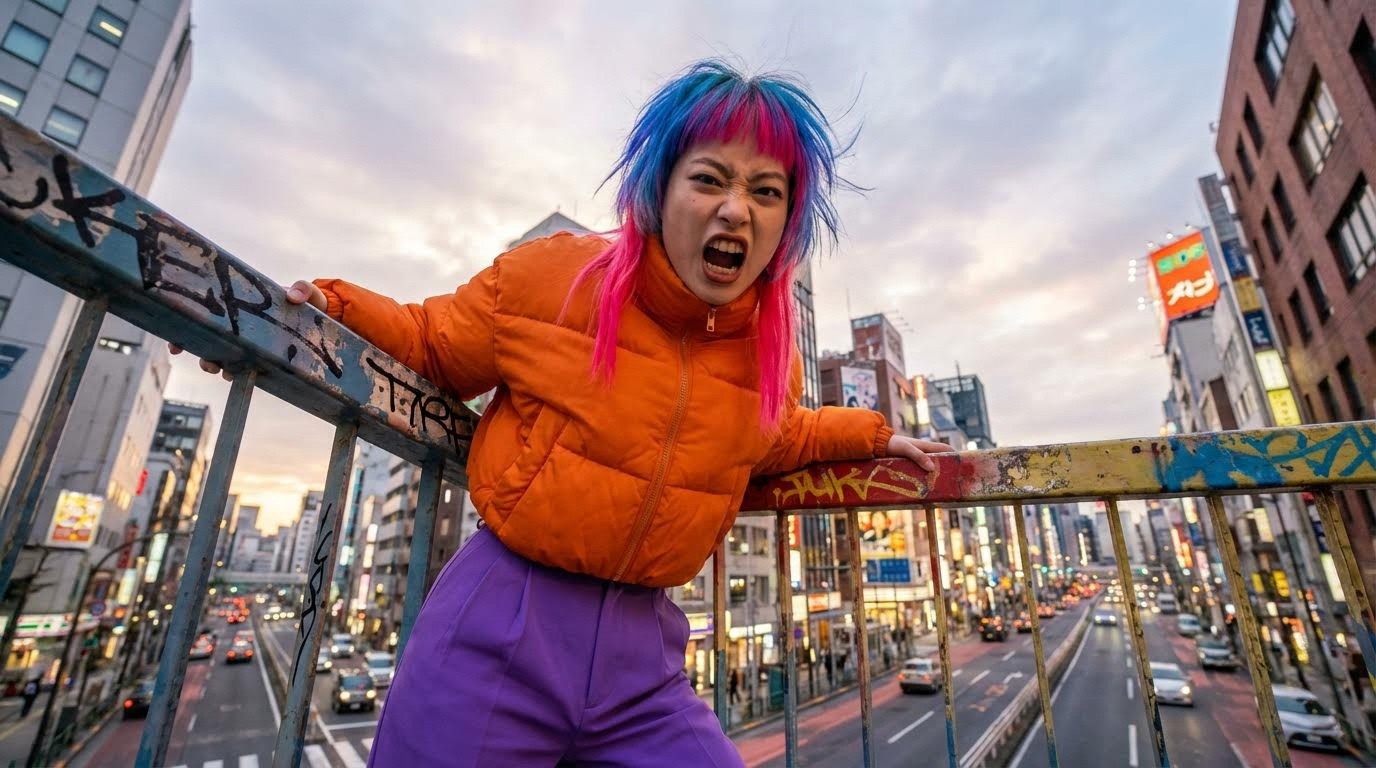
Best For: Villain shots, transformation moments, intimidation scenes
8. Aerial / Drone Shot (Junkyard)
Used to reveal scale and isolation, showing how small a character is in their world.
The Prompt:
Drone shot from above looking down on the vast junkyard.
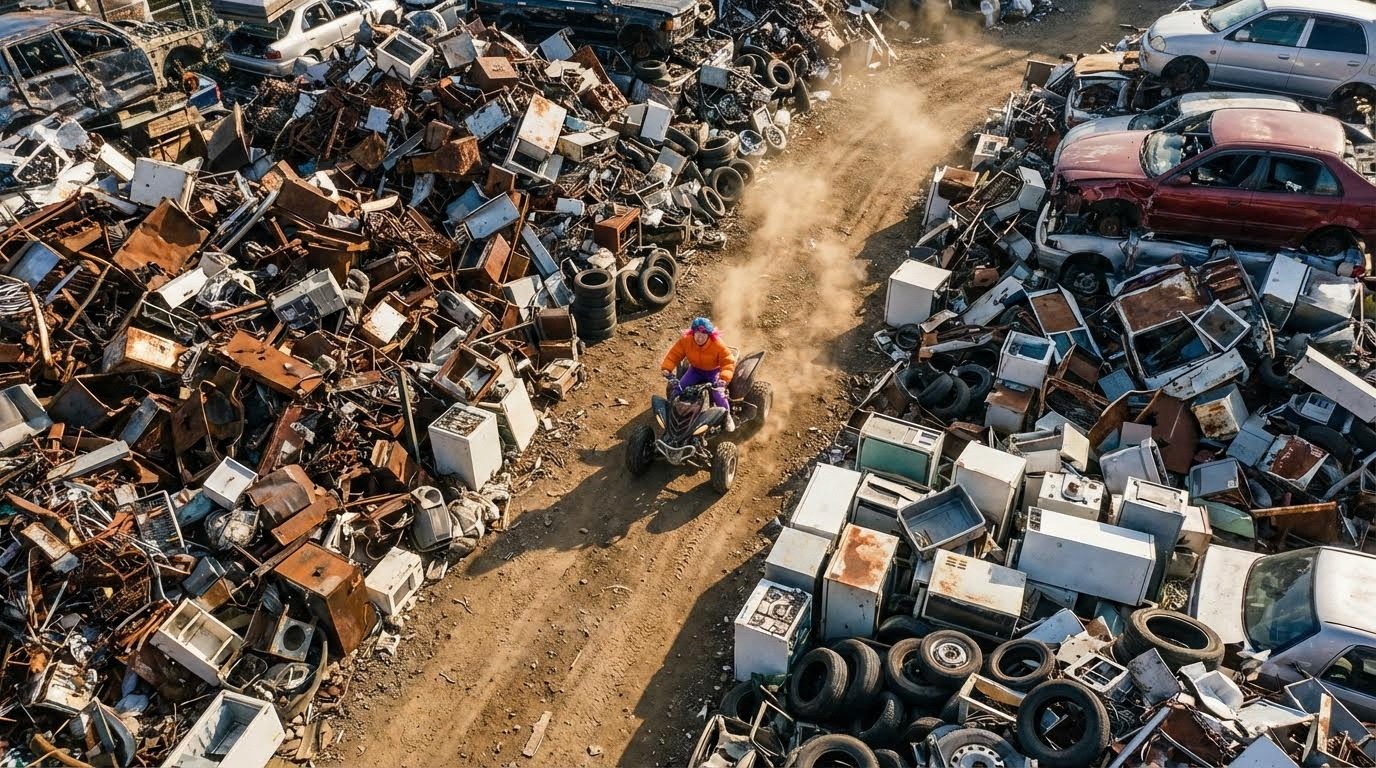
Best For: Establishing environment, showing scale, transitions between scenes
9. Side Profile (Pondering)
The classic contemplative shot used in countless films.
The Prompt:
Side profile shot of the woman, looking at the sky in a pondering expression.
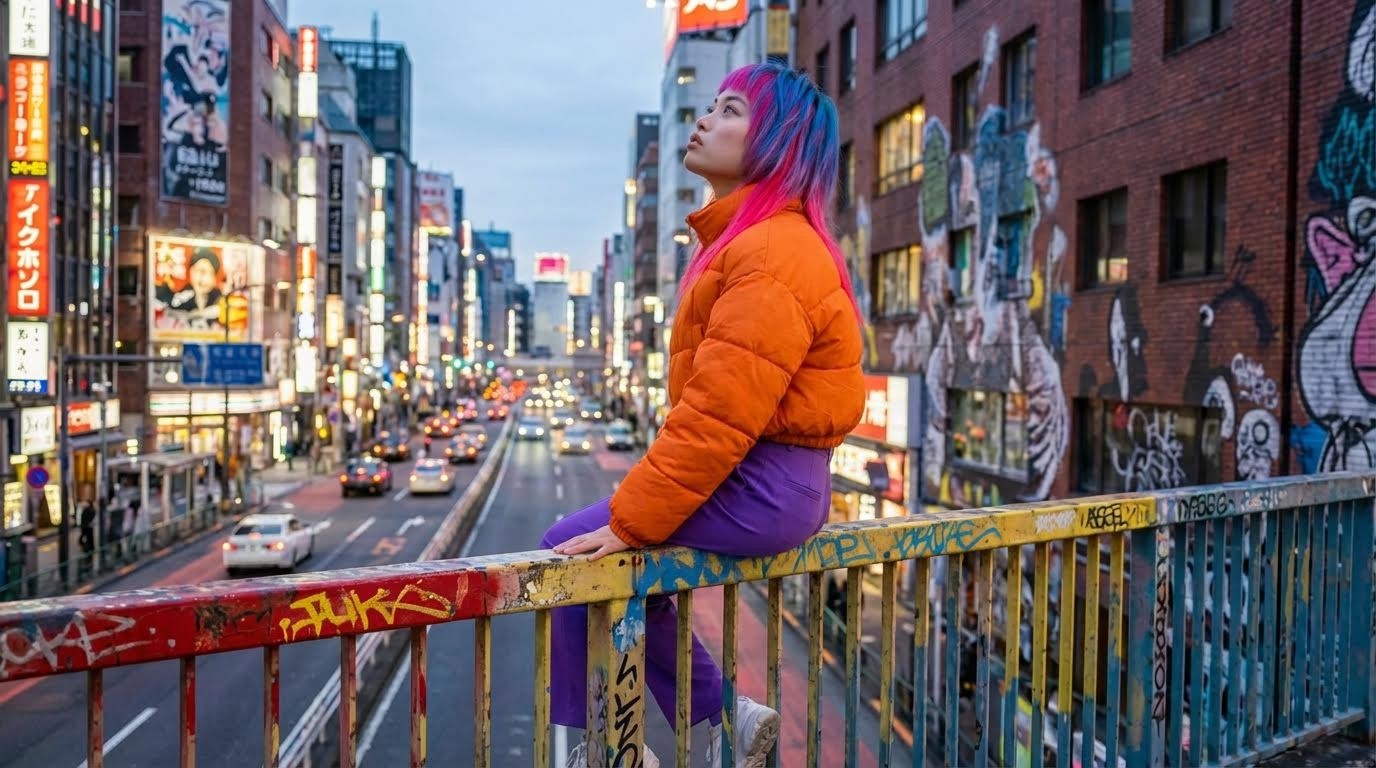
Best For: Thoughtful moments, internal conflict, transitions
10. Three-Quarter Shot
What's the difference between high angle and low angle shots?
A standard prompt like "three-quarter shot" often fails in AI. Instead, describe the framing relative to the body.
The Prompt:
Best For: Standard dialogue scenes, character introduction, interviews
11. Close-Up Face Shot
The Prompt:

Best For: Emotional moments, reveals, reaction shots
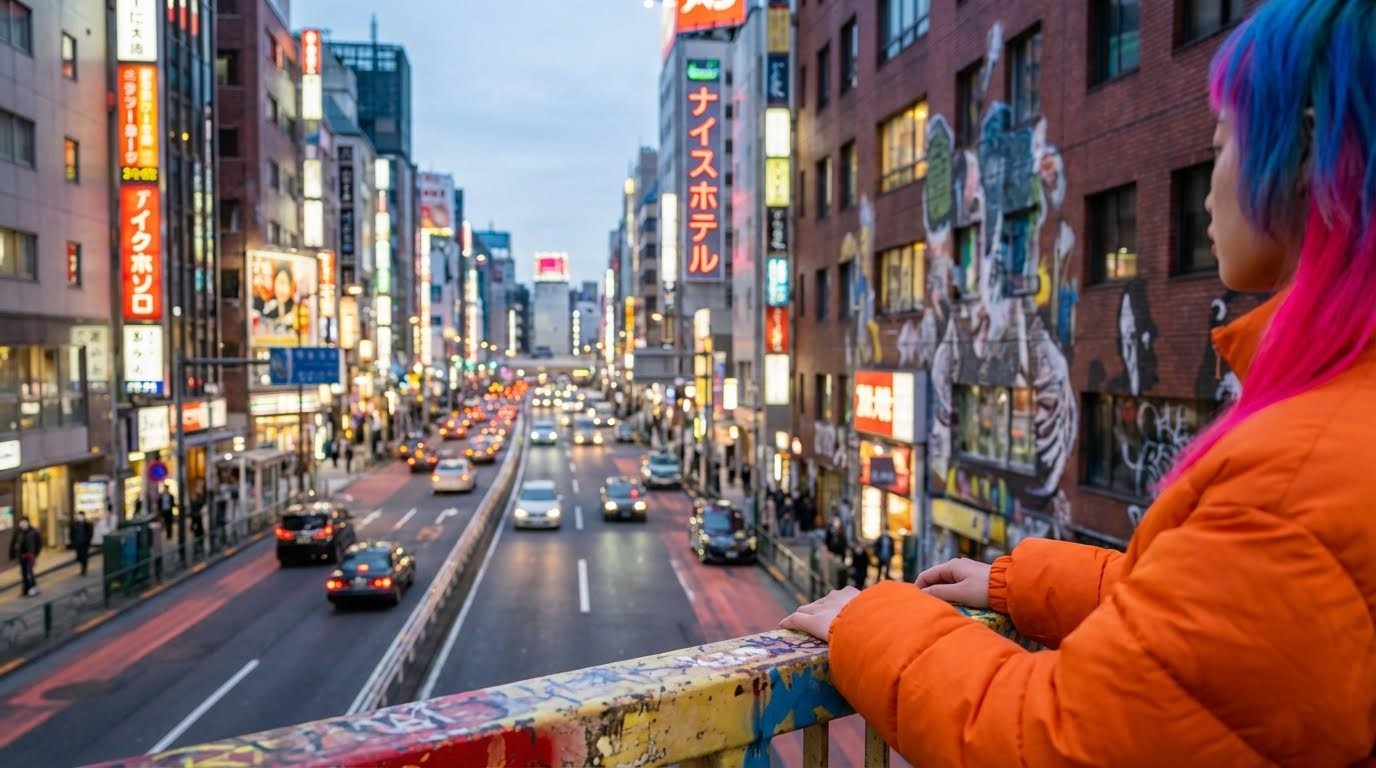
12. Wide Establishing Shot
The Prompt:
Wide shot showing the woman in the full environment, cinematic framing, rule of thirds composition.
Best For: Scene transitions, showing location, opening shots
13. Medium Shot (Waist Up)
The Prompt:
Medium shot from the waist up, the woman centered in frame, cinematic lighting and composition.
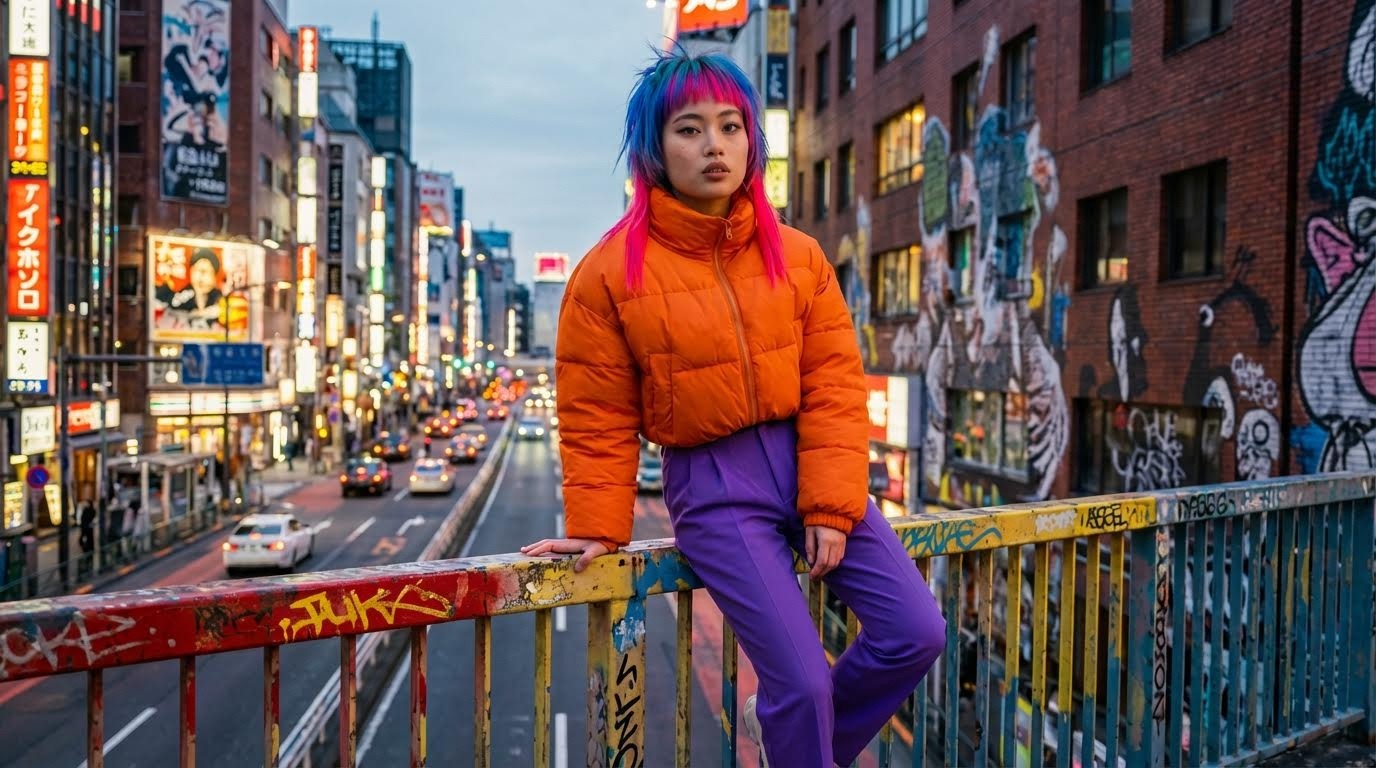
Best For: Dialogue scenes, general coverage, versatile framing
14. Point-of-View (POV) Shot
The Prompt:
First-person perspective from the woman's point of view, showing what she sees, cinematic framing.
Best For: Immersive moments, showing character perspective
15. Two-Shot (Character Interaction)
The Prompt:
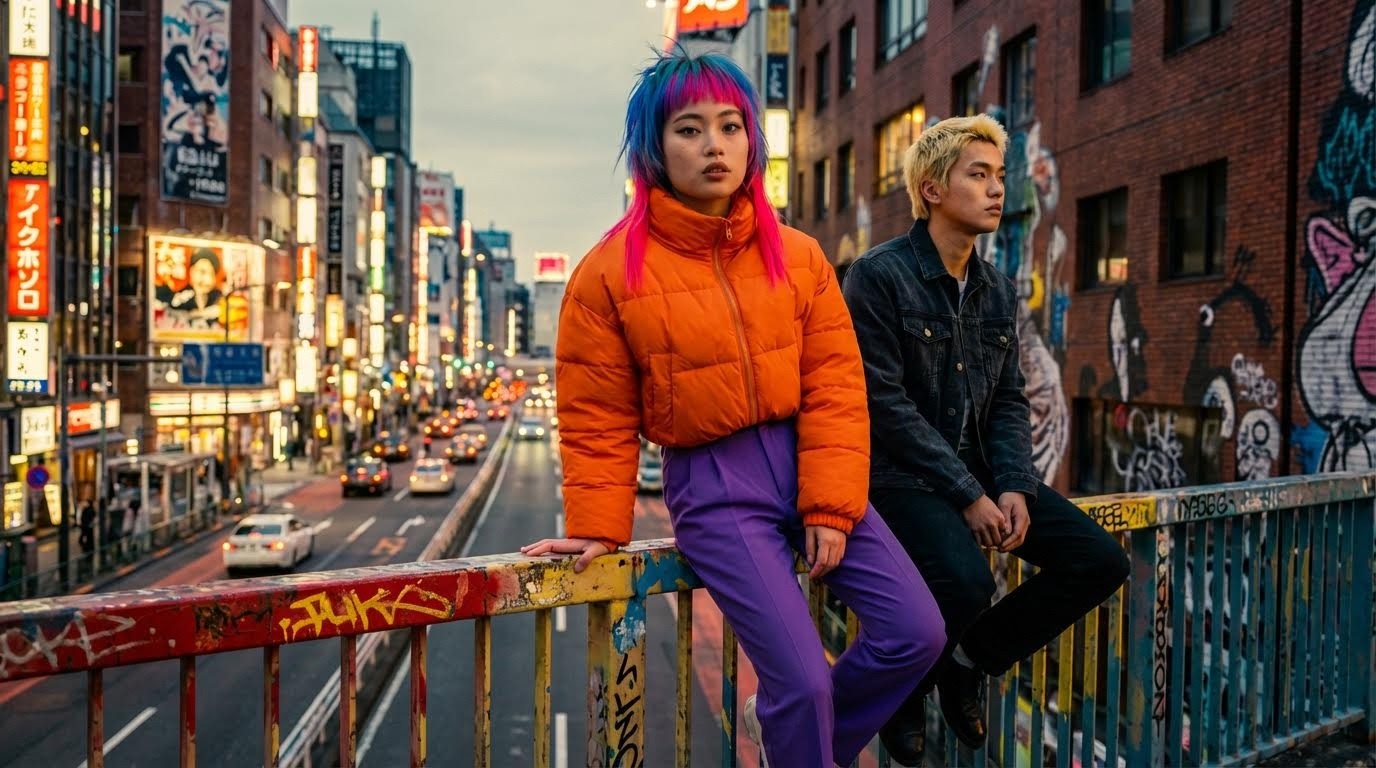
Best For: Dialogue between characters, relationship dynamics
Step 3: Animating Your Scenes in Atlabs AI
Once you have your cinematic frames, the final step is turning them into video. At Atlabs AI, you can seamlessly take these images and animate them with text-to-video models like Kling, Hailuo, or Veo3.
Motion Prompts for Common Scenes
For the Quad Bike Scene:
The camera zooms away while panning to the right, high speed dynamic motion.
For the Running Scene:
The camera pulls backwards as the woman runs towards the camera, high speed, dynamic movements.
For the Face Zoom:
Fast zoom up to the girl's face, showing a very scared and surprised expression. She then turns around and starts running away.
For Static Drama:
Slow camera push in, subtle character movement, wind blowing hair and clothing.
Common Mistakes vs. Correct Approach
Mistake #1: Vague Base Prompts
❌ Wrong: "A woman in a city"
✅ Right: "Create an eye-catching urban scene featuring a bold young Japanese woman with vivid blue hair with neon pink streaks, dressed in a vibrant orange puffer jacket..."
Why it matters: Specificity in your base prompt ensures consistency across all angle variations.
Mistake #2: Skipping the Full Body Shot
❌ Wrong: Starting with a headshot or cropped image
✅ Right: Always begin with a complete full-body reference image
Why it matters: The AI needs to see the complete outfit and proportions to maintain consistency.
Mistake #3: Using Generic Angle Terms
❌ Wrong: "Three-quarter angle"
✅ Right: "Camera view showing a half-body shot of the girl, cinematic composition"
Why it matters: AI models understand descriptive framing better than technical film terminology.
Mistake #4: Changing Character Details Between Prompts
❌ Wrong: Modifying outfit or hair color in angle prompts
✅ Right: Keep character details identical, only change camera position and angle
Why it matters: Any variation in character description can break consistency.
Frequently Asked Questions
How do I maintain character consistency in AI video?
Use a full-body base image with all outfit details visible, then reference this image when generating different camera angles in Atlabs AI. Keep character descriptions identical across all prompts, changing only the camera angle and scene description.
What's the best AI model for consistent characters?
Nano Banana Pro excels at character consistency when using image references, especially for cinematic video generation. It's specifically designed to maintain facial features, outfit details, and body proportions across multiple generations.
Can I use these prompts with other AI tools?
These prompts are optimized for Atlabs AI but can be adapted for any image-to-video models. You may need to adjust syntax based on your platform's requirements.
How many camera angles should I generate for a scene?
For professional coverage, aim for 5-7 angles per scene: wide establishing shot, medium shot, close-up, over-shoulder, and at least one dynamic angle (low/high). This gives you editing flexibility.
What resolution should my base character image be?
For best results, use at least 1024x1024 pixels for your base image. Higher resolution provides better detail retention across different camera angles.
Can I animate multiple characters with consistency?
Yes, but create separate base images for each character first. Then use multi-character prompts that reference both base images simultaneously in Atlabs AI.
Key Takeaways
🎯 Always start with a full-body base image containing complete outfit and feature details
🎯 Use descriptive camera language instead of technical film terms
🎯 Keep character details identical across all angle prompts
🎯 Reference your base image for every new angle generation
🎯 Test motion prompts before committing to final animation
🎯 Use the angle reference table to match emotional intent with camera choice
Start Creating Professional AI Videos Today
You don't need a film crew, expensive equipment, or years of filmmaking experience. With Atlabs AI and these prompts, you can direct cinematic AI videos in minutes.
What You Get with Atlabs AI:
✓ Access to 50+ AI models in one platform
✓ Nano Banana Pro for consistent character generation
✓ Kling, Hailuo, and Veo3 for professional animation
✓ All-in-one workspace for image and video creation
✓ No context switching between multiple tools
Ready to create your first cinematic AI video?
Start Creating on Atlabs AI – Free Trial Available
Related Guides
Prompt Guide for AI Film Dialogue Scenes using 180 Degree Rule
How to Turn One Image into Multiple Camera Angles with Nano Banana Pro